Quantcast
Channel: Severalnines - MySQL
Viewing all 568 articles
Browse latest View live

Deploying Secure Multicloud MySQL Replication on AWS and GCP with VPN

$
0
0

Why Choose MySQL Replication?

Some basics firast about the replication technology. MySQL Replication is not complicated! It is easy to implement, monitor, and tune as there are various resources you can leverage - google being one. MySQL Replication does not contain a lot of configuration variables to tune. SQL_THREAD and IO_THREAD's logical errors aren't that hard to understand and fix. MySQL Replication is very popular nowadays and offers a simple way of implementing database High Availability. Powerful features such as GTID (Global Transaction Identifier) instead of the old-fashioned binary log position, or lossless Semi-Synchronous Replication make it more robust.

As we saw in an earlier post, network latency is a big challenge when selecting a high availability solution. Using MySQL Replication offers the advantage of not being as sensitive to latency. It does not implement any certification-based replication, unlike Galera Cluster uses group communication and transaction ordering techniques to achieve synchronous replication. Thus, it has no requirement that all of the nodes have to certify a writeset, and no need to wait before a commit on the other slave or replica.

Choosing the traditional MySQL Replication with asynchronous Primary-Secondary approach provides you speed when it comes to handling transactions from within your master; it does not need to wait for the slaves to sync or commit transactions. The setup typically has a primary (master) and one or more secondaries (slaves). Hence, it is a shared-nothing system, where all servers have a full copy of the data by default. Of course there are drawbacks. Data integrity can be an issue if your slaves failed to replicate due to SQL and I/O thread errors, or crashes. Alternatively, to address issues of data integrity, you can choose to implement MySQL Replication being semi-synchronous (or called lossless semi-sync replication in MySQL 5.7). How this works is that, the master has to wait until a replica acknowledges all events of the transaction. This means that it has to finish its writes to a relay log and flush to disk before it sends back to the master with an ACK response. With semi-synchronous replication enabled, threads or sessions in the master has to wait for acknowledgement from a replica. Once it gets an ACK response from the replica, it can then commit the transaction. The illustration below shows how MySQL handles semi-synchronous replication.

Image Courtesy of MySQL Documentation

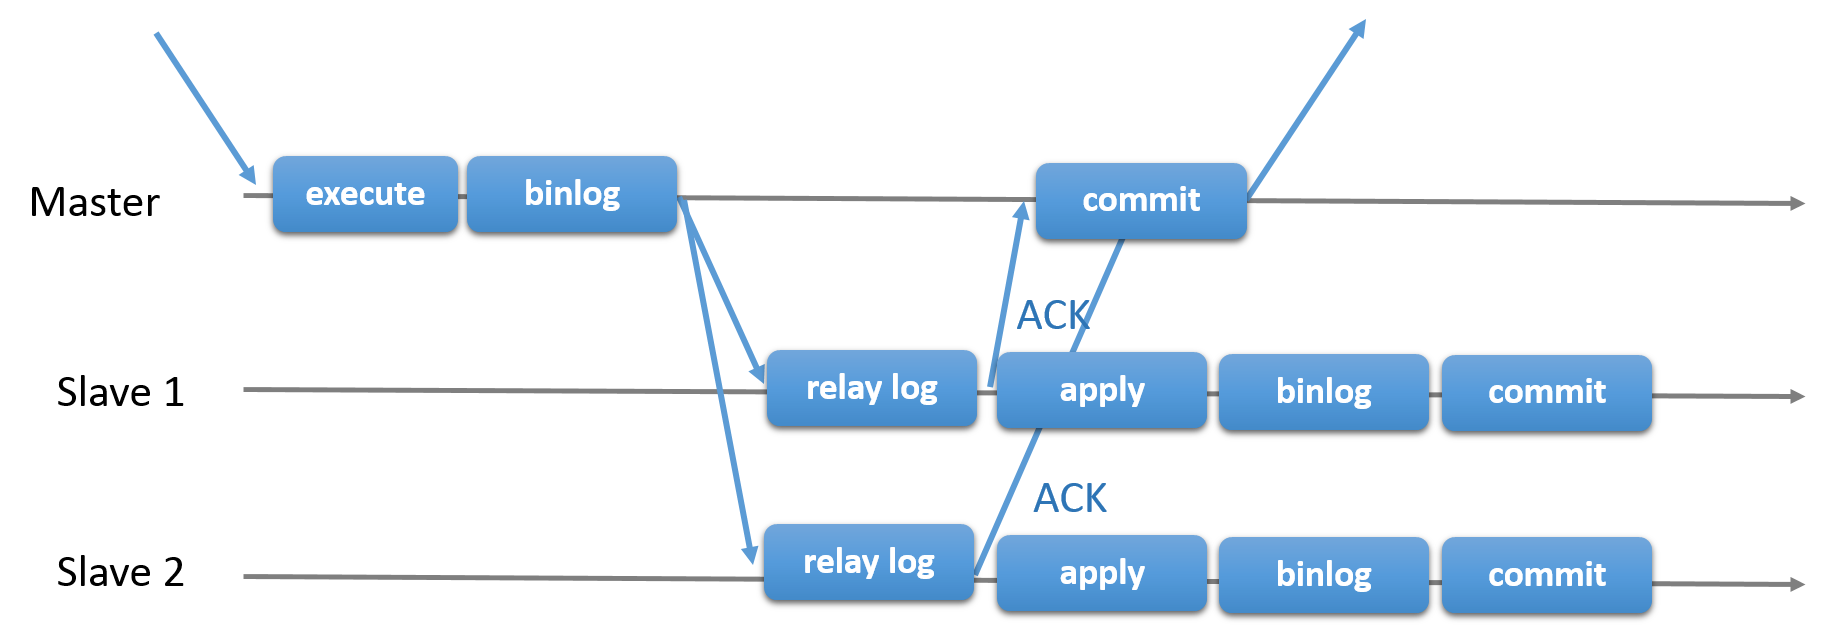
With this implementation, all committed transaction are already replicated to at least one slave in case of a master crash. Although semi-synchronous does not represent by itself a high-availability solution, but it's a component for your solution. It's best that you should know your needs and tune your semi-sync implementation accordingly. Hence, if some data loss is acceptable, then you can instead use the traditional asynchronous replication.

GTID-based replication is helpful to the DBA as it simplifies the task to do a failover, especially when a slave is pointed to another master or new master. This means that with a simple MASTER_AUTO_POSITION=1 after setting the correct host and replication credentials, it will start replicating from the master without the need to find and specify the correct binary log x & y positions. Adding support of parallel replication also boosts the replication threads as it adds speed to process the events from the relay log.

Thus, MySQL Replication is a great choice component over other HA solutions if it suits your needs.

Topologies for MySQL Replication

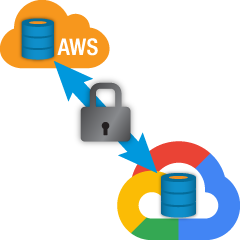
Deploying MySQL Replication in a multicloud environment with GCP (Google Cloud Platform) and AWS is still the same approach if you have to replicate on-prem.

There are various topologies you can setup and implement.

Master with Slave Replication (Single Replication)

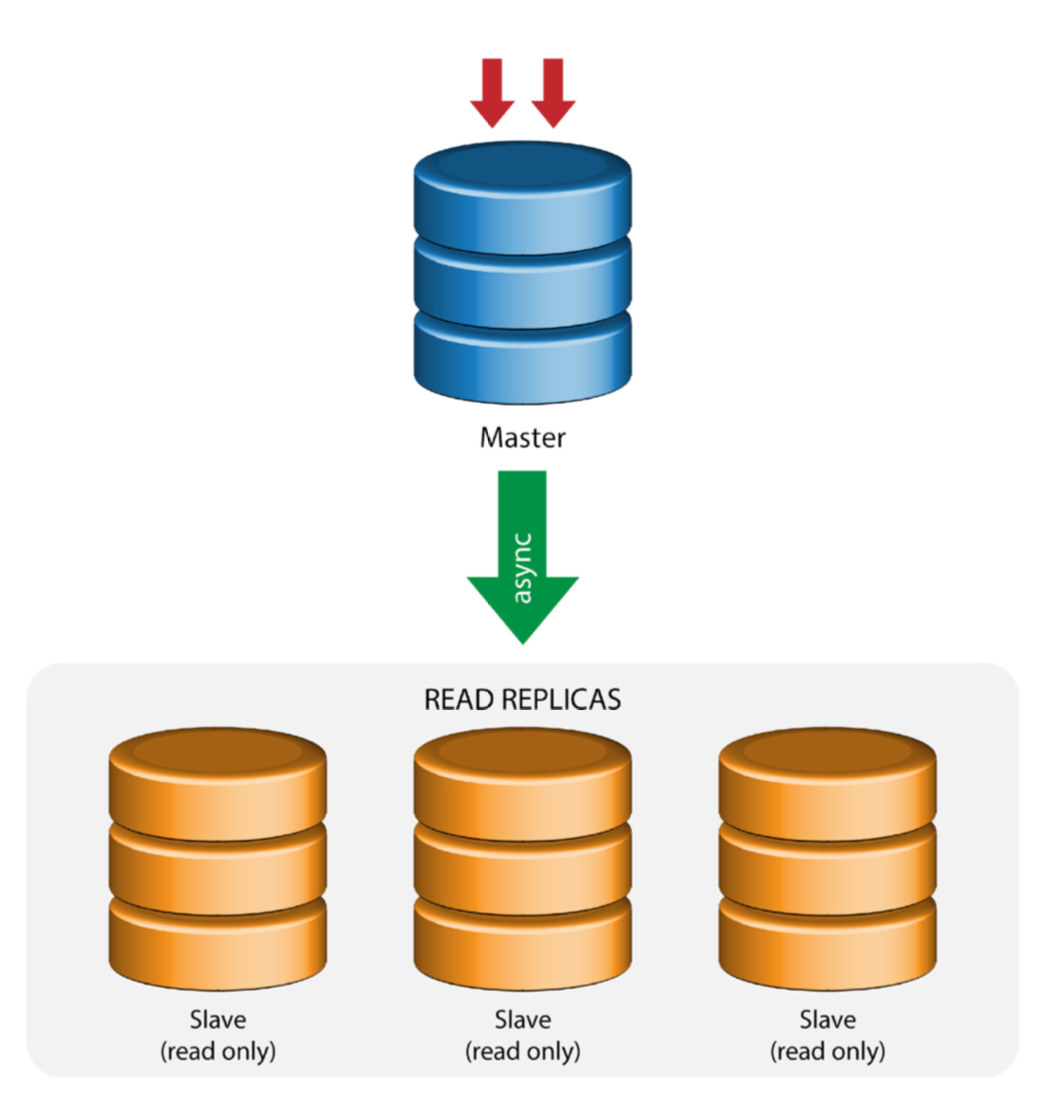
This the most straightforward MySQL replication topology. One master receives writes, one or more slaves replicate from the same master via asynchronous or semi- synchronous replication. If the designated master goes down, the most up-to-date slave must be promoted as new master. The remaining slaves resume the replication from the new master.

Master with Relay Slaves (Chain Replication)

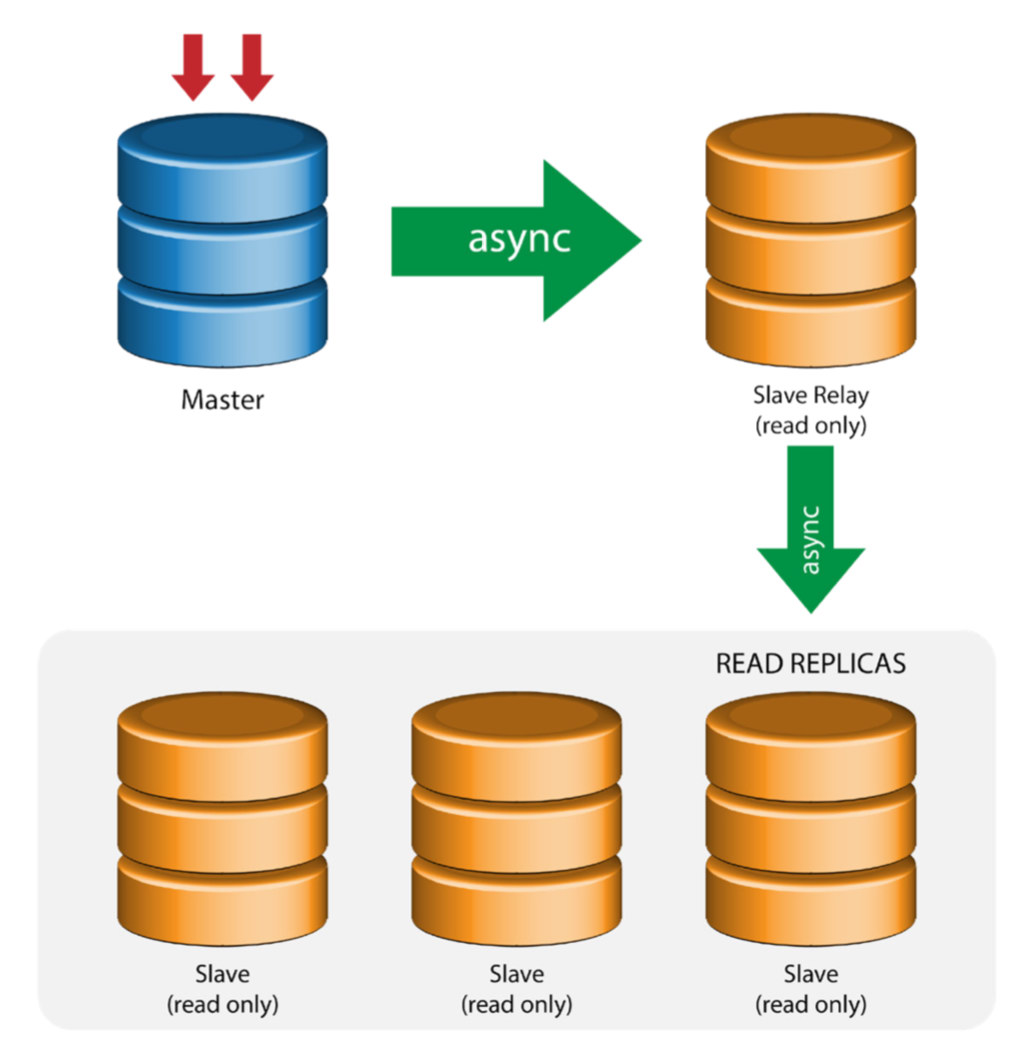
This setup use an intermediate master to act as a relay to the other slaves in the replication chain. When there are many slaves connected to a master, the network interface of the master can get overloaded. This topology allows the read replicas to pull the replication stream from the relay server to offload the master server. On the slave relay server, binary logging and log_slave_updates must be enabled, whereby updates received by the slave server from the master server are logged to the slave’s own binary log.

Using slave relay has its problems:

  • log_slave_updates has some performance penalty.
  • Replication lag on the slave relay server will generate delay on all of its slaves.
  • Rogue transactions on the slave relay server will infect of all its slaves.
  • If a slave relay server fails and you are not using GTID, all of its slaves stop replicating and they need to be reinitialized.

Master with Active Master (Circular Replication)

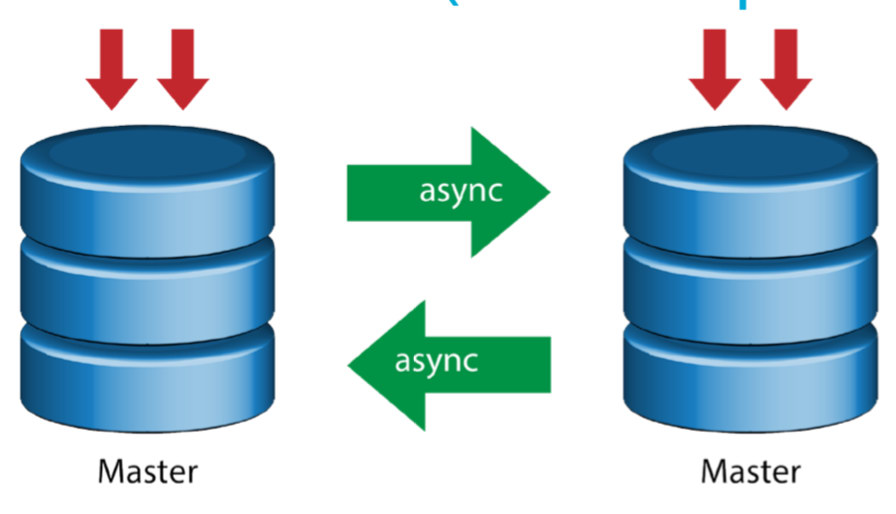
Also known as ring topology, this setup requires two or more MySQL servers which act as master. All masters receive writes and generate binlogs with a few caveats:

  • You need to set auto-increment offset on each server to avoid primary key collisions.
  • There is no conflict resolution.
  • MySQL Replication currently does not support any locking protocol between master and slave to guarantee the atomicity of a distributed update across two different servers.
  • Common practice is to only write to one master and the other master acts as a hot-standby node. Still, if you have slaves below that tier, you have to switch to the new master manually if the designated master fails.
  • ClusterControl does support this topology (we do not recommend multiple writers in a replication setup). See this previous blog on how to deploy with ClusterControl.

Master with Backup Master (Multiple Replication)

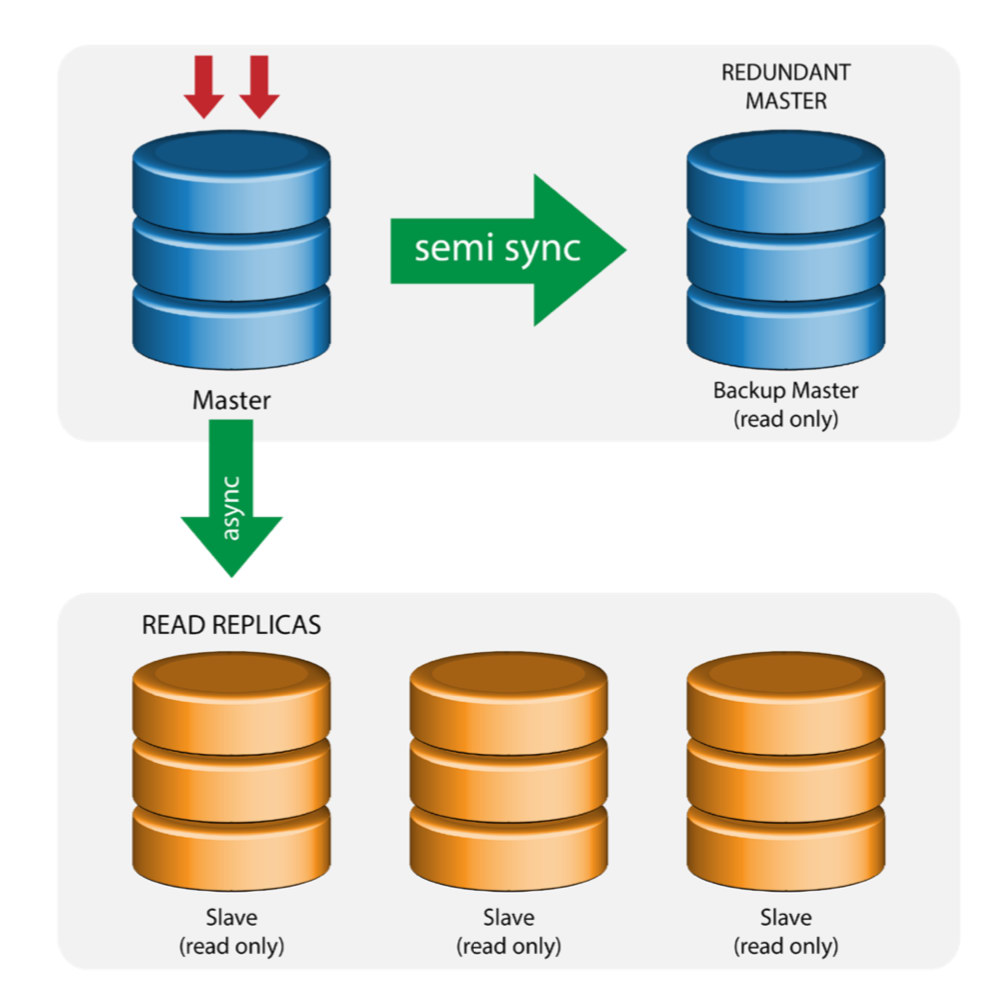
The master pushes changes to a backup master and to one or more slaves. Semi-synchronous replication is used between master and backup master. Master sends update to backup master and waits with transaction commit. Backup master gets updates, writes to its relay log and flushes to disk. Backup master then acknowledges receipt of the transaction to the master, and proceeds with transaction commit. Semi- sync replication has a performance impact, but the risk for data loss is minimized.

This topology works well when performing master failover in case the master goes down. The backup master acts as a warm-standby server as it has the highest probability of having up-to-date data when compared to other slaves.

Multiple Masters to Single Slave (Multi-Source Replication)

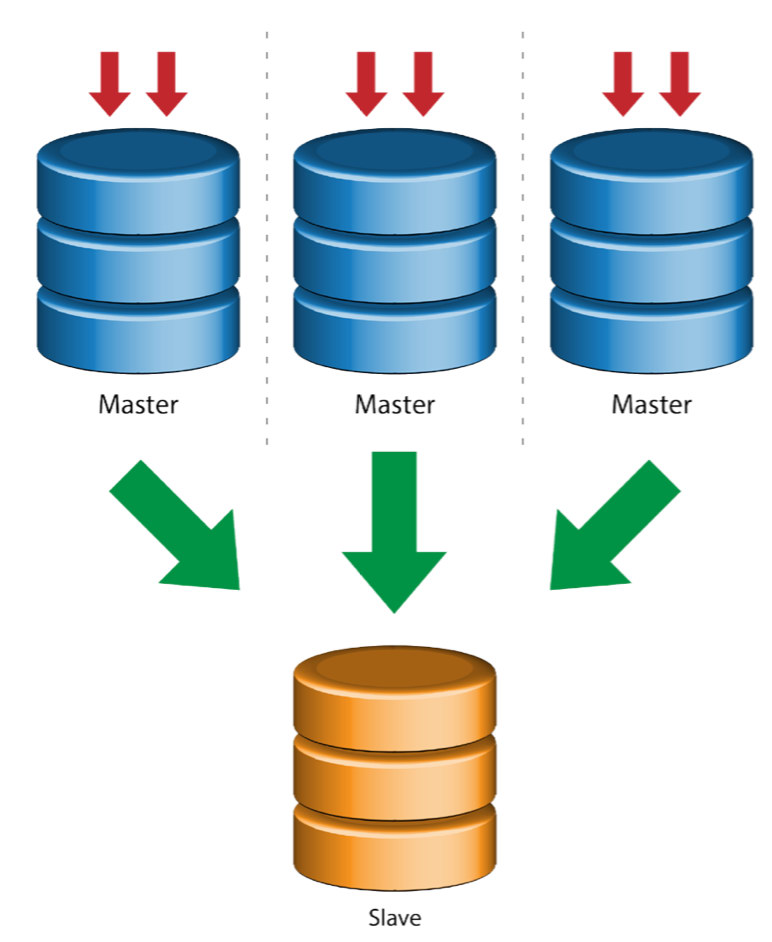
Multi-Source Replication enables a replication slave to receive transactions from multiple sources simultaneously. Multi-source replication can be used to backup multiple servers to a single server, to merge table shards, and consolidate data from multiple servers to a single server.

MySQL and MariaDB have different implementations of multi-source replication, where MariaDB must have GTID with gtid-domain-id configured to distinguish the originating transactions while MySQL uses a separate replication channel for each master the slave replicates from. In MySQL, masters in a multi-source replication topology can be configured to use either global transaction identifier (GTID) based replication, or binary log position-based replication.

More on MariaDB multi source replication can be found in this blog post. For MySQL, please refer to the MySQL documentation.

Galera with Replication Slave (Hybrid Replication)

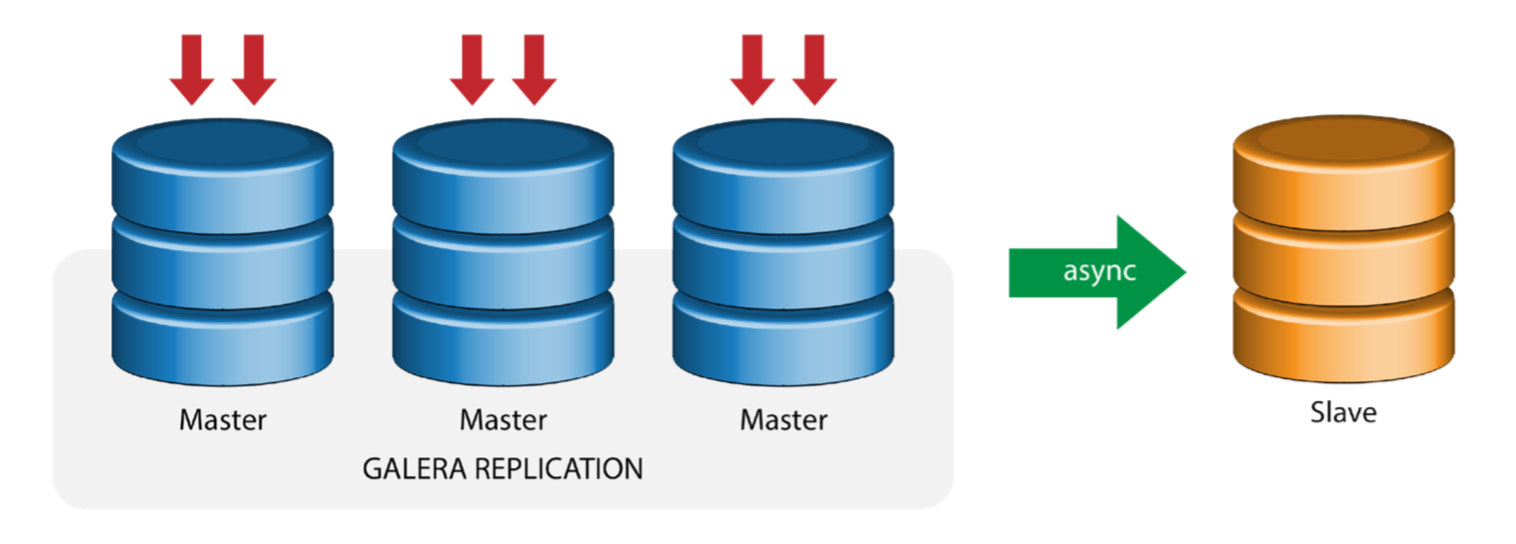
Hybrid replication is a combination of MySQL asynchronous replication and virtually synchronous replication provided by Galera. The deployment is now simplified with the implementation of GTID in MySQL replication, where setting up and performing master failover has become a straightforward process on the slave side.

Galera cluster performance is as fast as the slowest node. Having an asynchronous replication slave can minimize the impact on the cluster if you send long-running reporting/OLAP type queries to the slave, or if you perform heavy jobs that require locks like mysqldump. The slave can also serve as a live backup for onsite and offsite disaster recovery.

Hybrid replication is supported by ClusterControl and you can deploy it directly from the ClusterControl UI. For more information on how to do this, please read the blog posts - Hybrid replication with MySQL 5.6 and Hybrid replication with MariaDB 10.x.

ClusterControl
Single Console for Your Entire Database Infrastructure
Find out what else is new in ClusterControl

Preparing GCP and AWS Platforms

The "real-world" Problem

In this blog, we will demonstrate and use the "Multiple Replication" topology in which instances on two different public cloud platforms will communicate using MySQL Replication on different regions and on different availability zones. This scenario is based on a real-world problem where an organization wants to architect their infrastructure on multiple cloud platforms for scalability, redundancy, resiliency/fault-tolerance. Similar concepts would apply for MongoDB or PostgreSQL.

Let's consider a US organization, with an overseas branch in south east Asia. Our traffic is high within the Asian-based region. Latency must be low when catering for writes and reads, but at the same time the US-based region can also pull-up records coming from the Asian-based traffic.

The Cloud Architecture Flow

In this section, I will discuss the architectural design. First, we want to offer a highly-secure layer for which our Google Compute and AWS EC2 nodes can communicate, update or install packages from the internet, secure, highly-available in case an AZ (Availability Zone) goes down, can replicate and communicate to another cloud platform over a secured layer. See the image below for illustration:

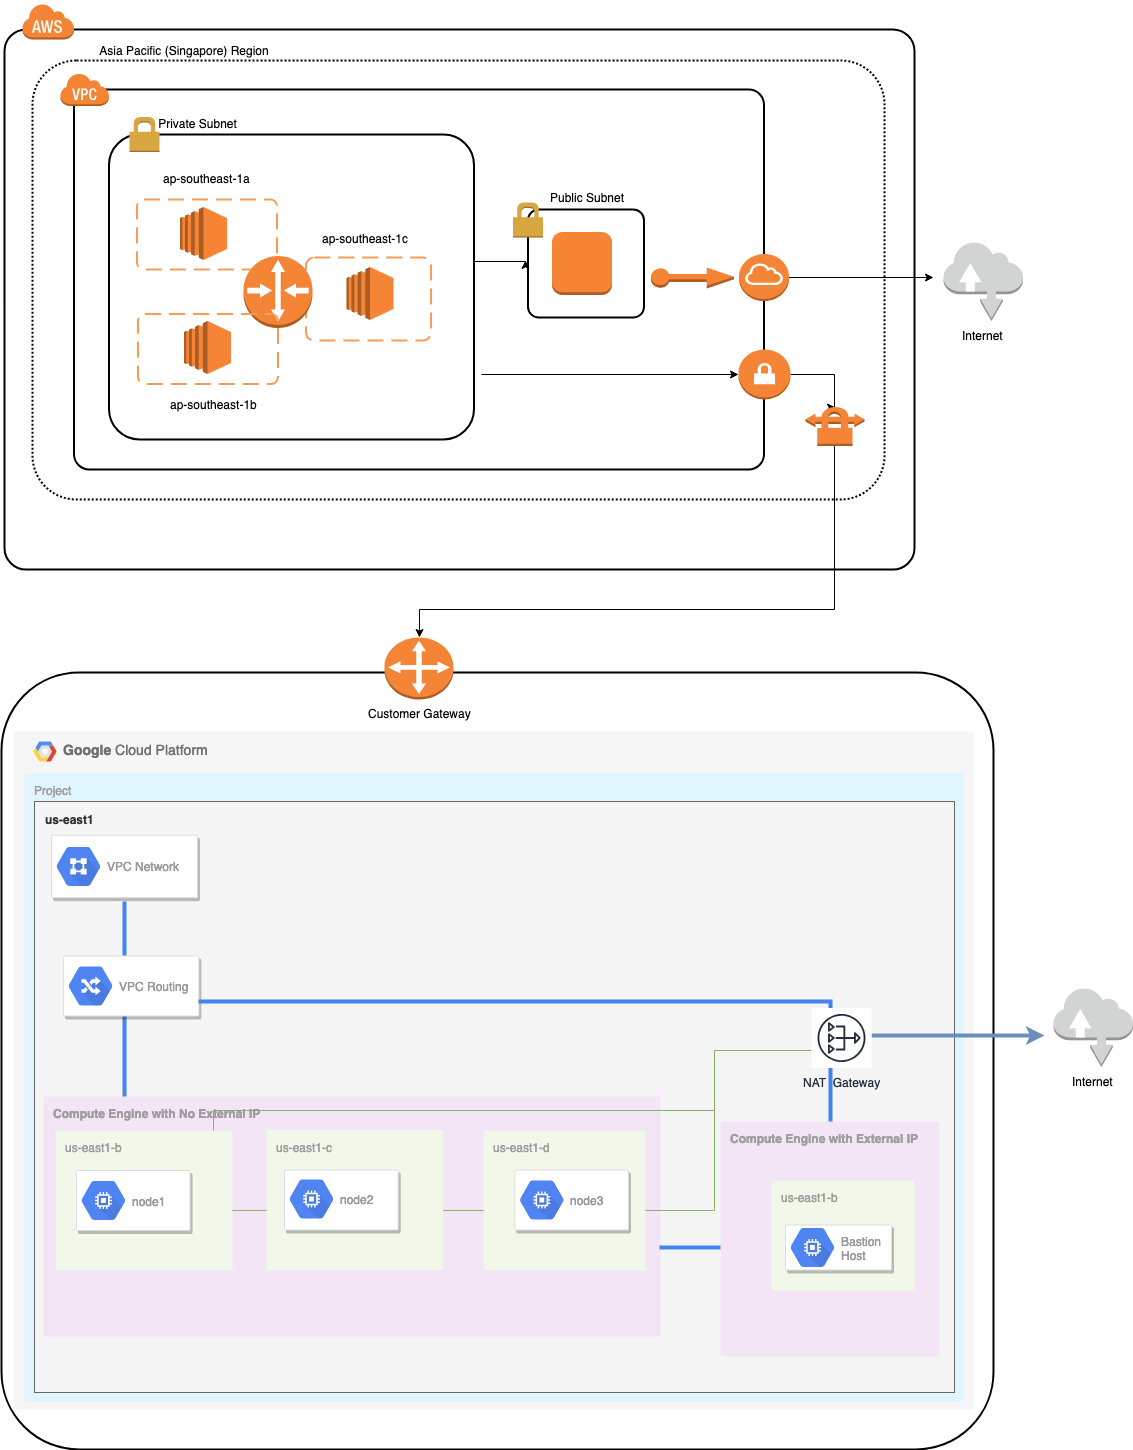
Based on the illustration above, under the AWS platform, all nodes are running on different availability zones. It has a private and public subnet for which all the compute nodes are on a private subnet. Hence, it can go outside the internet to pull and update its system packages when needed. It has a VPN gateway for which it has to interact with GCP in that channel, bypassing the Internet but through a secure and private channel. Same as GCP, all compute nodes are on different availability zones, use NAT Gateway to update system packages when needed and use VPN connection to interact with the AWS nodes which are hosted on a different region, i.e. Asia Pacific (Singapore). On the other hand, the US-based region is hosted under us-east1. In order to access the nodes, one node in the architecture serves as the bastion-node for which we will use it as the jump host and install ClusterControl. This will be tackled later in this blog.

Setting up GCP and AWS Environments

When registering your first GCP account, Google provides a default VPC (Virtual Private Cloud) account. Hence, it's best to create a separate VPC than the default and customize it according to your needs.

Our goal here is to place the compute nodes in private subnets or nodes will not be setup with public IPv4. Hence, both public clouds must be able to talk to each other. The AWS and GCP compute nodes operate with different CIDRs as previously mentioned. Hence, here are the following CIDR:

AWS Compute Nodes: 172.21.0.0/16
GCP Compute Nodes: 10.142.0.0/20

In this AWS setup, we allocated three subnets which has no Internet Gateway but NAT Gateway; and one subnet which has an Internet Gateway. Each of these subnets are hosted individually in different Availability Zones (AZ).

ap-southeast-1a = 172.21.1.0/24
ap-southeast-1b = 172.21.8.0/24
ap-southeast-1c = 172.21.24.0/24

While in GCP, the default subnet created in a VPC under us-east1 which is 10.142.0.0/20 CIDR is used. Hence, these are the steps you can follow to setup your multi-public cloud platform.

  • For this exercise, I created a VPC in us-east1 region with the following subnet of 10.142.0.0/20. See below:

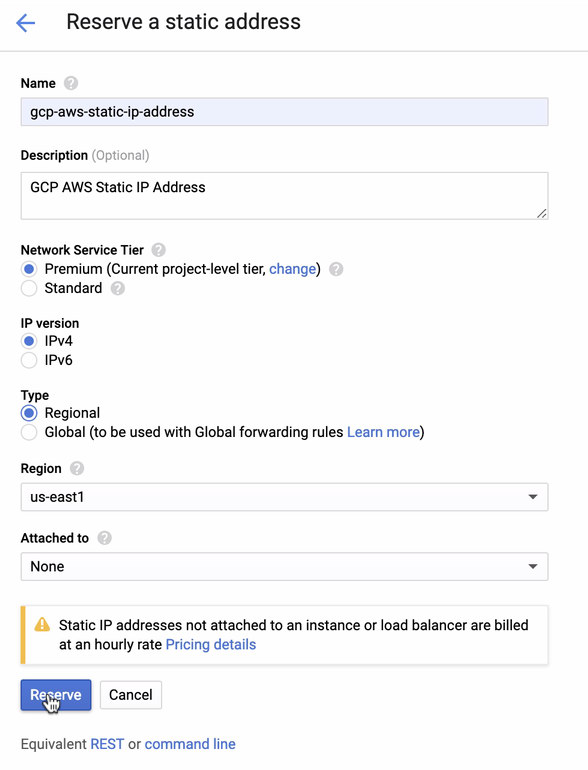
  • Reserve a Static IP. This is the IP that we will be setting up as a Customer Gateway in AWS

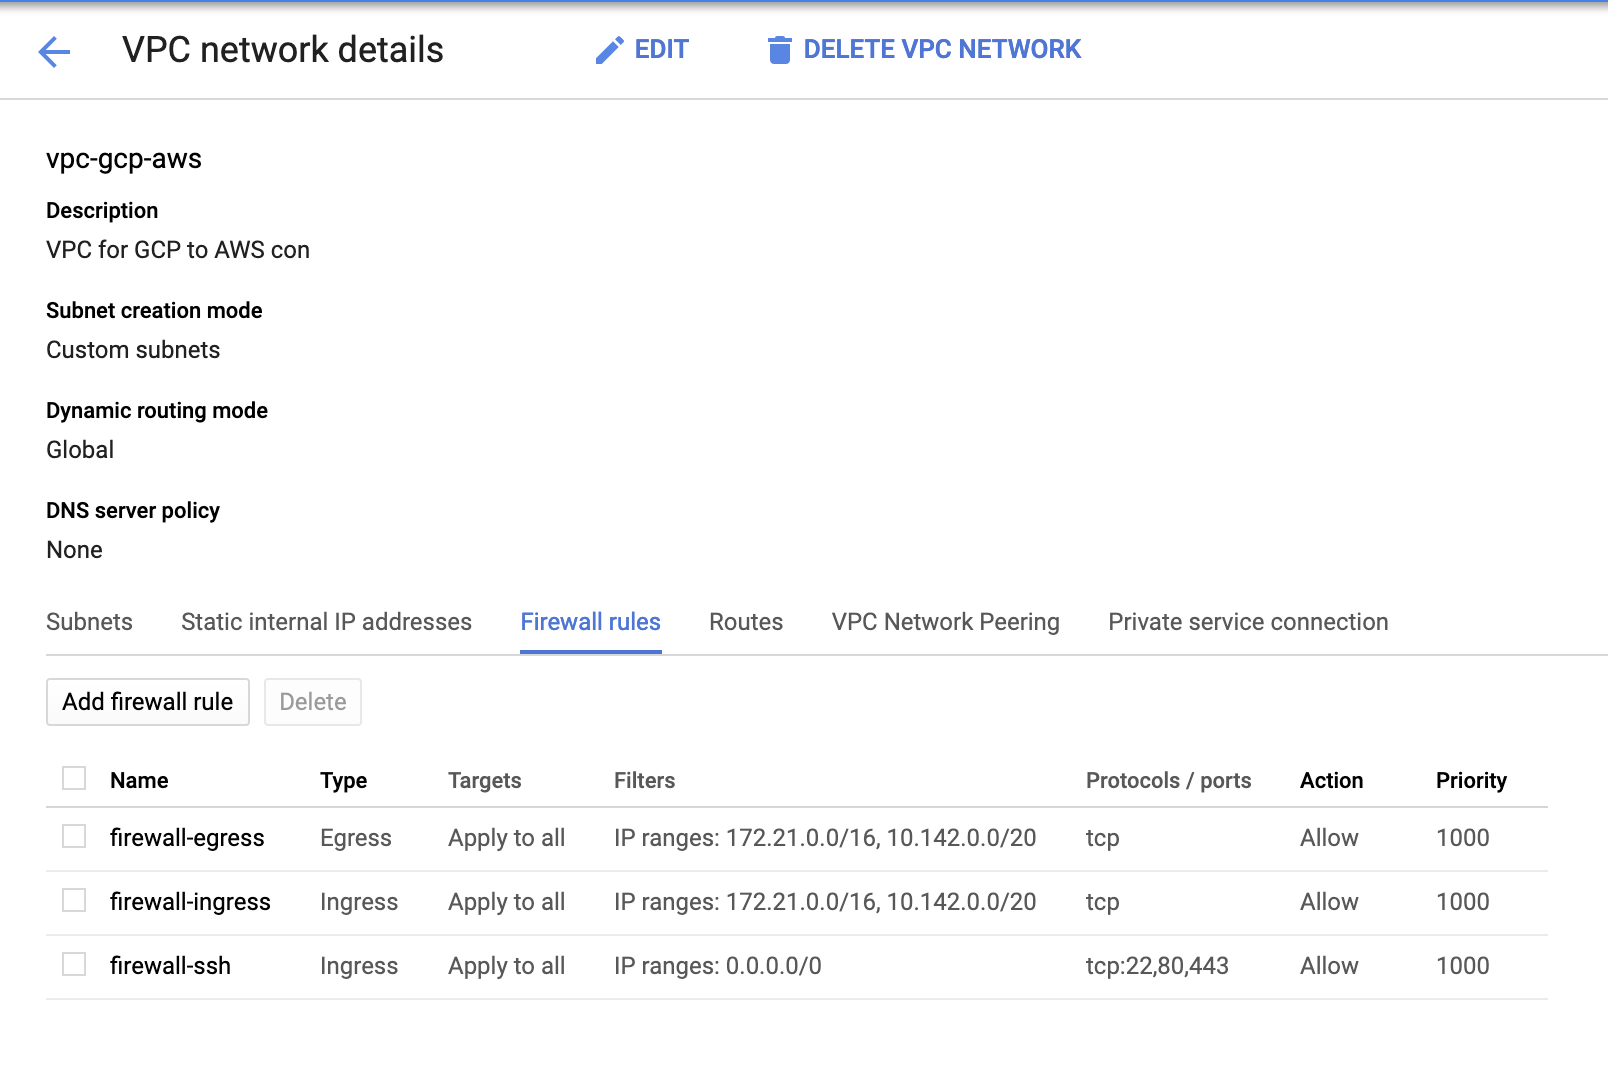
  • Since we have subnets in place (provisioned as subnet-us-east1), go to GCP -> VPC Network -> VPC Networks and select the VPC you created and go to the Firewall Rules. In this section, add the rules by specifying your ingress and egress. Basically, these are the inbound/outbound rules in AWS or your firewall for incoming and outgoing connections. In this setup, I opened all TCP protocols from the CIDR range set in my AWS and GCP VPC to make it simpler for the purpose of this blog. Hence, this is not the optimal way for security. See image below:

    The firewall-ssh here will be used to allow ssh, HTTP and HTTPS incoming connections.

  • Now switch to AWS and create a VPC. For this blog, I used CIDR (Classless Inter-Domain Routing) 172.21.0.0/16

  • Create the subnets for which you have to assign them in each AZ (Availability Zone); and at least reserve one subnet for a public subnet which will handle the NAT Gateway, and the rest are for EC2 nodes.

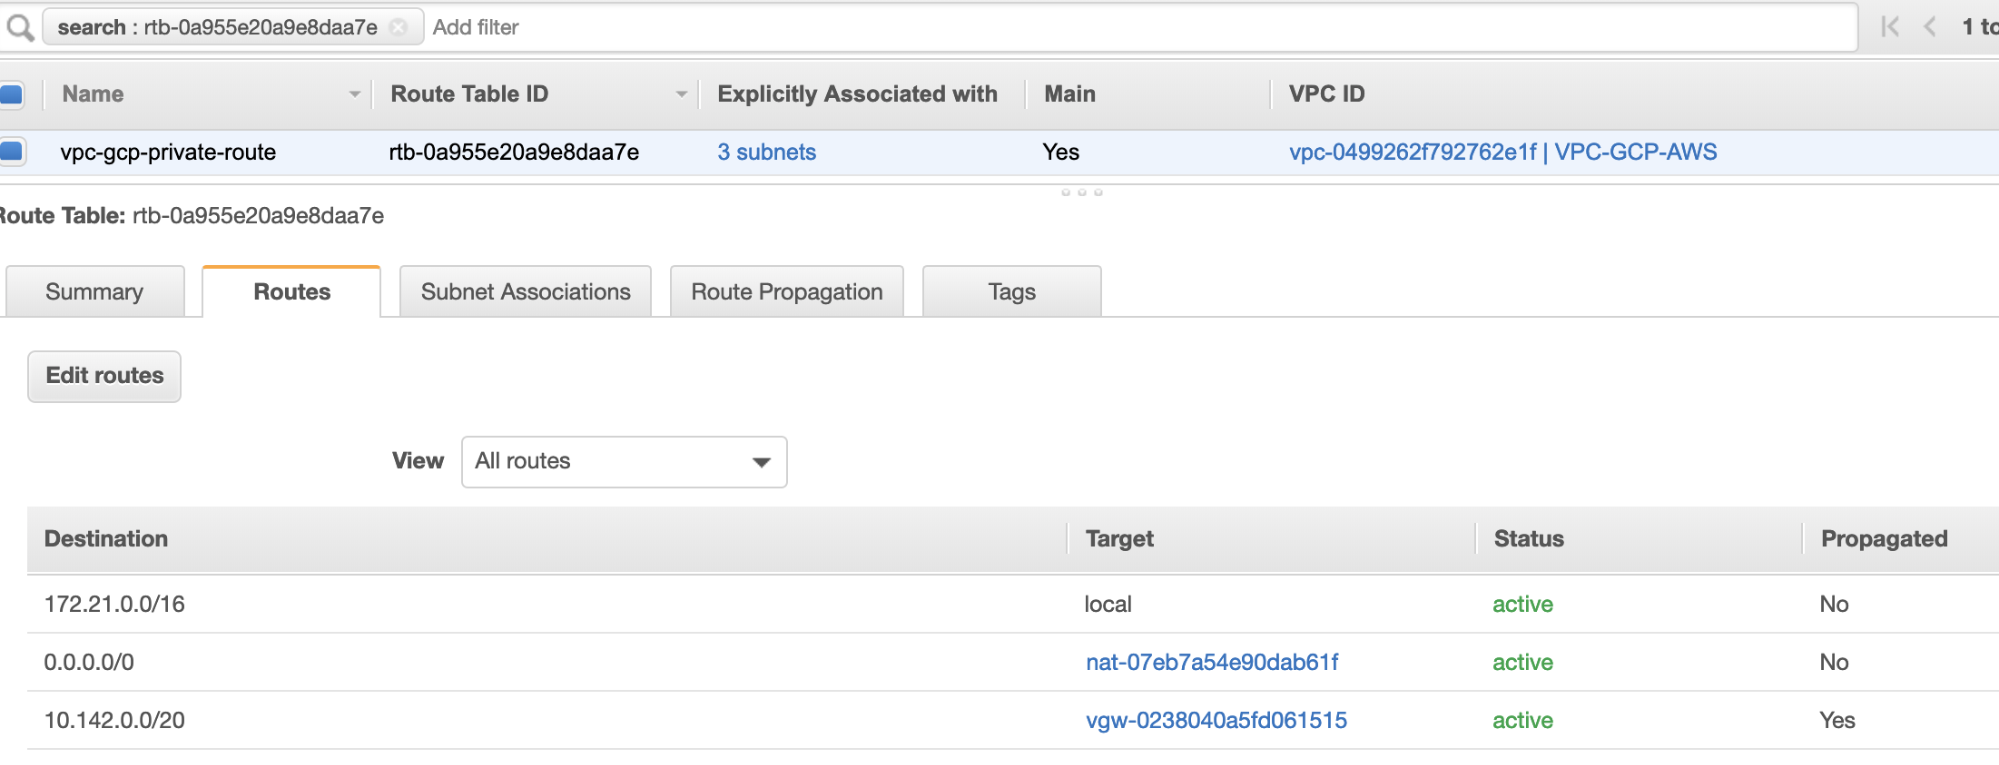
  • Next, create your Route Table and ensure that the "Destination" and "Targets" are set correctly. For this blog, I created 2 route tables. One which will handle the 3 AZ which my compute nodes will be assigned individually and will be assigned without an Internet Gateway as it will have no public IP. Then the other one will handle the NAT Gateway and will have an Internet Gateway which will be in the public subnet. See image below:

    and as mentioned, my example destination for private route that handles 3 subnets shows to have a NAT Gateway target plus a Virtual Gateway target which I will mention later in the incoming steps.

  • Next, create an "Internet Gateway" and assign it to the VPC that was previously created in the AWS VPC section. This Internet Gateway shall only be set as destination to the public subnet as it will be the service that has to connect to the internet. Obviously, the name stands for as an internet gateway service.

  • Next, create a "NAT Gateway". When creating a "NAT Gateway", ensure that you have assigned your NAT to a public-facing subnet. The NAT Gateway is your channel to access the internet from your private subnet or EC2 nodes that have no public IPv4 assigned. Then create or assign an EIP (Elastic IP) since, in AWS, only compute nodes that have public IPv4 assigned can connect to the internet directly.

  • Now, under VPC -> Security -> Security Groups (SG), your created VPC will have a default SG. For this setup, I created "Inbound Rules" with sources assigned for each CIDR i.e. 10.142.0.0/20 in GCP and 172.21.0.0/16 in AWS. See below:

    For "Outbound Rules", you can leave that as is since assigning rules to "Inbound Rules" is bilateral, which means it'll open as well for "Outbound Rules". Take note that this is not the optimal way for setting your Security Group; but to make it easier for this setup, I have made a wider scope of port range and source as well. Also that the protocol are specific for TCP connections only since we'll not be dealing with UDP for this blog.
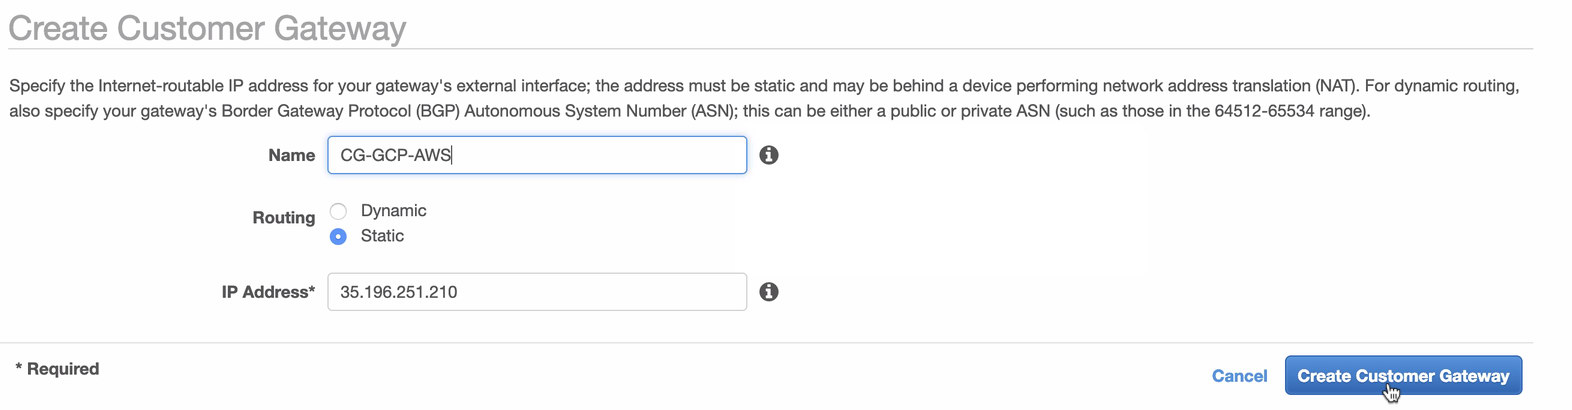
    Additionally, you can leave your VPC -> Security -> Network ACLs untouched as long as it does not DENY any tcp connections from the CIDR stated in your source.

  • Next, we'll setup the VPN configuration which will be hosted under AWS platform. Under the VPC -> Customer Gateways, create the gateway using the static IP address that were created earlier in the previous step. Take a look at the image below:

  • Next, create a Virtual Private Gateway and attach this to the current VPC that we created previously in the previous step. See image below:

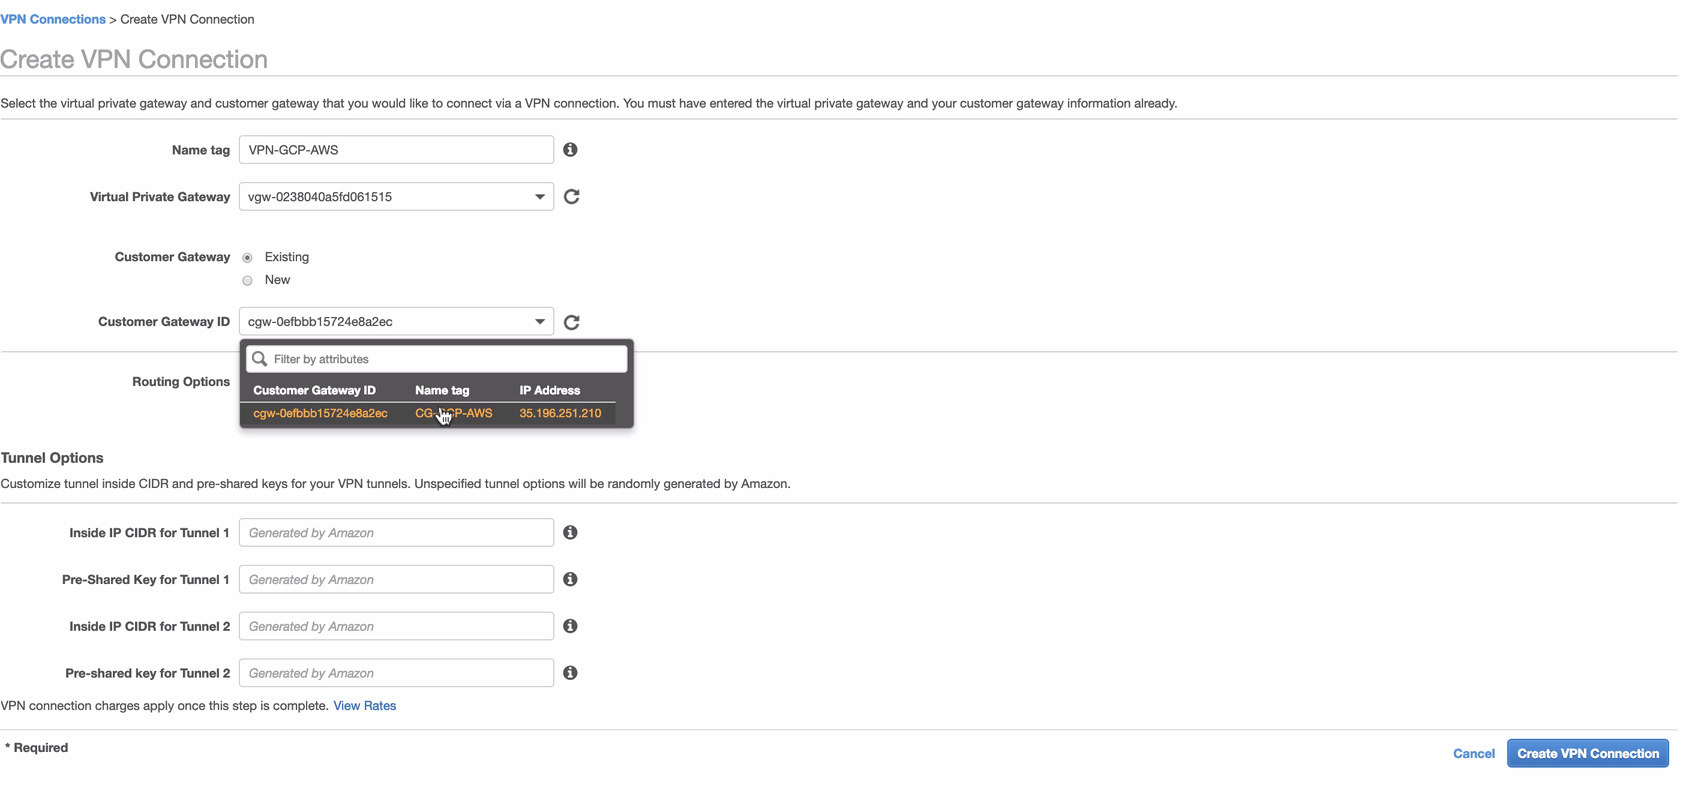
  • Now, create a VPN connection which will be used for the site-to-site connection between AWS and GCP. When creating a VPN connection, make sure that you have selected the correct Virtual Private Gateway and the Customer Gateway that we created in the previous steps. See image below:

    This might take some time while AWS is creating your VPN connection. When your VPN connection is then provisioned, you might wonder why under the Tunnel tab (after you select your VPN connection), it will show that the Outside IP Address is down. This is normal as there's no connection that has been established yet from the client. Take a look at the example image below:

    Once the VPN connection is ready, select your VPN connection created and download the configuration. It contains your credentials needed for the following steps to create a site-to-site VPN connection with the client.

    Note: In case you have setup your VPN where IPSEC IS UP but Status is DOWN just like the image below

    this is likely due to wrong values set to the specific parameters while setting up your BGP session or cloud router. Check it out here for troubleshooting your VPN.

  • Since we have a VPN connection ready hosted in AWS, let's create a VPN connection in GCP. Now, let's go back to GCP and setup the client connection there. In GCP, go to GCP -> Hybrid Connectivity -> VPN. Make sure that you are choosing the correct region, which is on this blog, we're using us-east1. Then select the static IP address created in the previous steps. See image below:

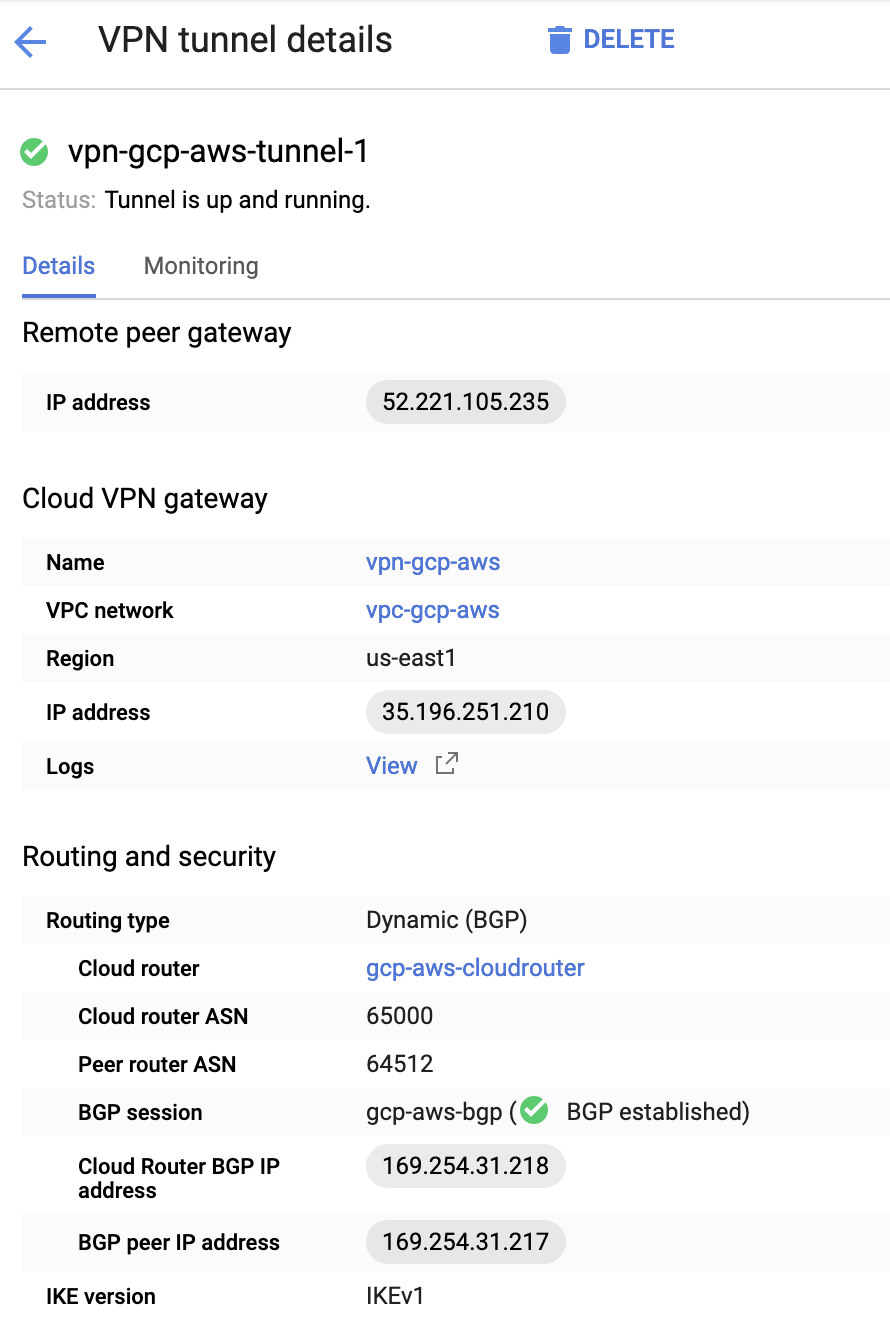
    Then in the Tunnels section, this is where you'll have to setup based on the downloaded credentials from the AWS VPN connection you created previously. I suggest to check out this helpful guide from Google. For example, one of the tunnels being setup is shown in the image below:

    Basically, the most important things here are the following:

    • Remote Peer Gateway: IP Address - This is the IP of the VPN server stated under the Tunnel Details -> Outside IP Address. This is not to be confused of the static IP we created under GCP. That is the Cloud VPN gateway -> IP address though.
    • Cloud router ASN - By default, AWS uses 65000. But likely, you'll get this information from the downloaded configuration file.
    • Peer router ASN - This is the Virtual Private Gateway ASN which is found in the downloaded configuration file.
    • Cloud Router BGP IP address - This is the Customer Gateway found in the downloaded configuration file.
    • BGP peer IP address - This is the Virtual Private Gateway found in the downloaded configuration file.
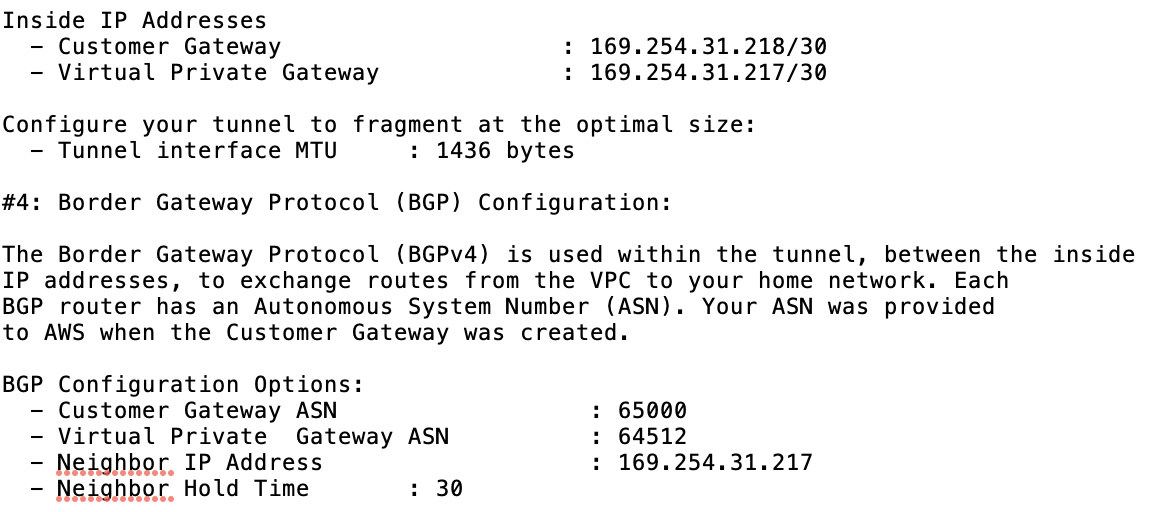
  • Take a look at the example configuration file I have below:

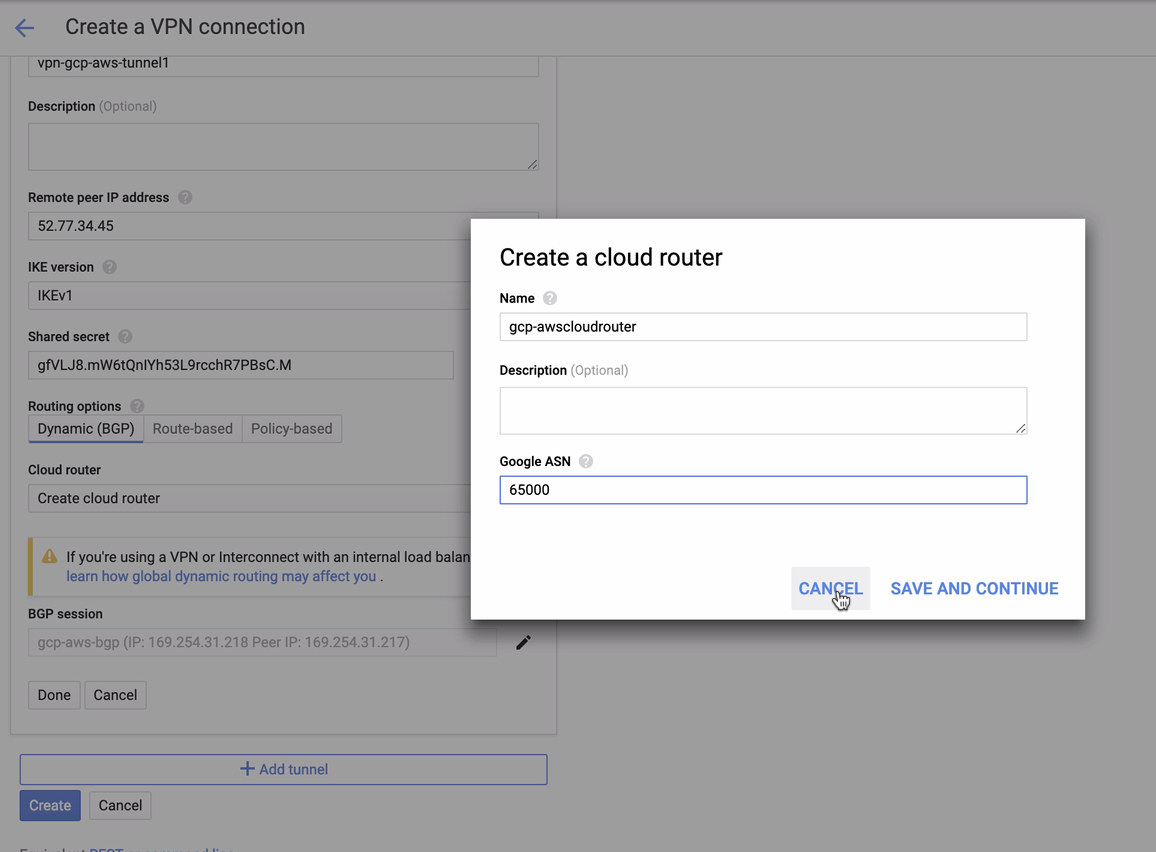
    for which you have to match this during adding your Tunnel under the GCP -> Hybrid Connectivity -> VPN connectivity setup. See the image below for which I created a cloud router and a BGP session during creating a sample tunnel:

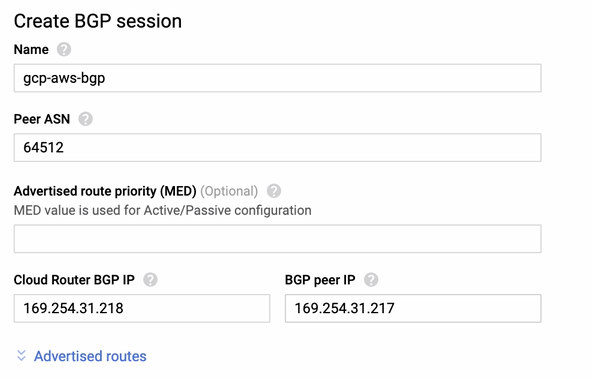
    Then BGP session as,

    Note: The downloaded configuration file contains IPSec configuration tunnel for which AWS as well contains two (2) VPN servers ready for your connection. You must have to setup both of them so that you'll have a high available setup. Once its setup for both tunnels correctly, the AWS VPN connection under the Tunnels tab will show that both Outside IP Address are up. See image below:

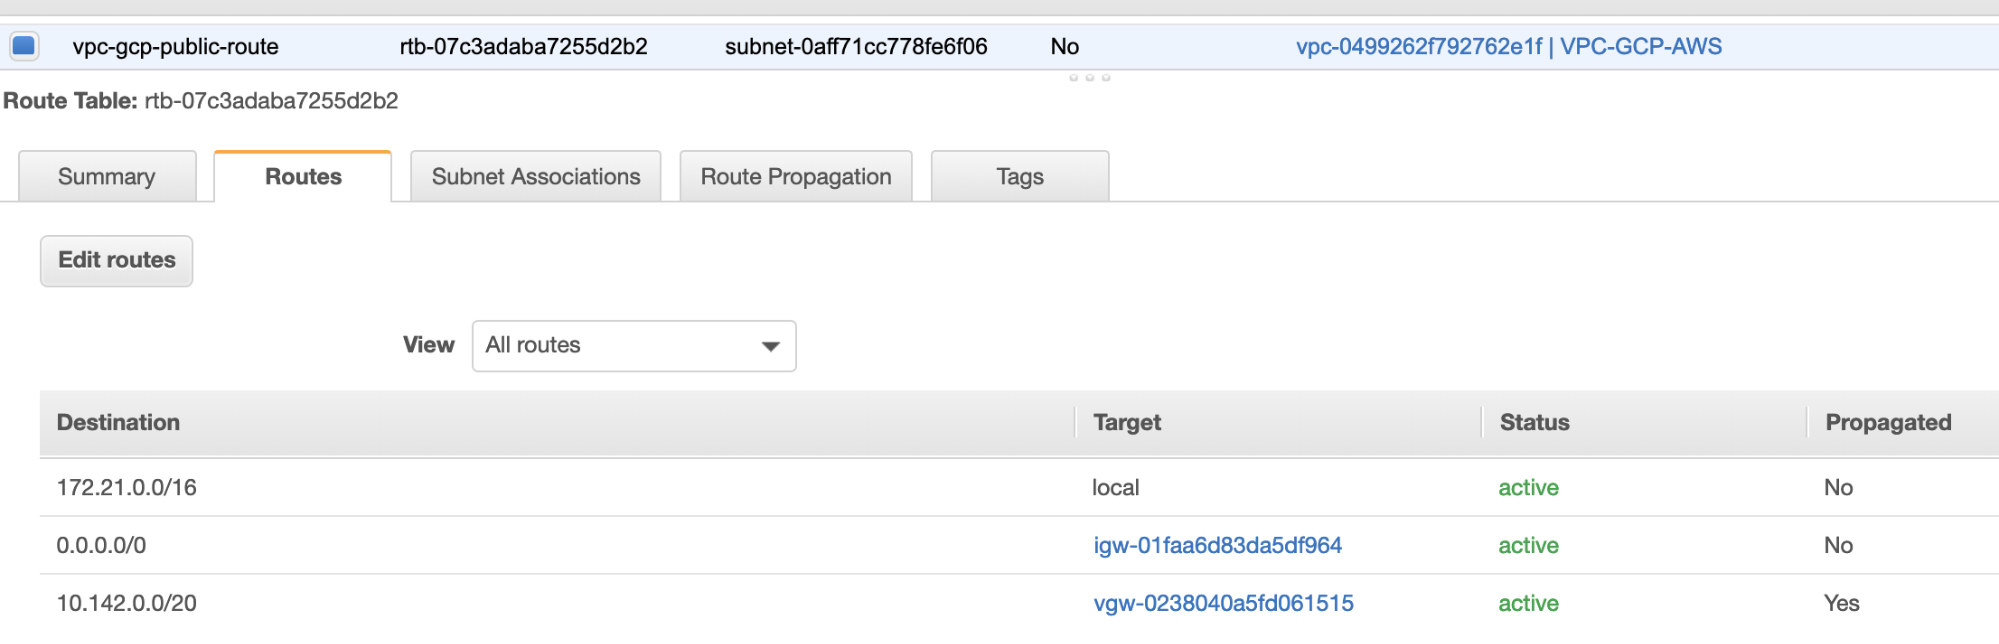
  • Lastly, since we have created an Internet Gateway and NAT Gateway, populate the public and private subnets correctly with correct Destination and Target as noticed in the screenshot from previous steps. This can be setup by going to Services -> Networking & Content Delivery -> VPC -> Route Tables and select the created route tables mentioned from the previous steps. See the image below:

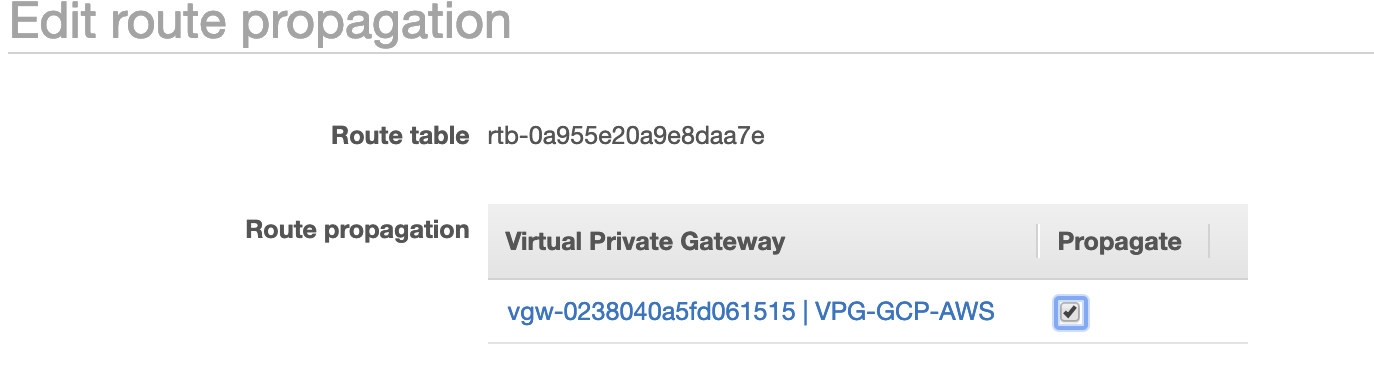
    As you noticed, the igw-01faa6d83da5df964 is the Internet Gateway that we created and is used by the public route. Whilst, the private route table has destination and target set to nat-07eb7a54e90dab61f and both of these have Destination set to 0.0.0.0/0 since it'll allow from different IPv4 connections. Also do not forget to set the Route Propagation correctly for the Virtual Gateway as seen in the screenshot which has a target vgw-0238040a5fd061515. Just click Route Propagation and set it to Yes just like in the screenshot below:

    This is very important so that the connection from the external GCP connections will route to the route tables in AWS and no further manual work needed. Otherwise, your GCP cannot establish connection to AWS.

Now that our VPN is up, we'll continue setting up our private nodes including the bastion host.

Setting up the Compute Engine Nodes

Setting up the Compute Engine/EC2 nodes will be fast and easy since we have all setup in place. I'll not go into that details but checkout the screenshots below as it explains the setup.

AWS EC2 Nodes:

GCP Compute Nodes:

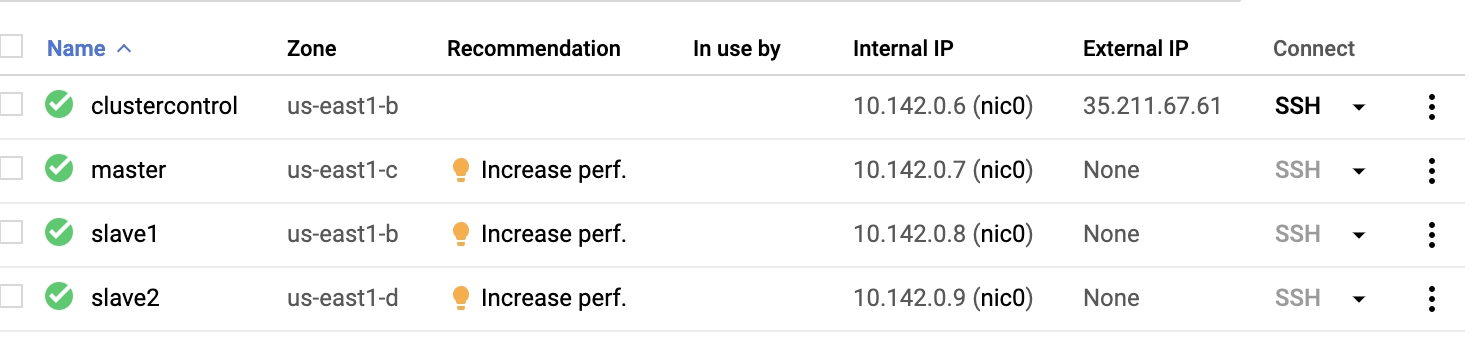
Basically, on this setup. The host clustercontrol will be the bastion or jump host and for which the ClusterControl will be installed. Obviously, all the nodes here are not internet accessible. They have no External IPv4 assigned and nodes are communicating through a very secure channel using VPN.

Lastly, all these nodes from AWS to GCP are setup with one uniform system user with sudo access, which is needed in our next section. See how ClusterControl can make your life easier when in multicloud and multi-region.

ClusterControl To The Rescue!!!

Handling multiple nodes and on different public cloud platforms, plus on a different "Region" can be a "truly-painful-and-daunting" task. How do you monitor that effectively? ClusterControl acts not only as your swiss-knife, but also as your Virtual DBA. Now, let’s see how ClusterControl can make your life easier.

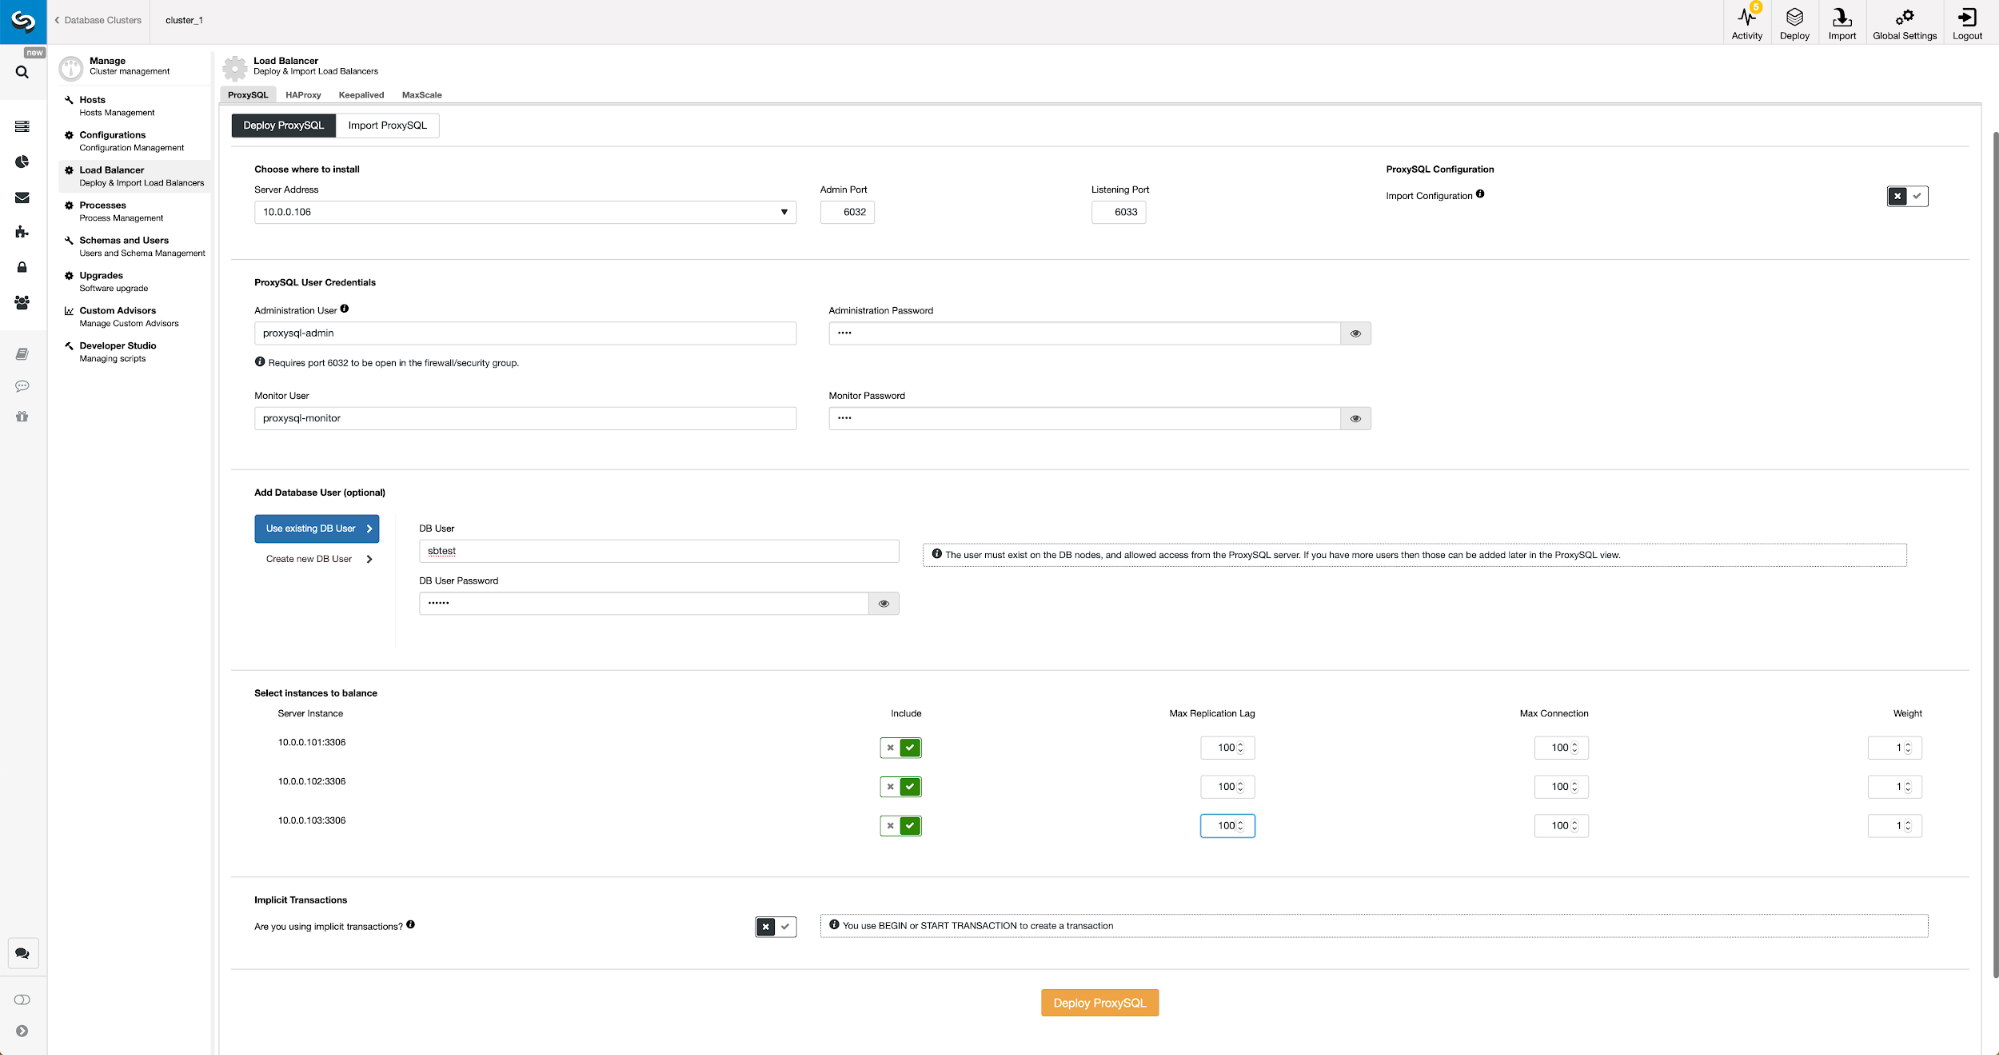
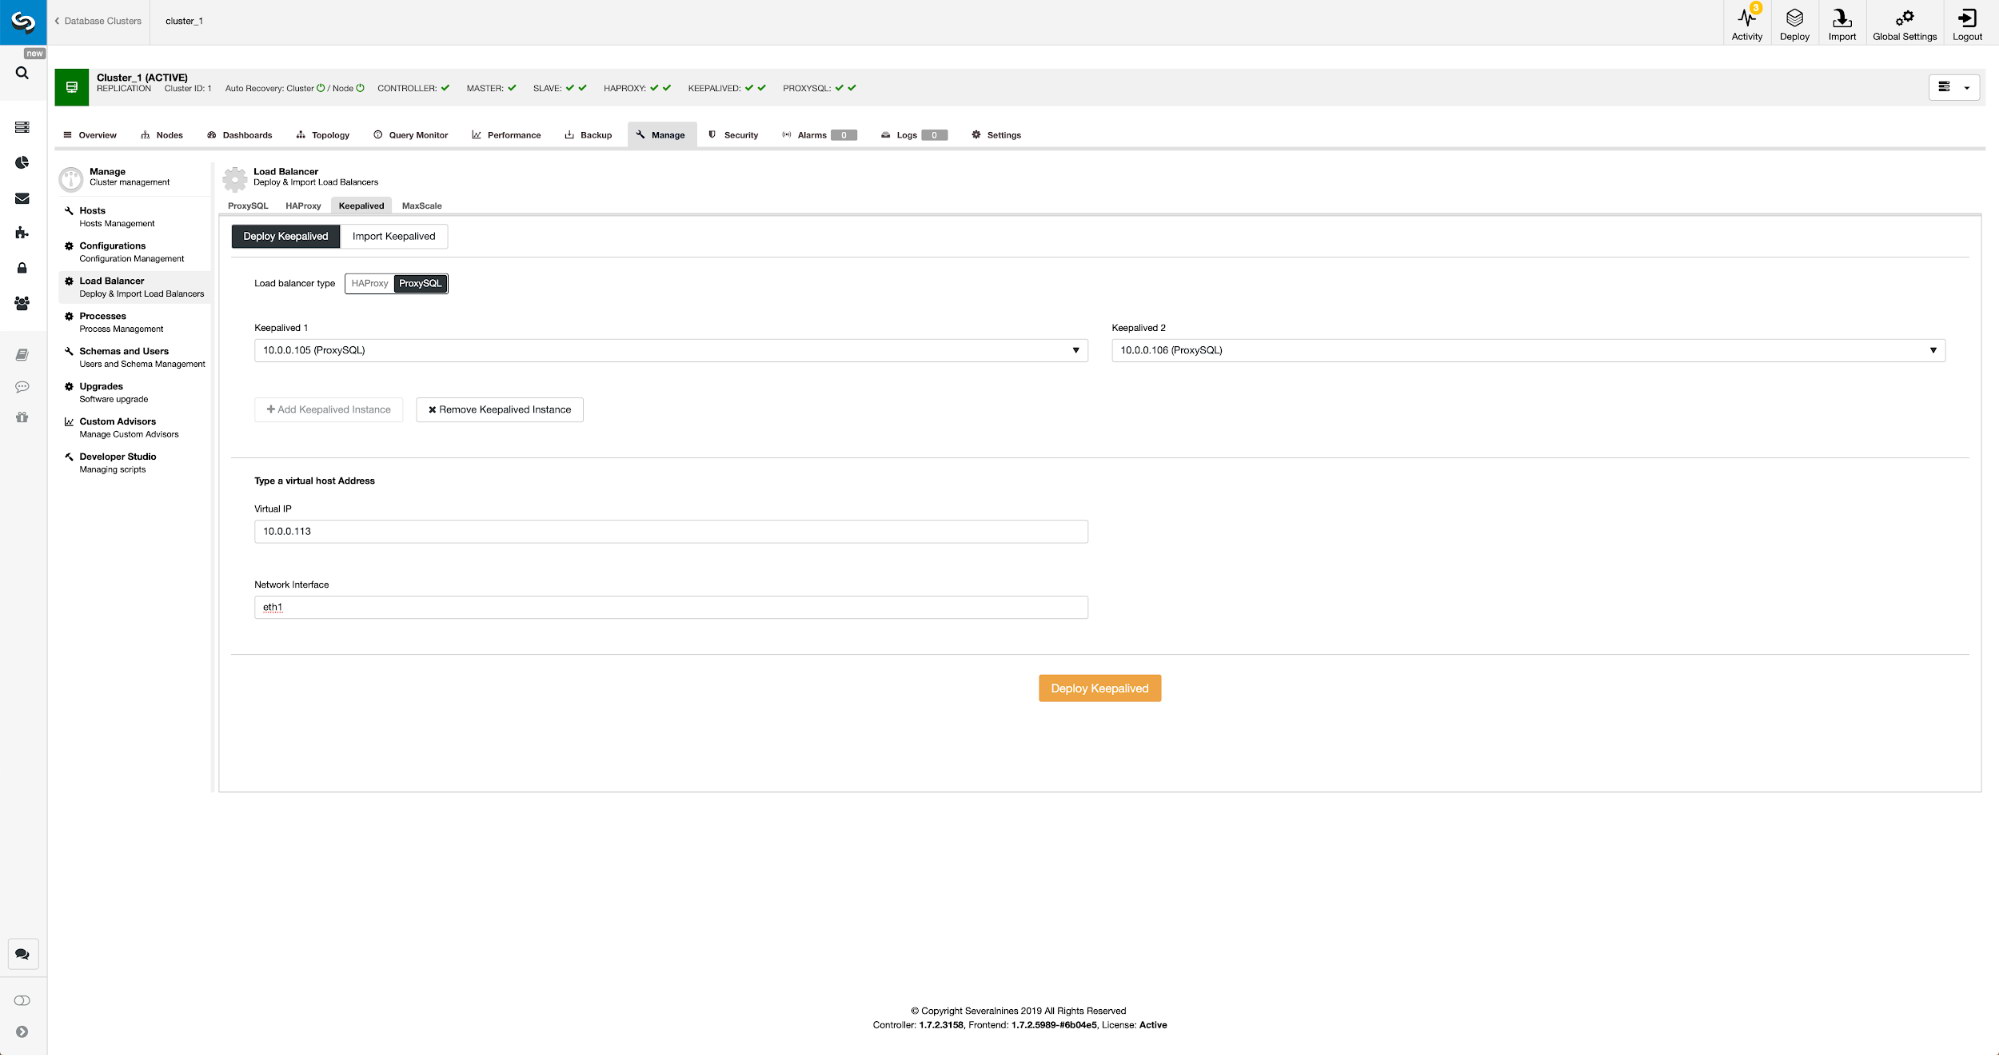
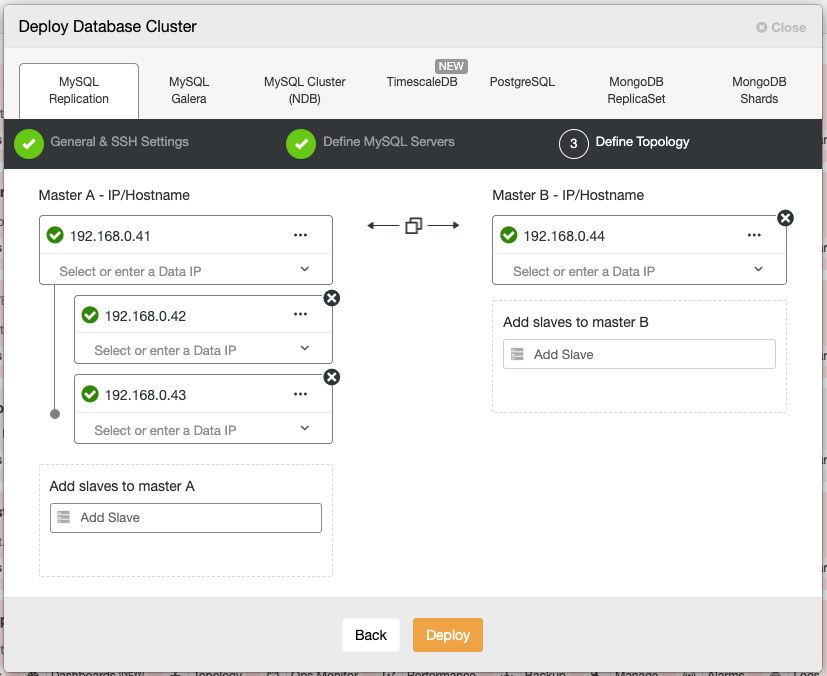
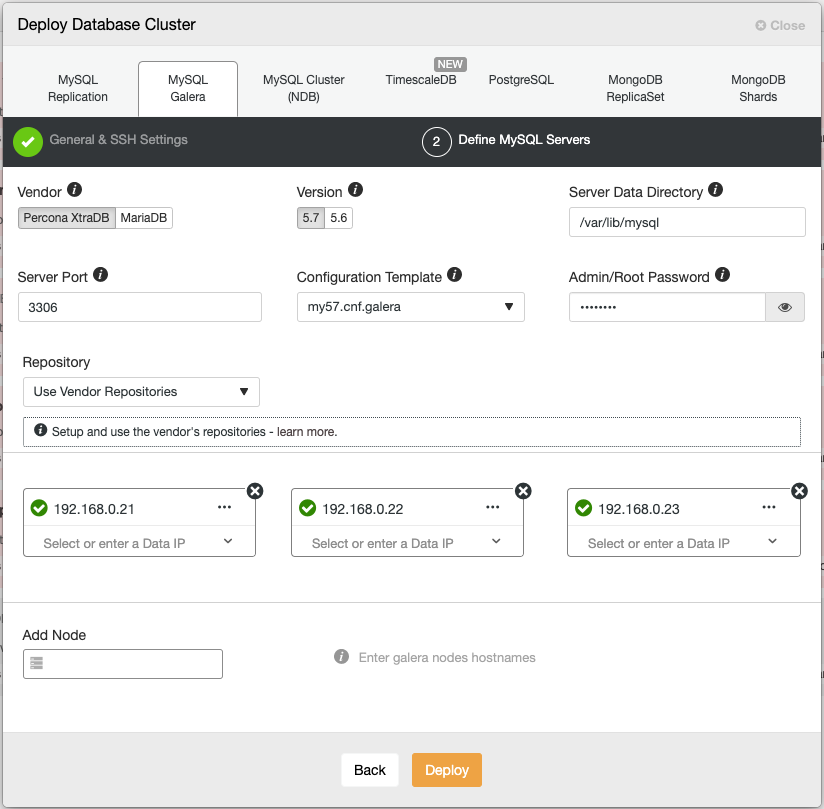
Creating a Multiple-Replication Cluster using ClusterControl

Now let's try to create a MariaDB master-slave replication cluster following the "Multiple Replication" topology.

ClusterControl Deploy Wizard

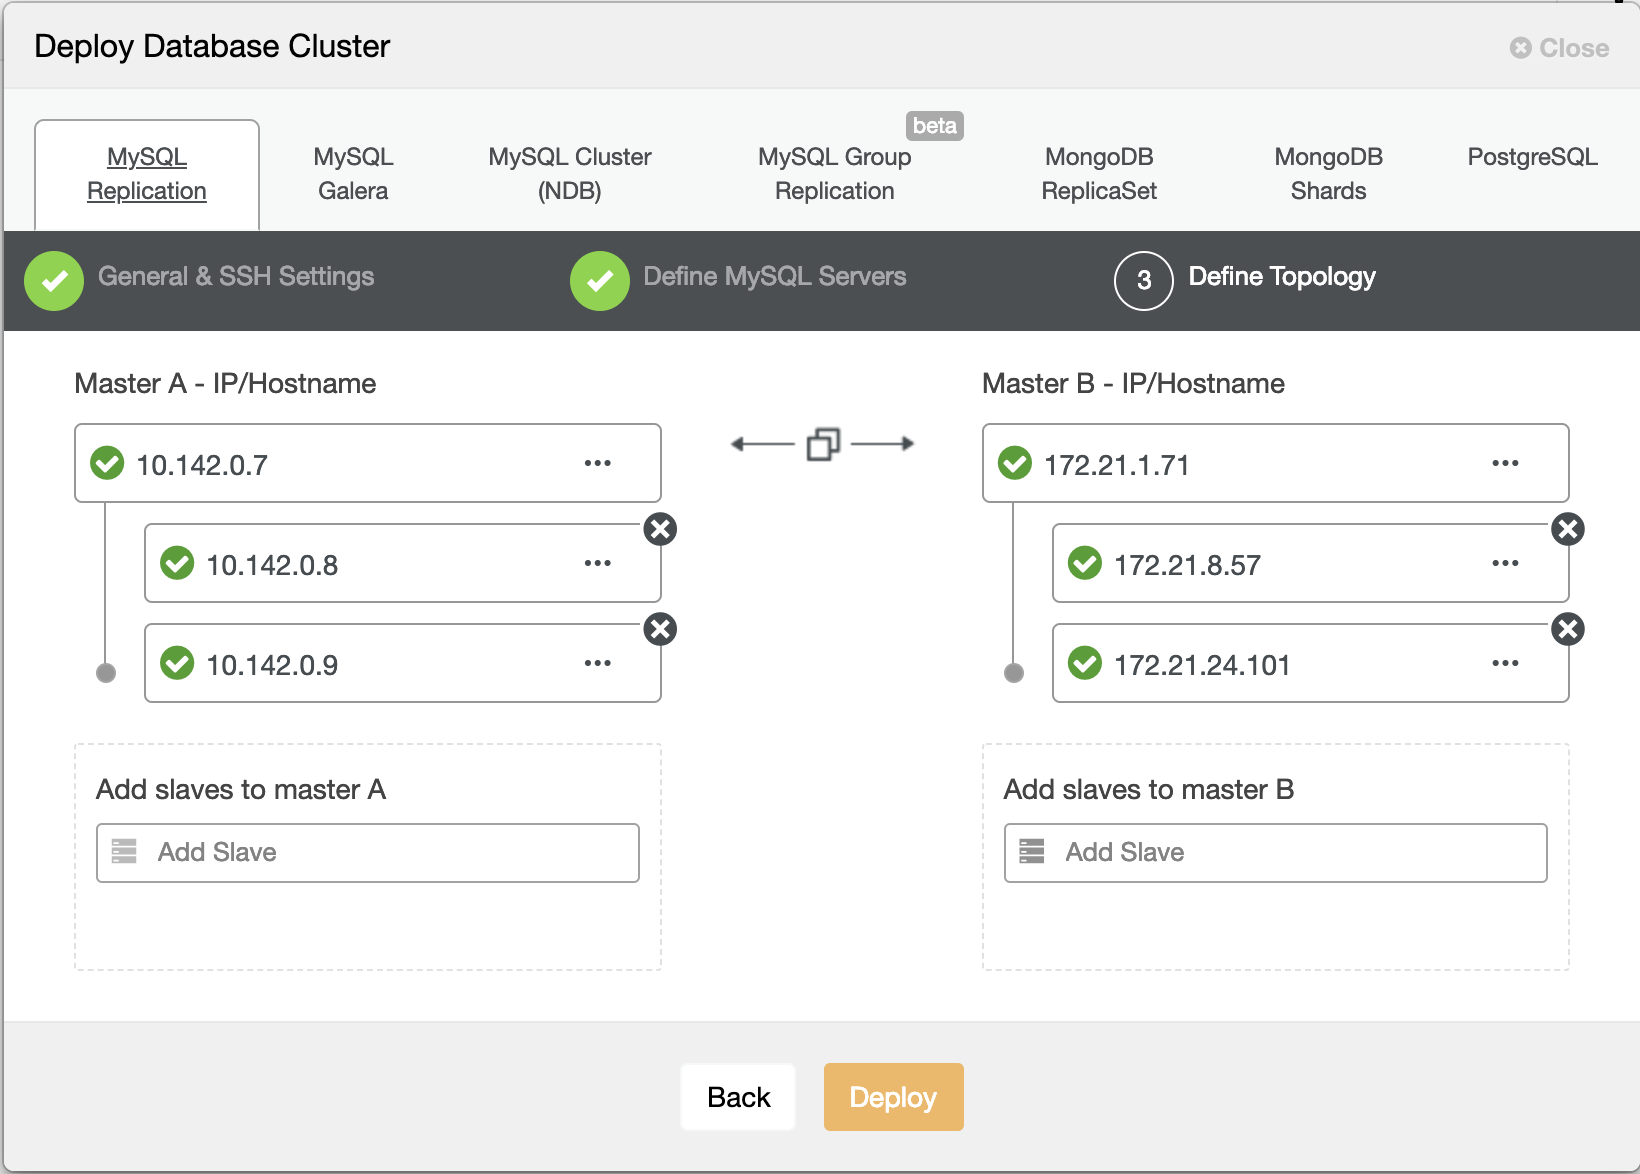
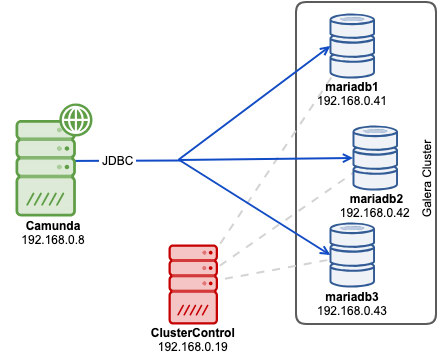
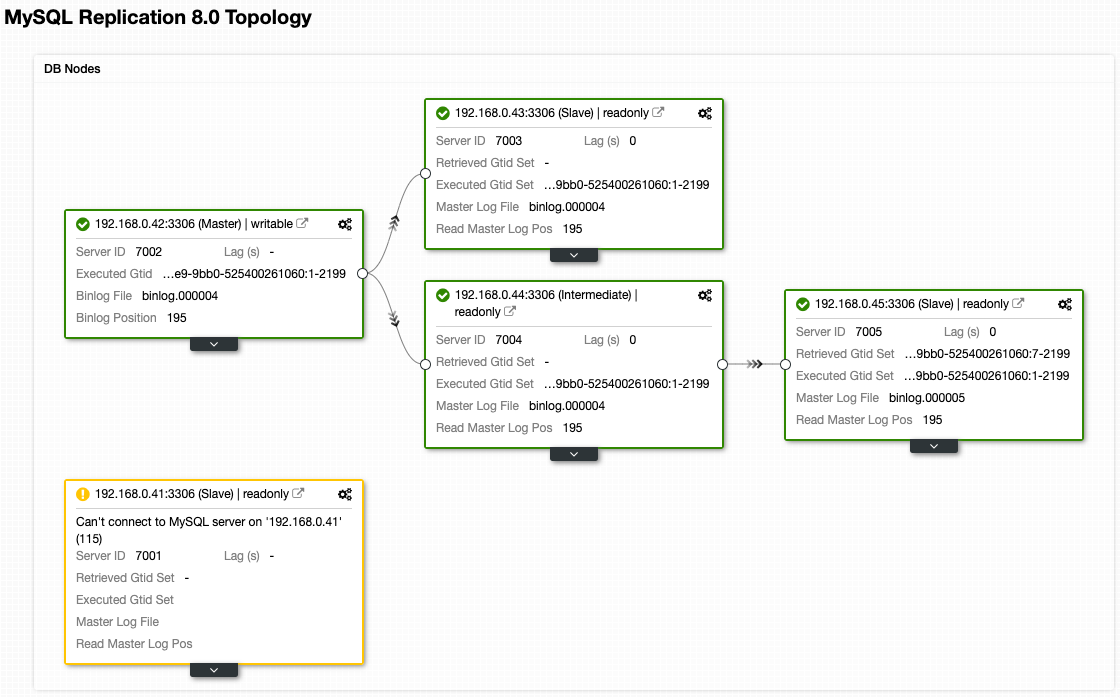
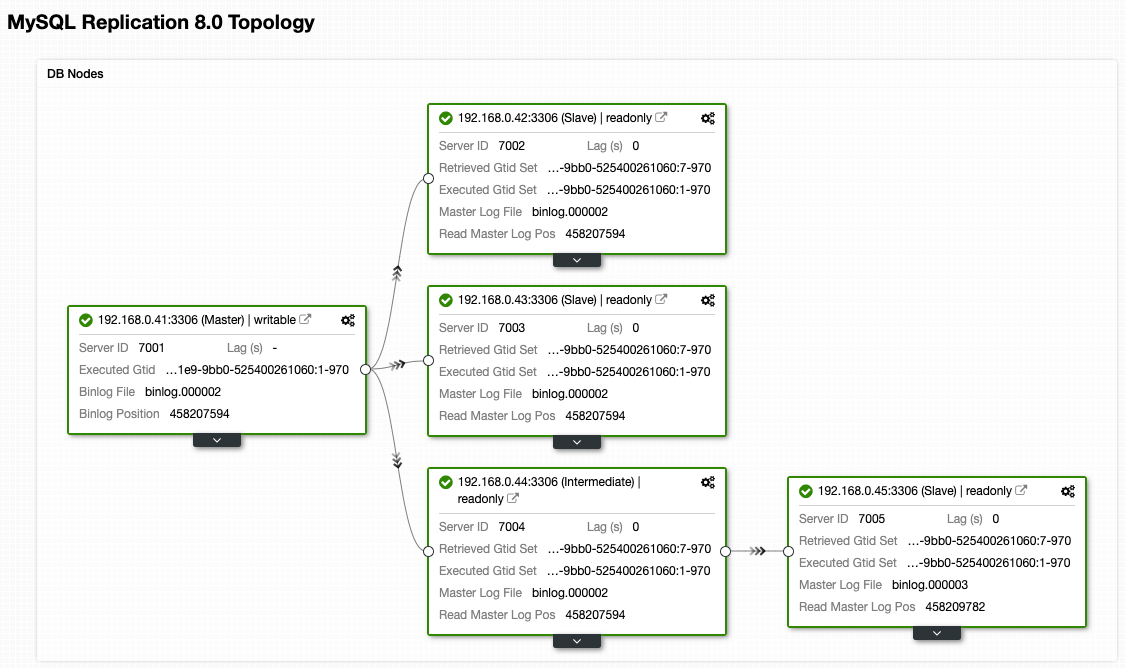
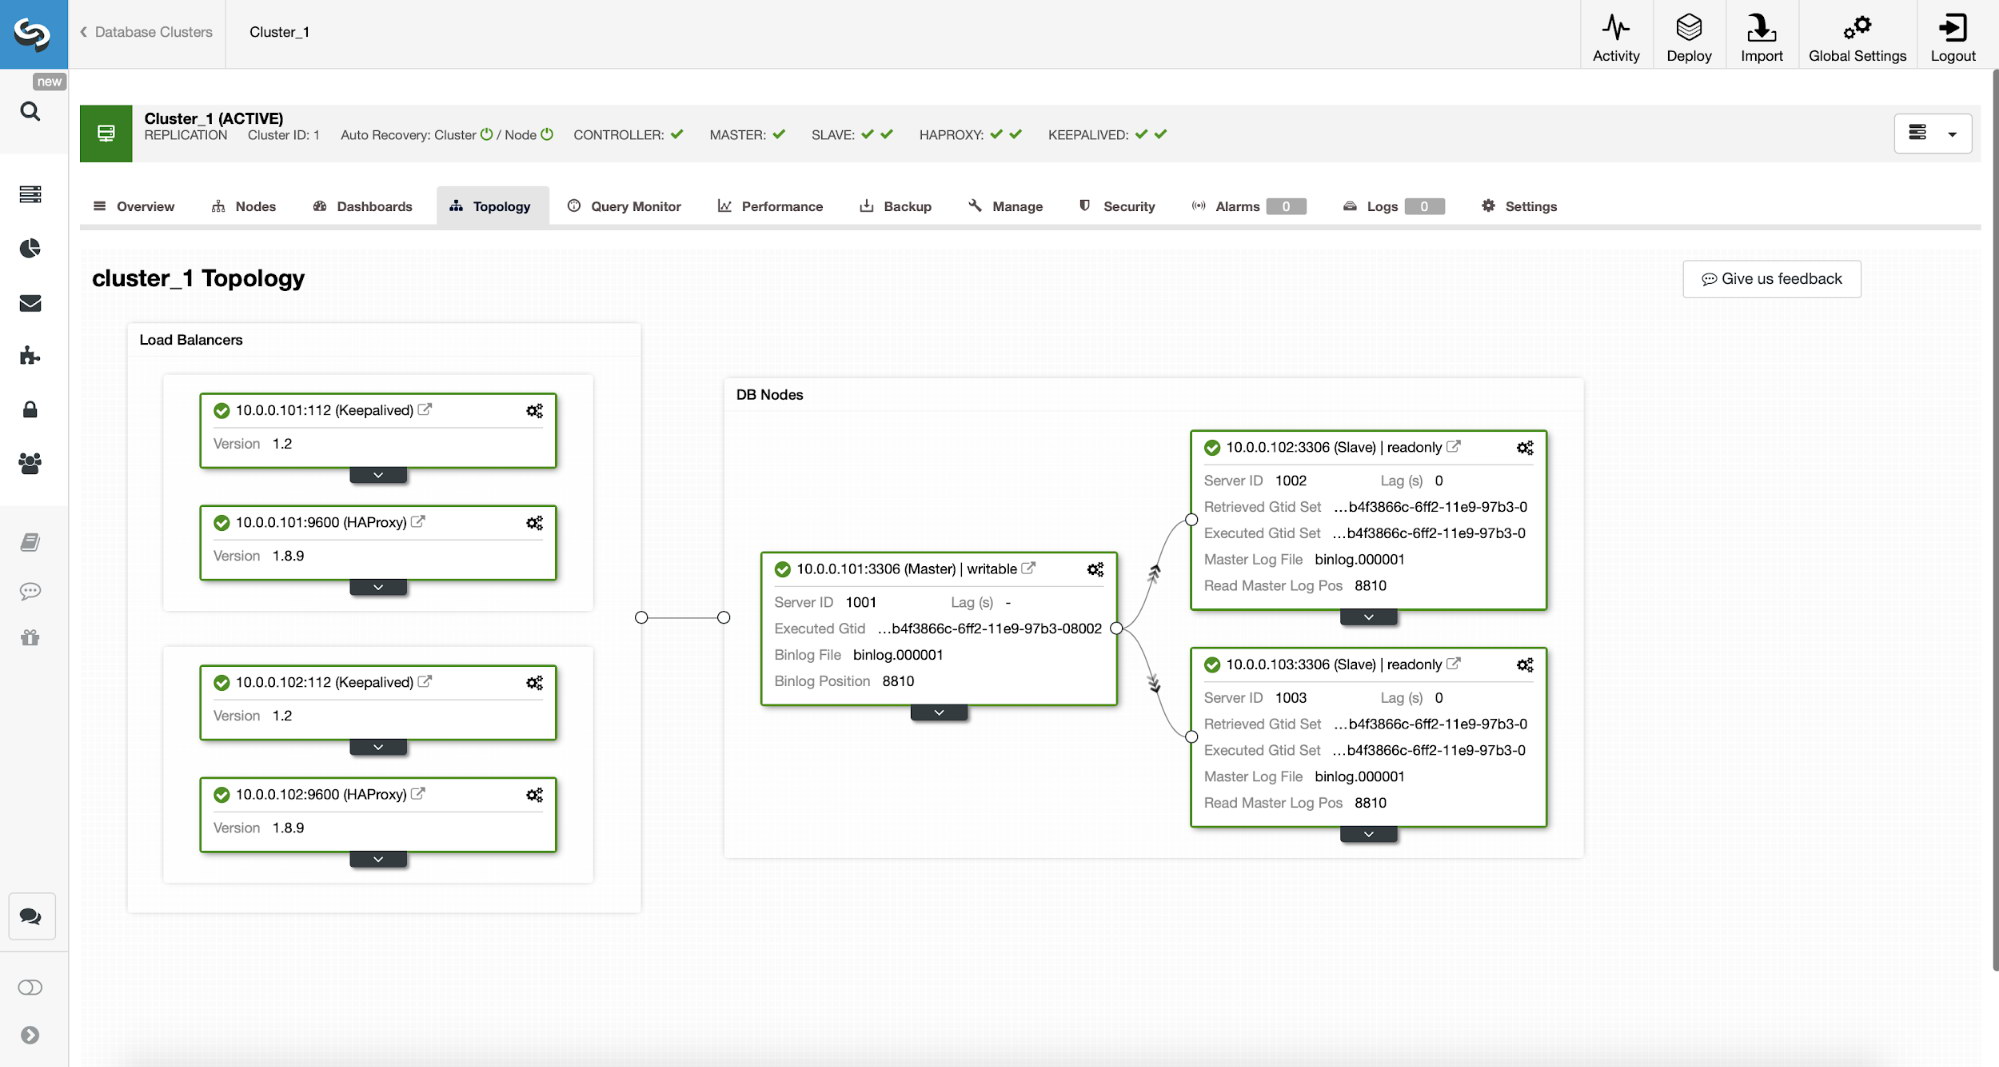
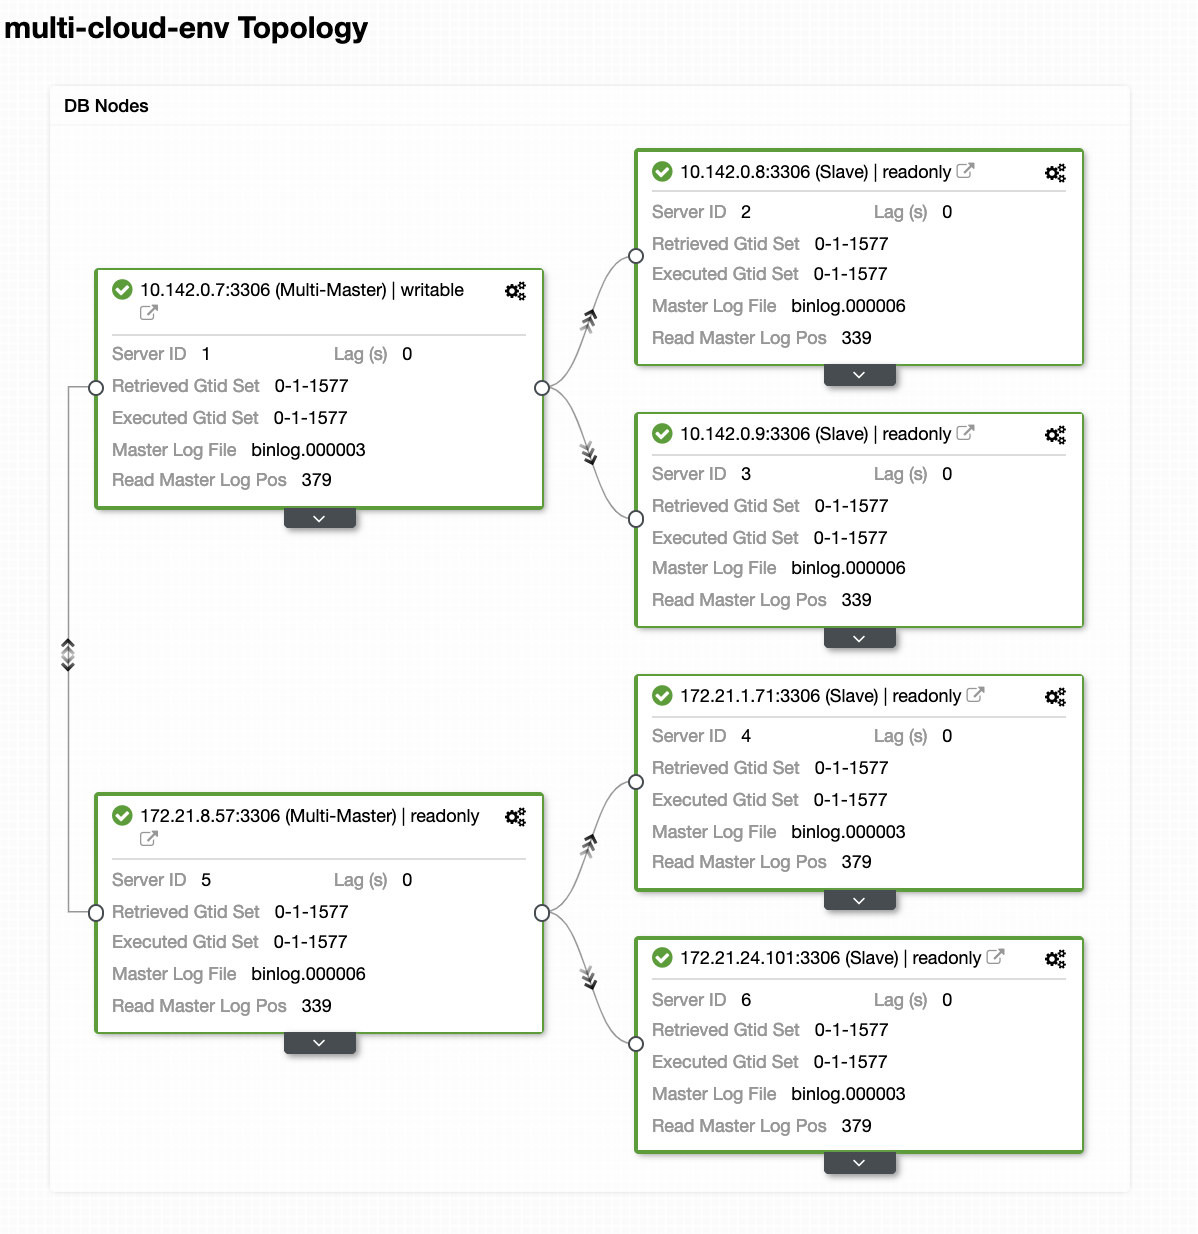
Hitting Deploy button will install packages and setup the nodes accordingly. Hence, a logical view of how the topology would look like:

ClusterControl - Topology View

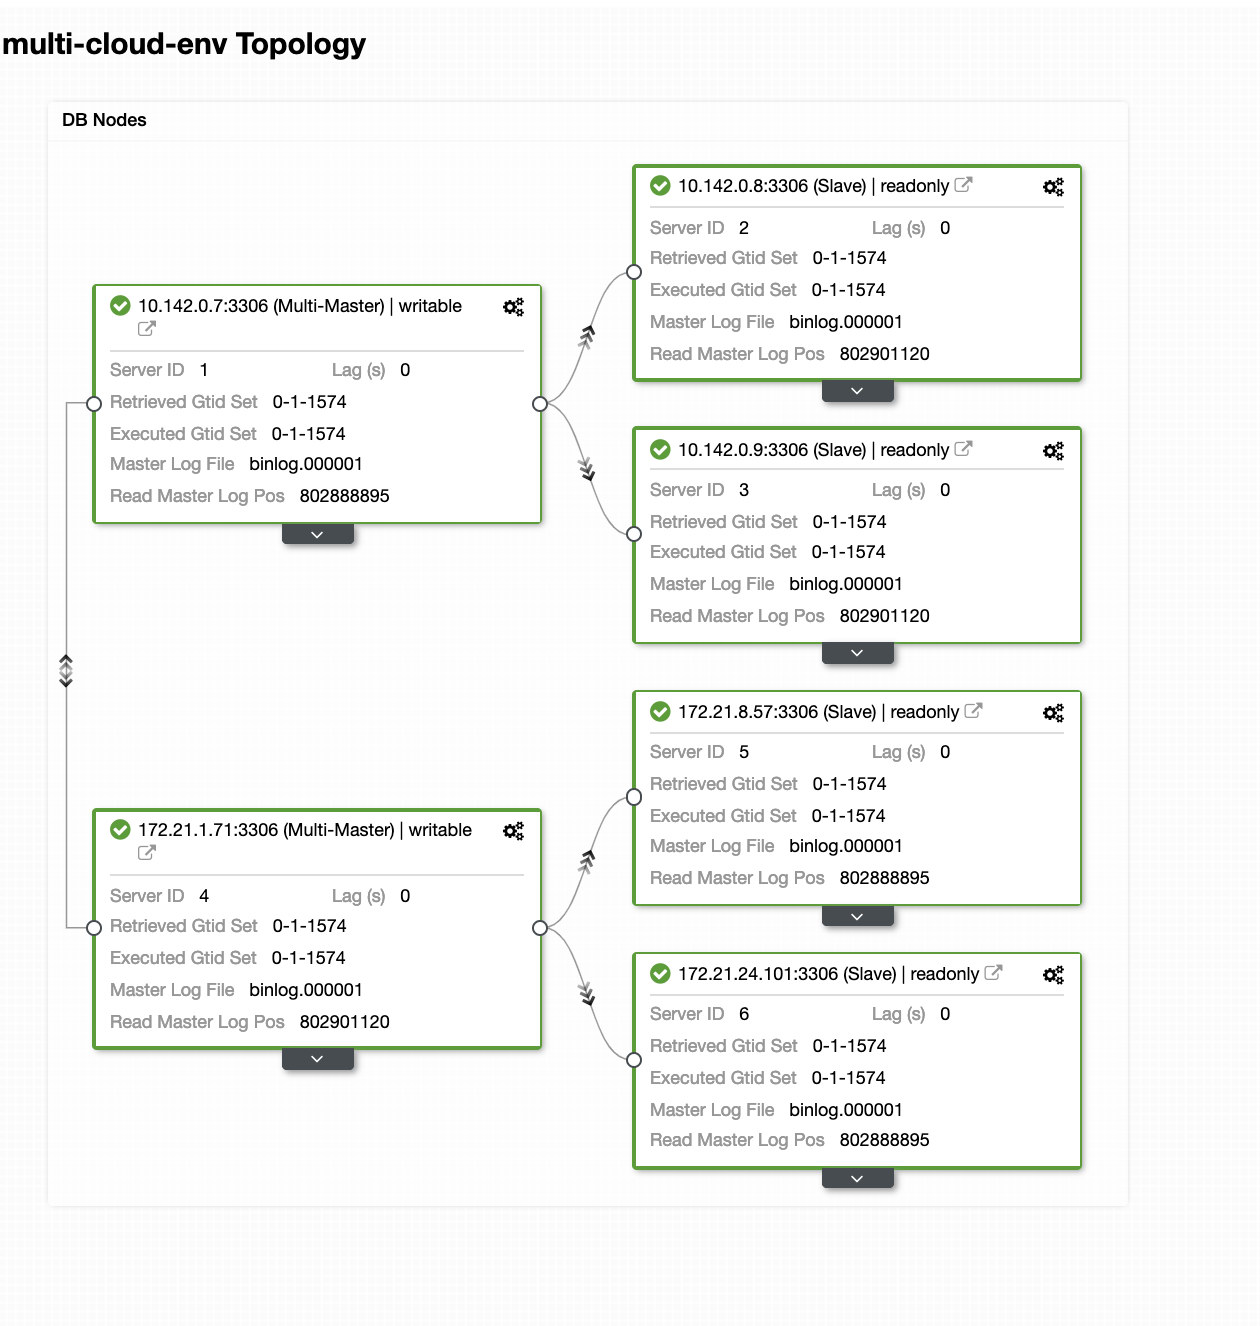
The nodes 172.21.0.0/16 range IP's are replicating from it's master running on GCP.

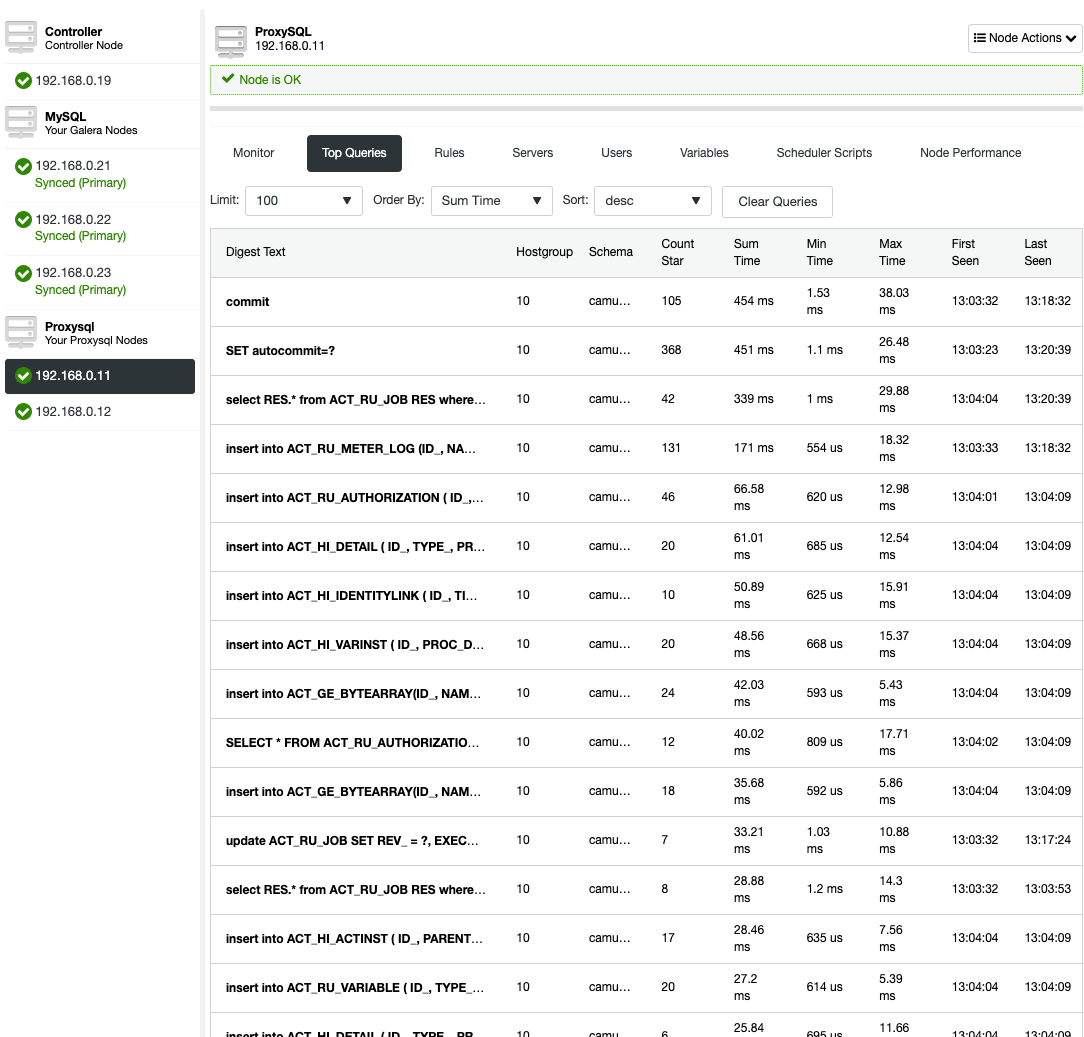
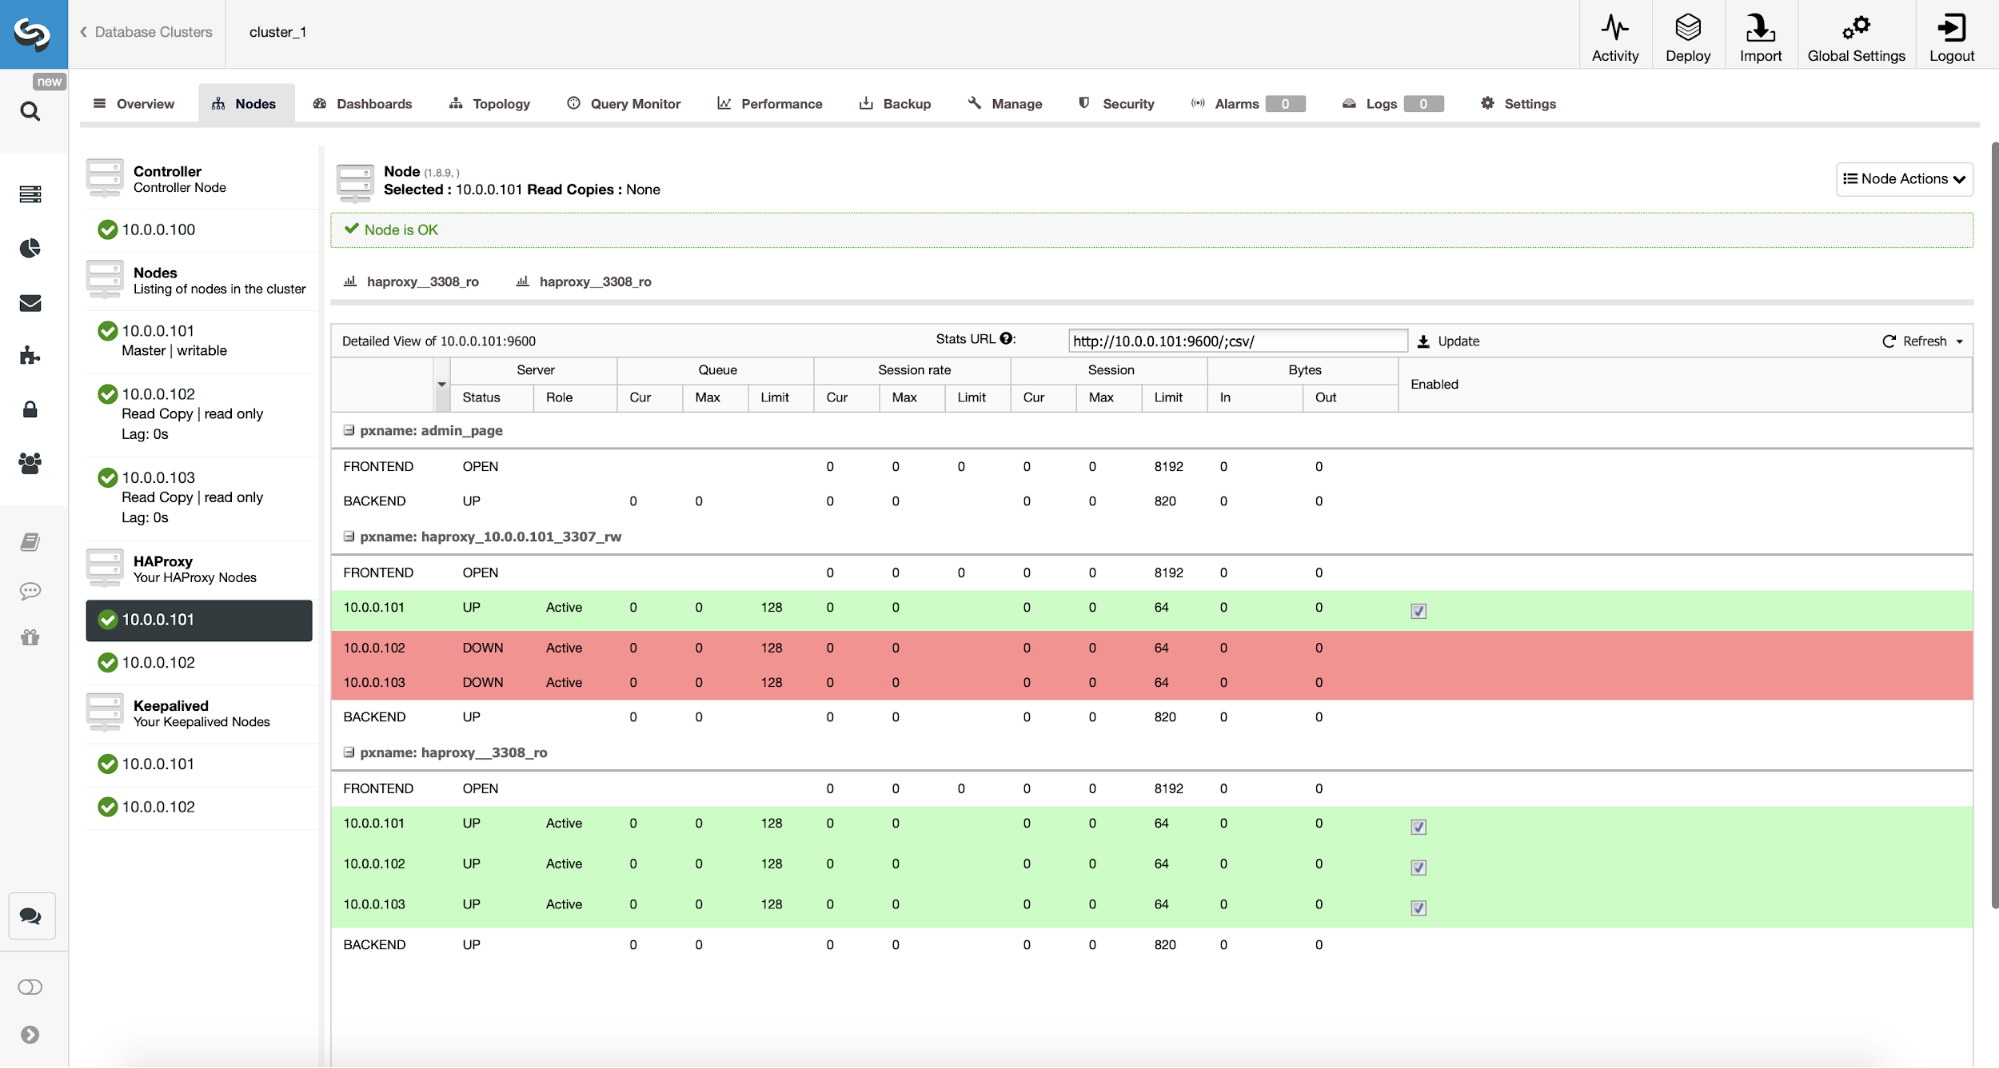
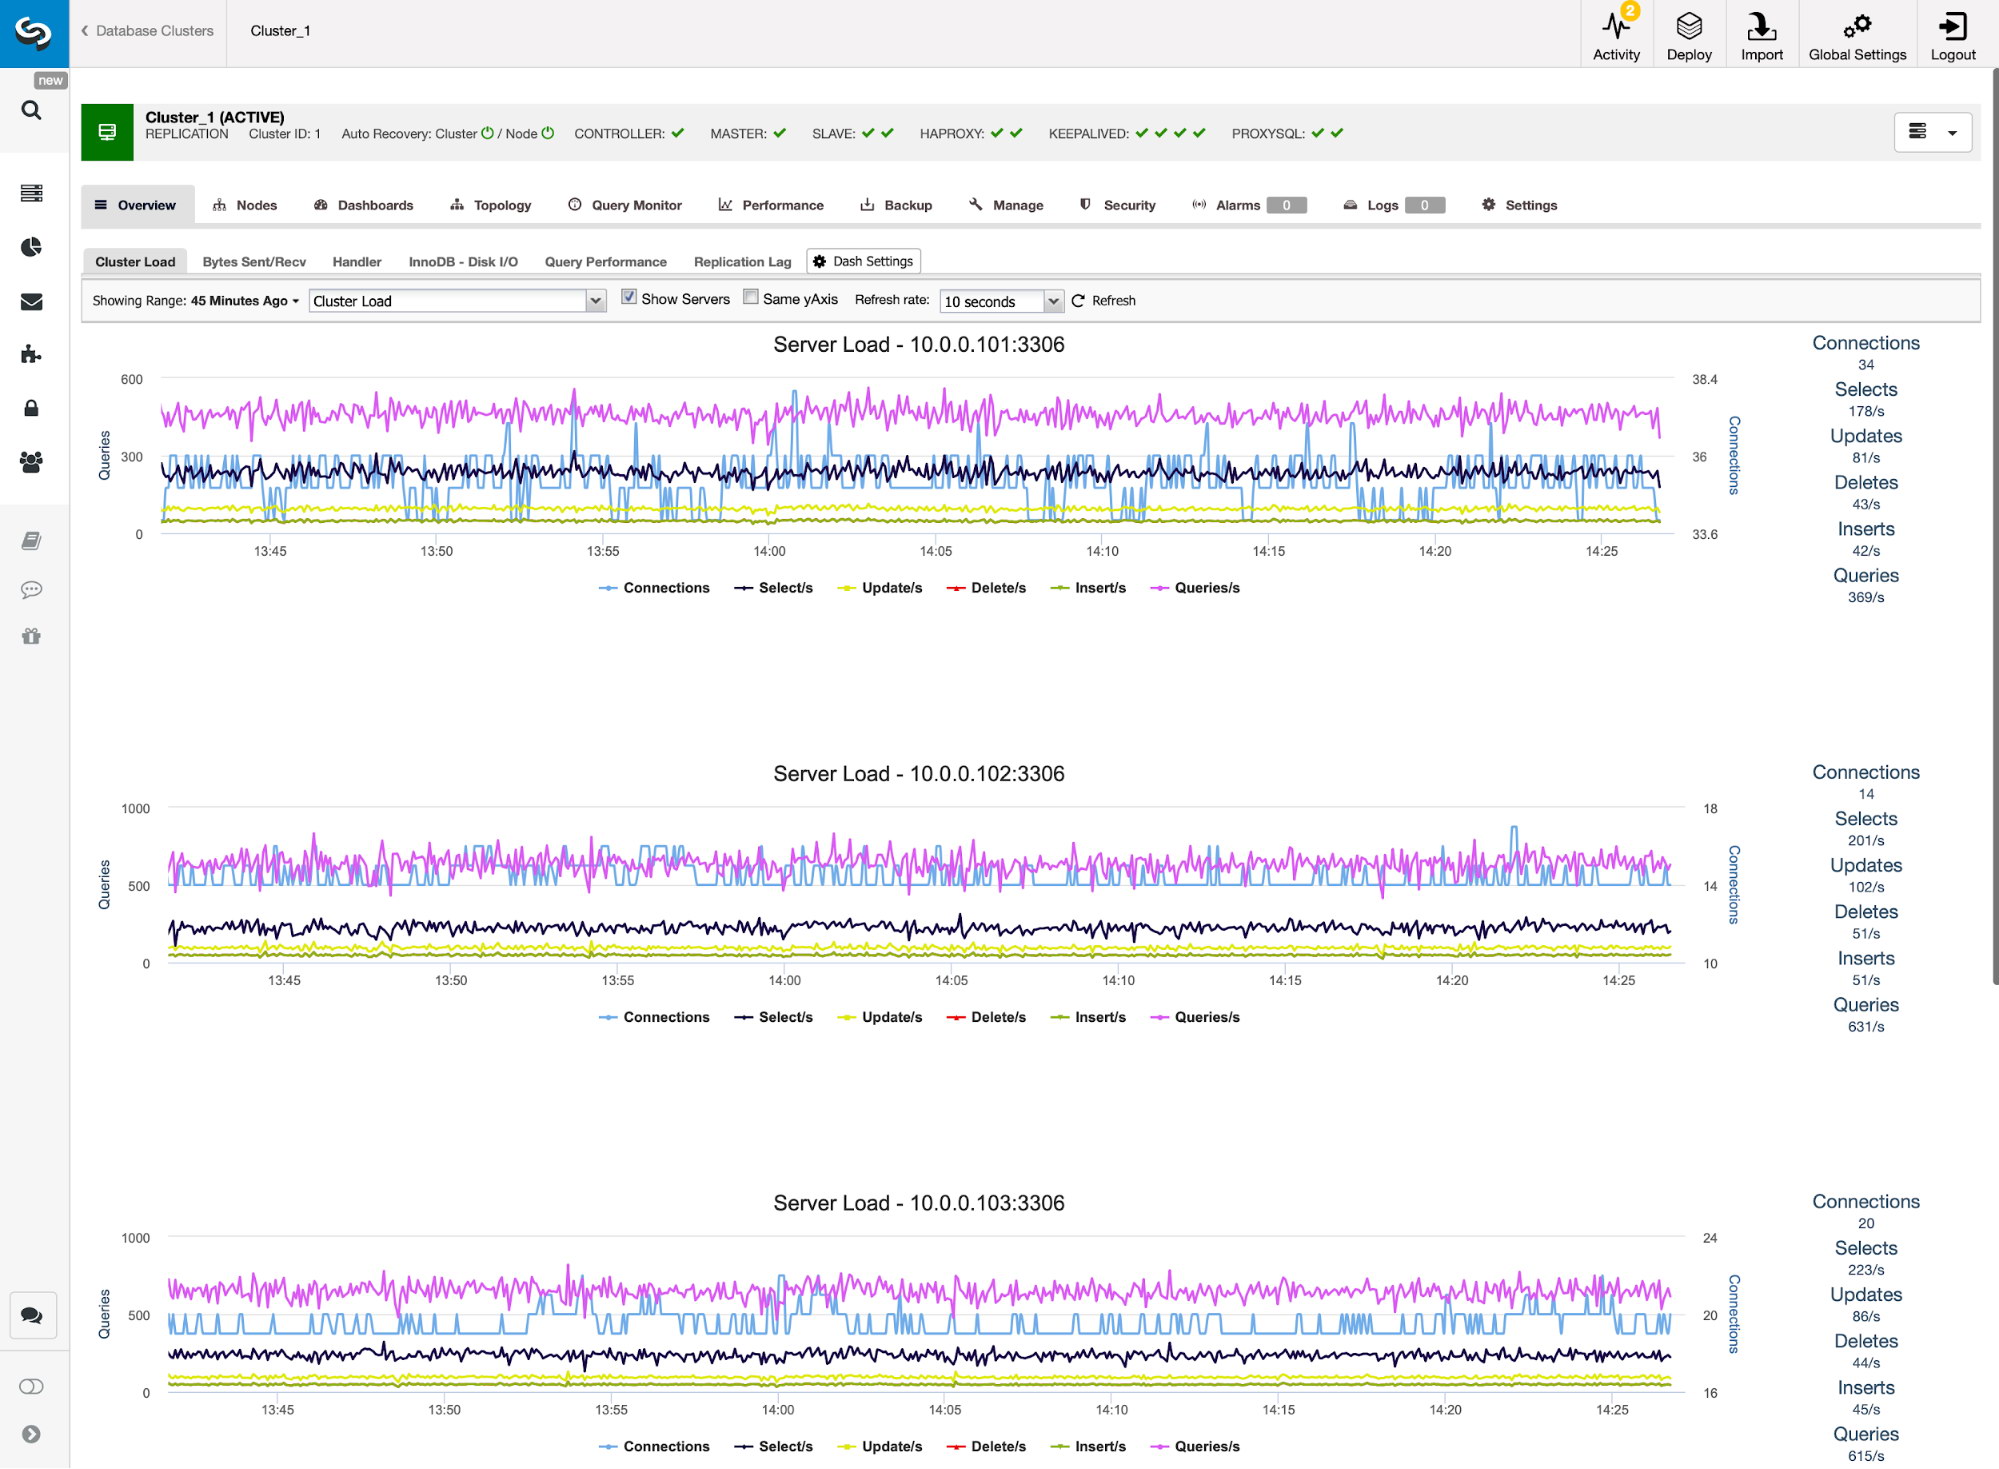
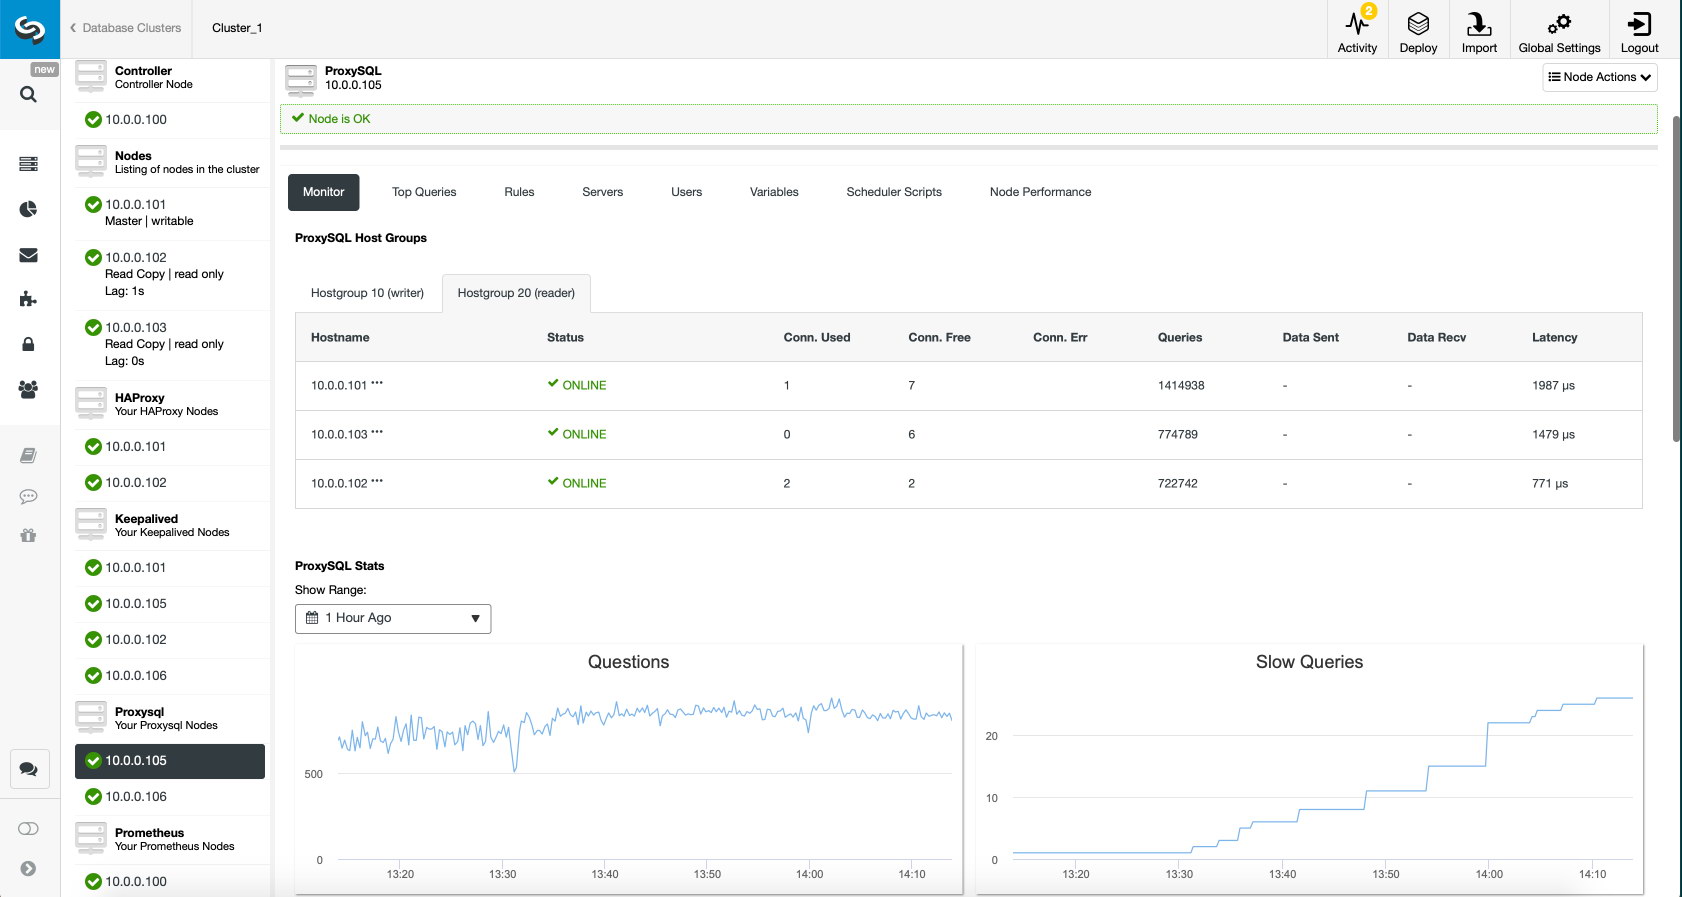
Now, how about we try to load some writes on the master? Any issues with connectivity or latency might generate slave lag, you will be able to spot this with ClusterControl. See the screenshot below:

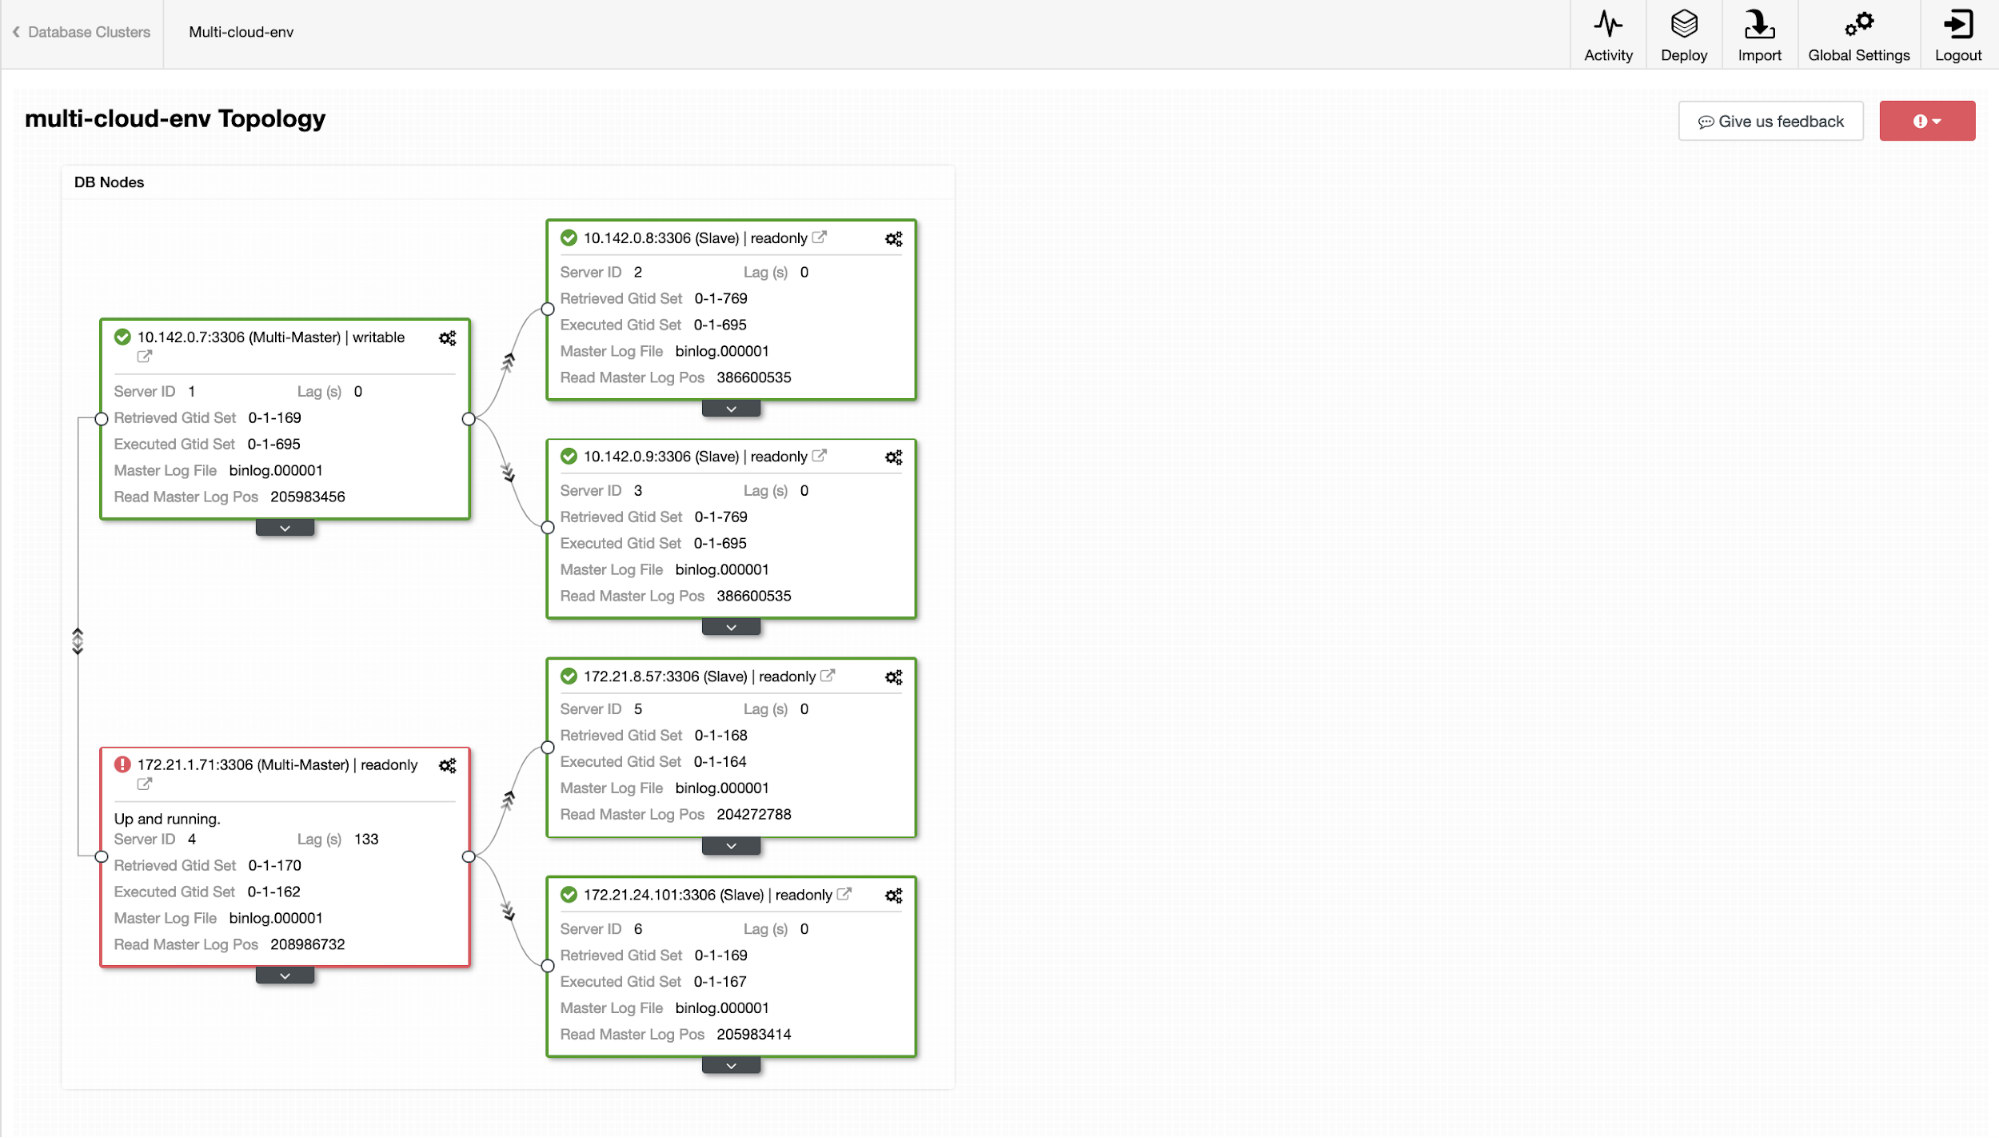
and as you see in the top-right corner of the screenshot, it turns red as it indicates issues were detected. Hence, an alarm was being sent while this issue has been detected. See below:

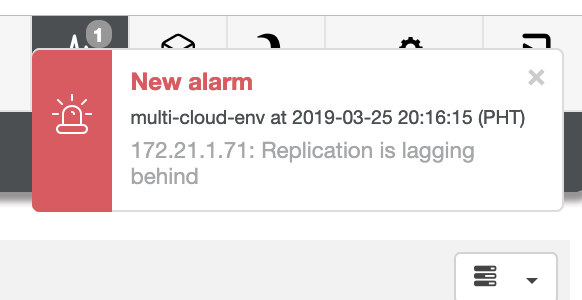
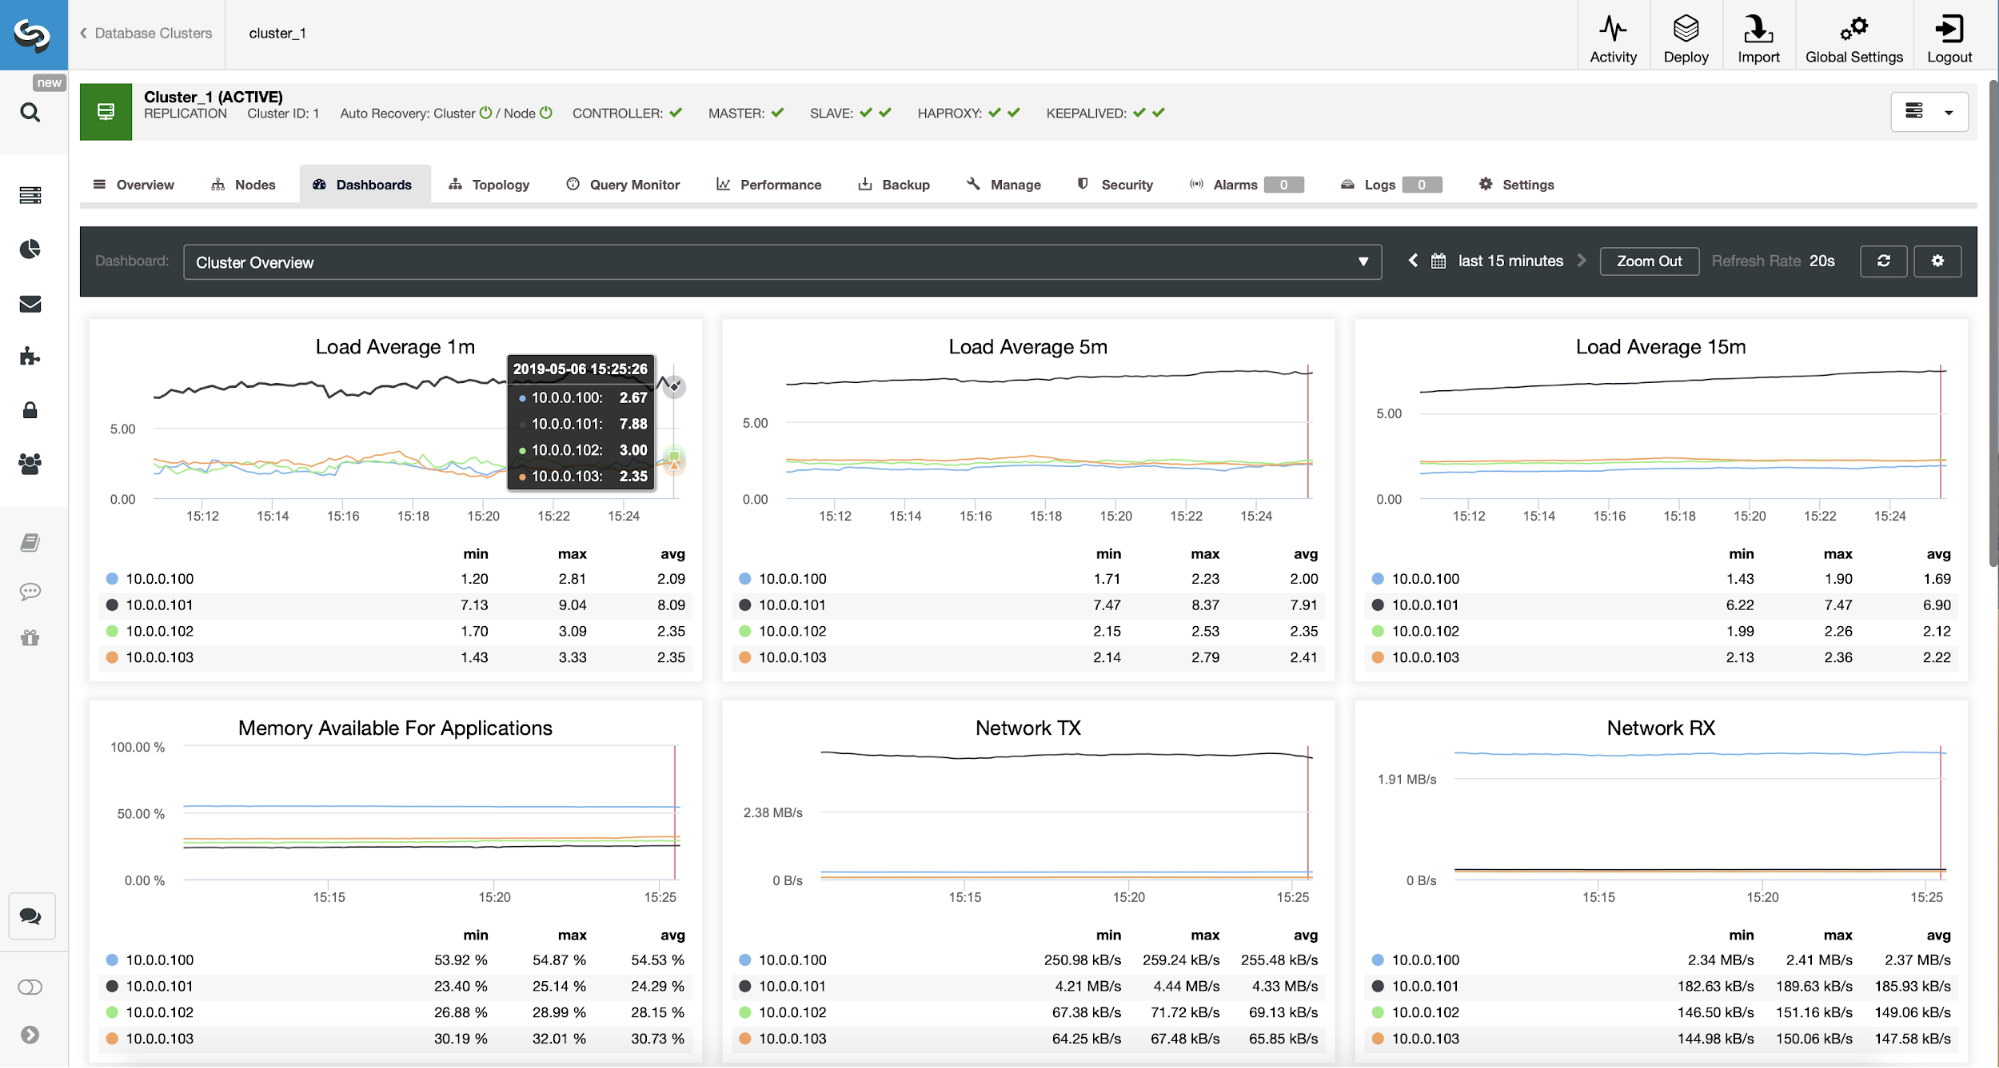
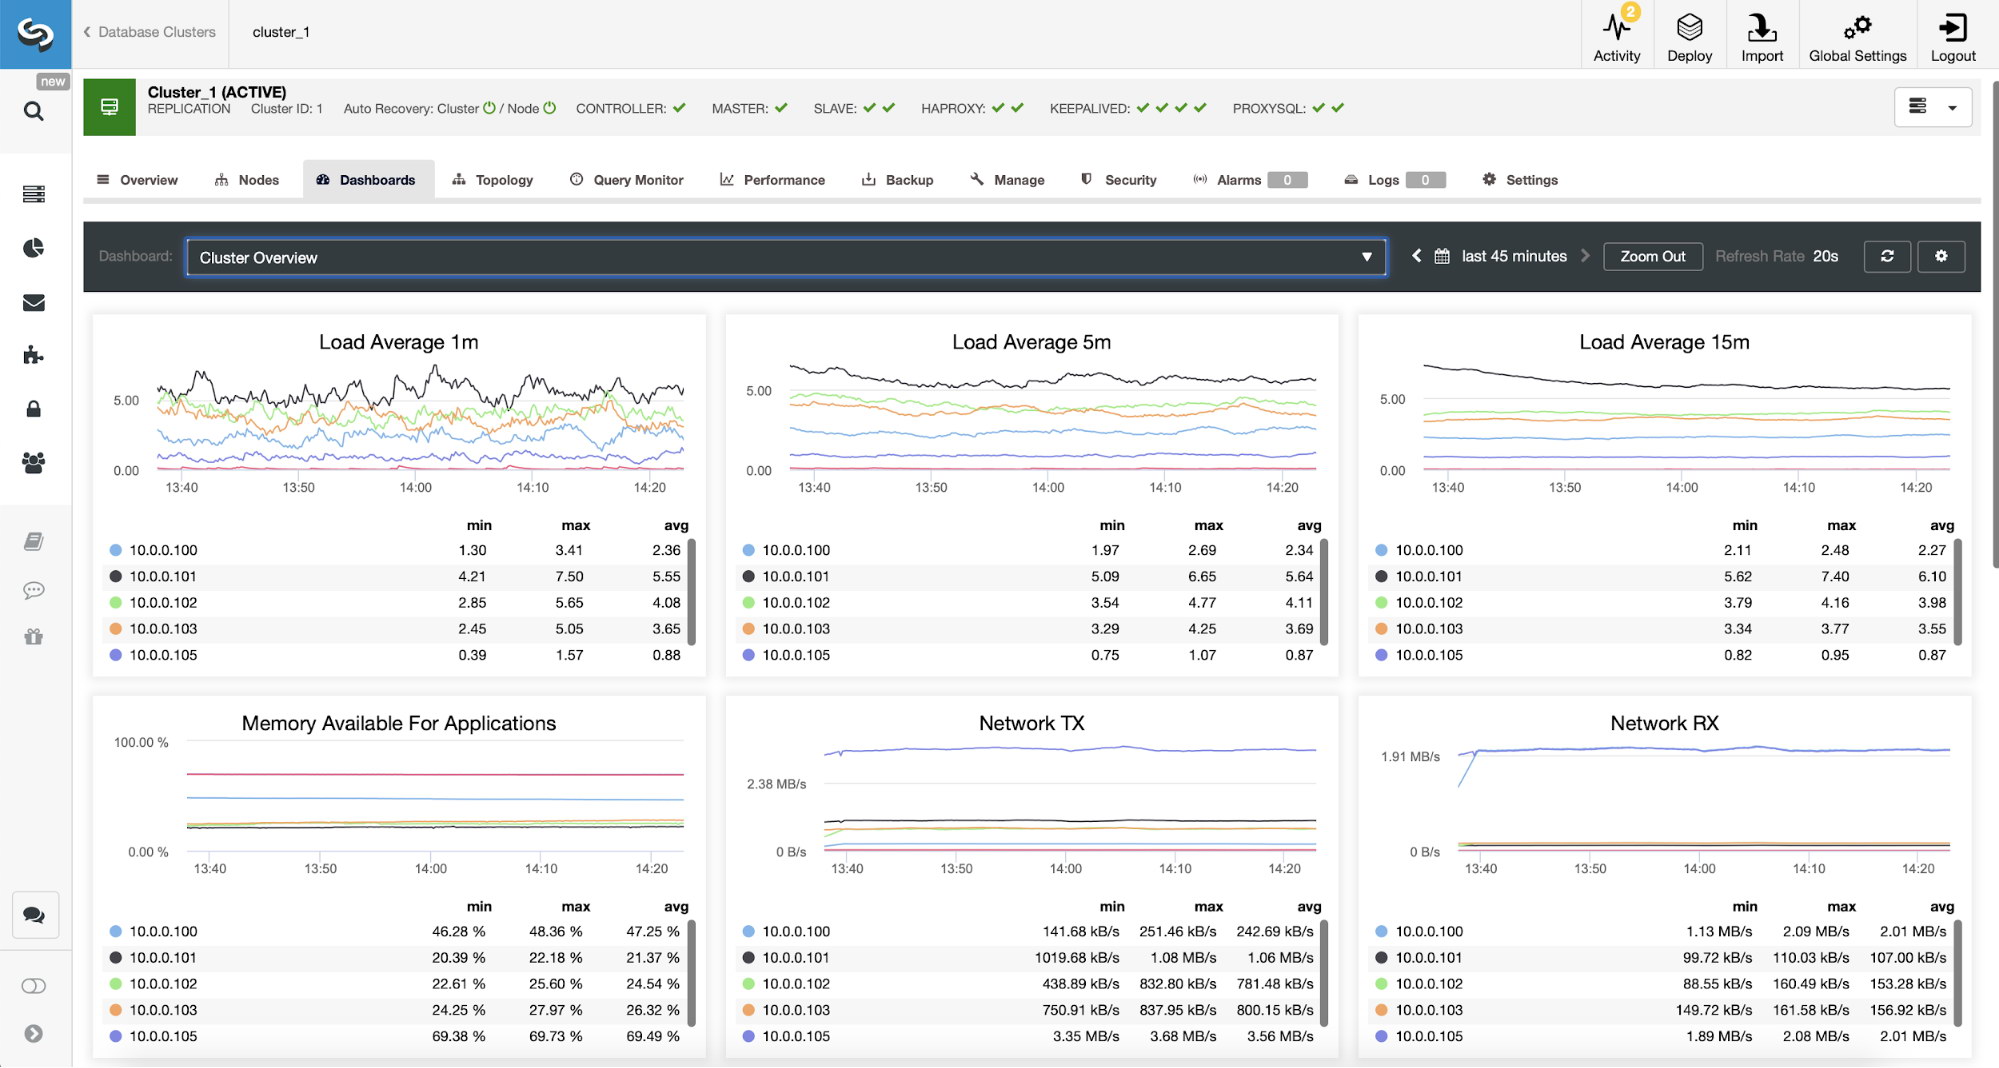
We need to dig into this. For fine-grained monitoring, we have enabled agents on the database instances. Let’s have a look at the Dashboard.

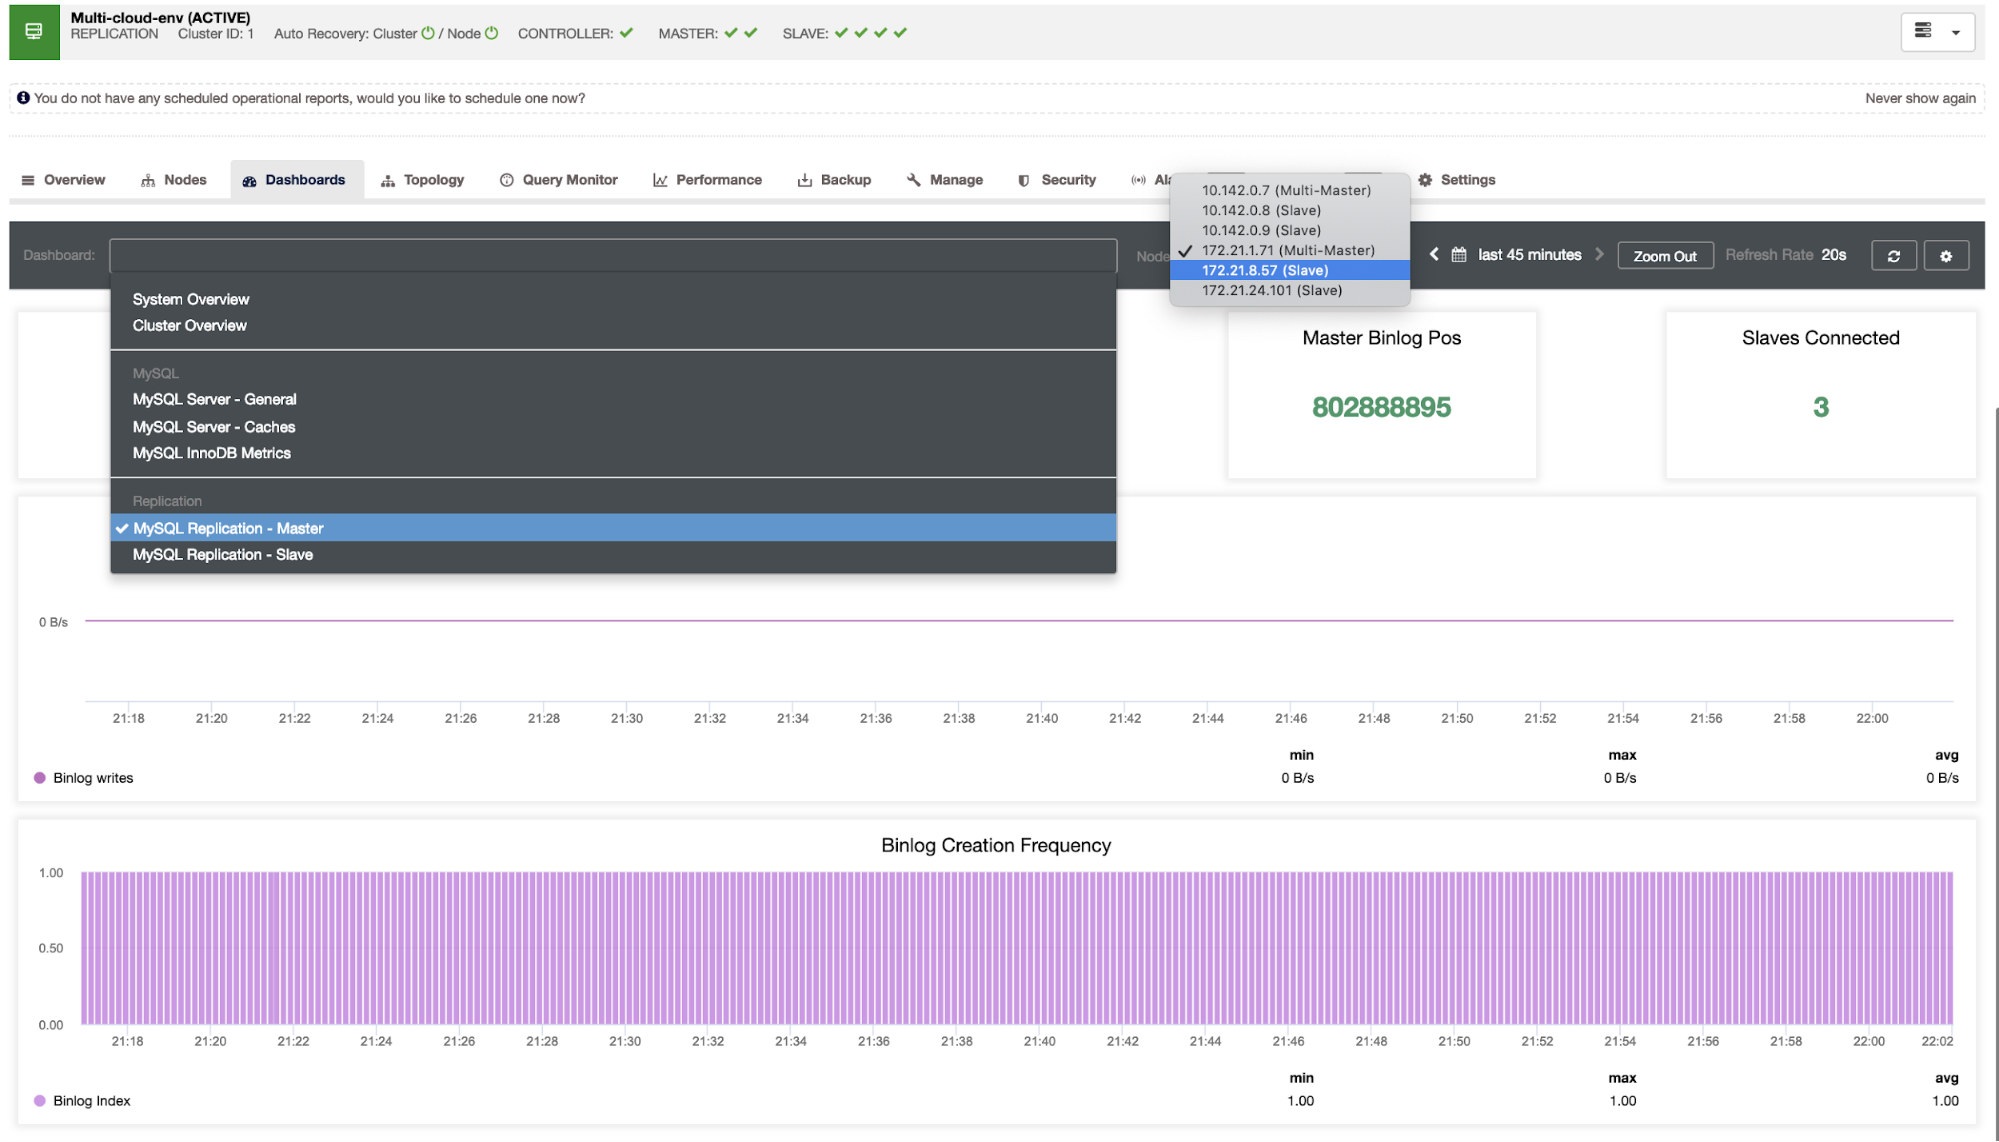
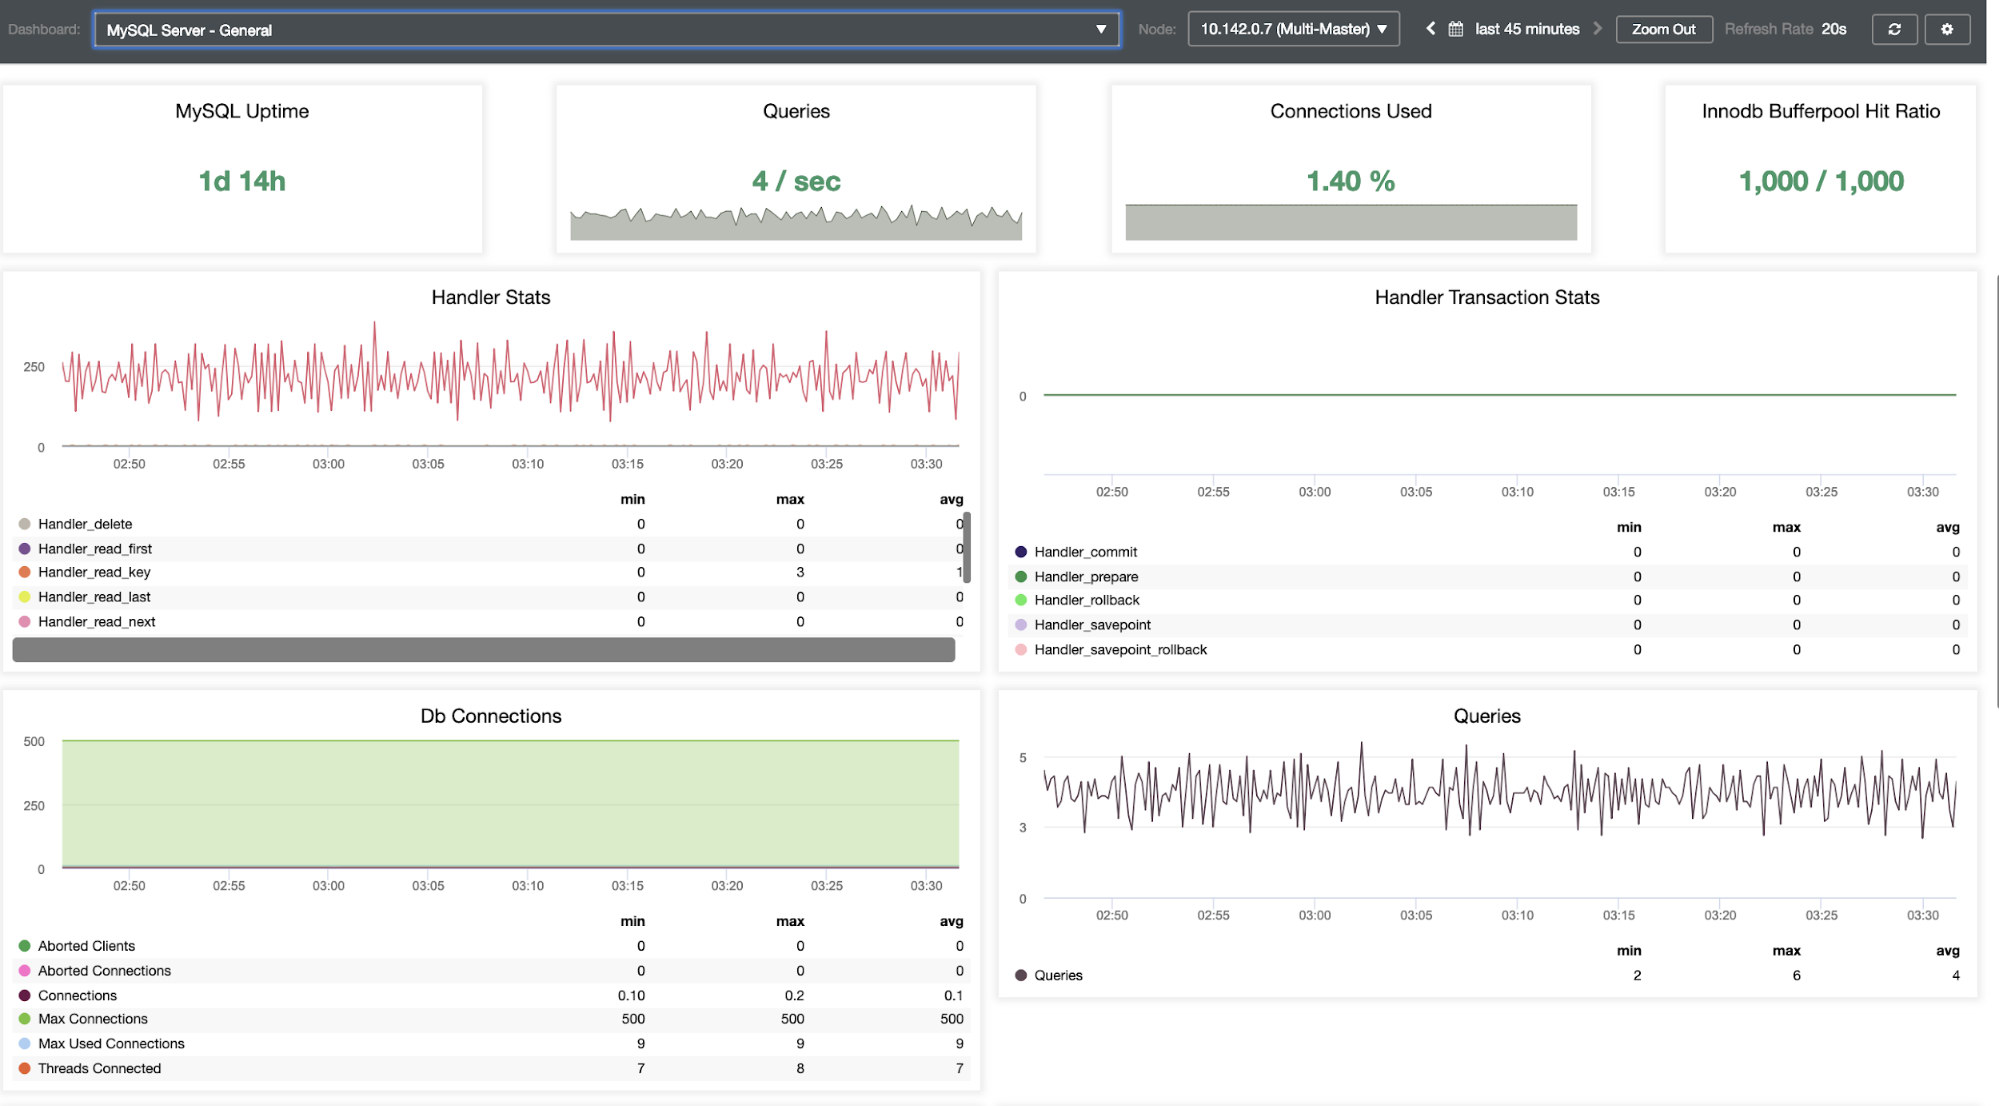
It offers a super smooth experience in terms of monitoring your nodes.

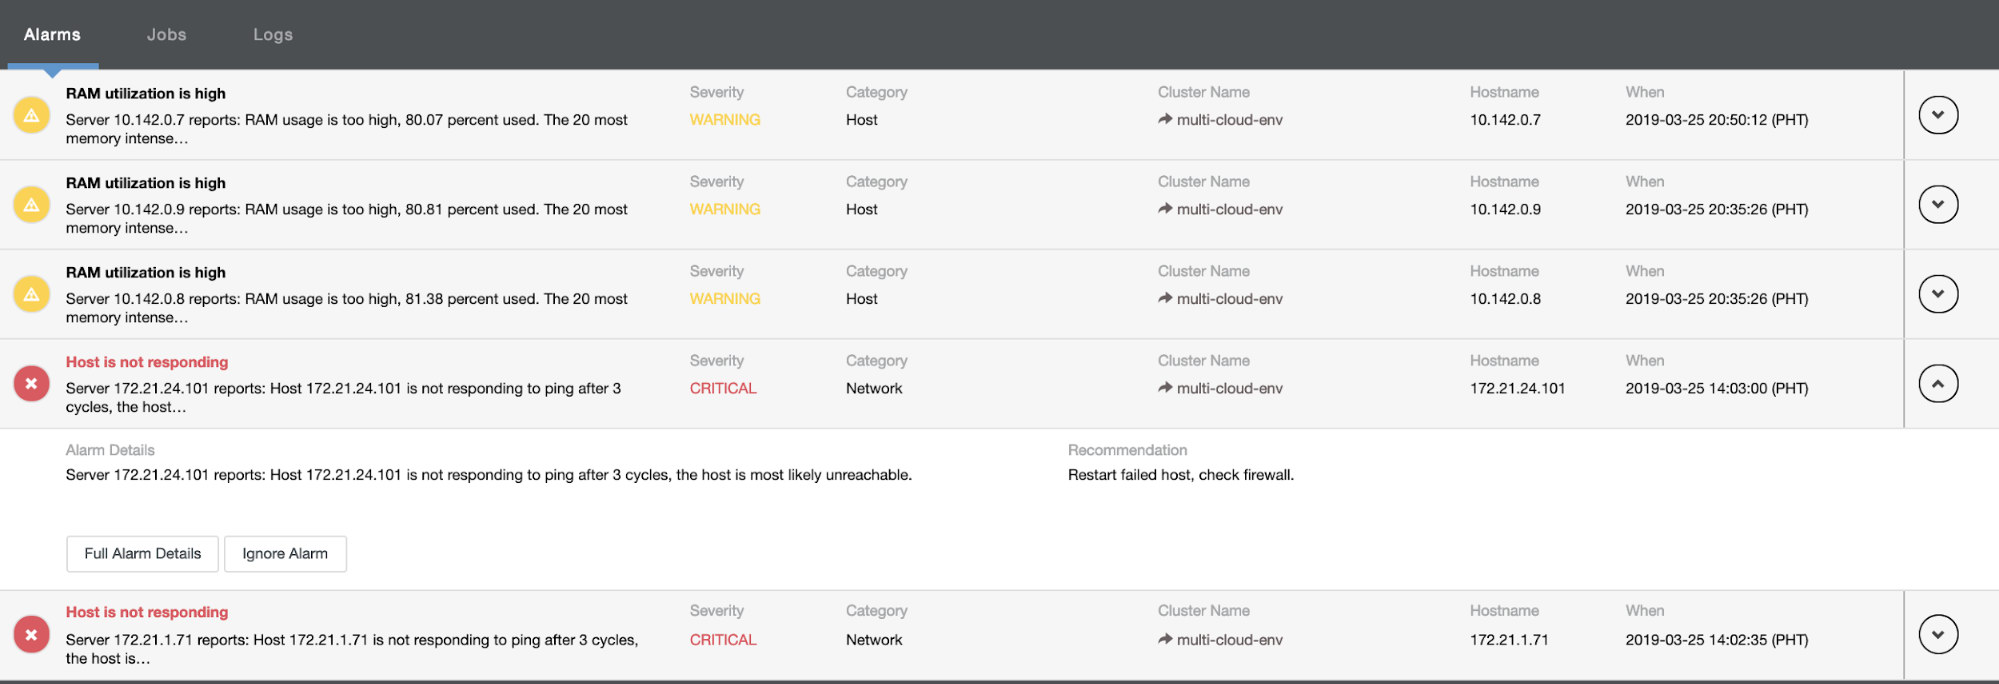
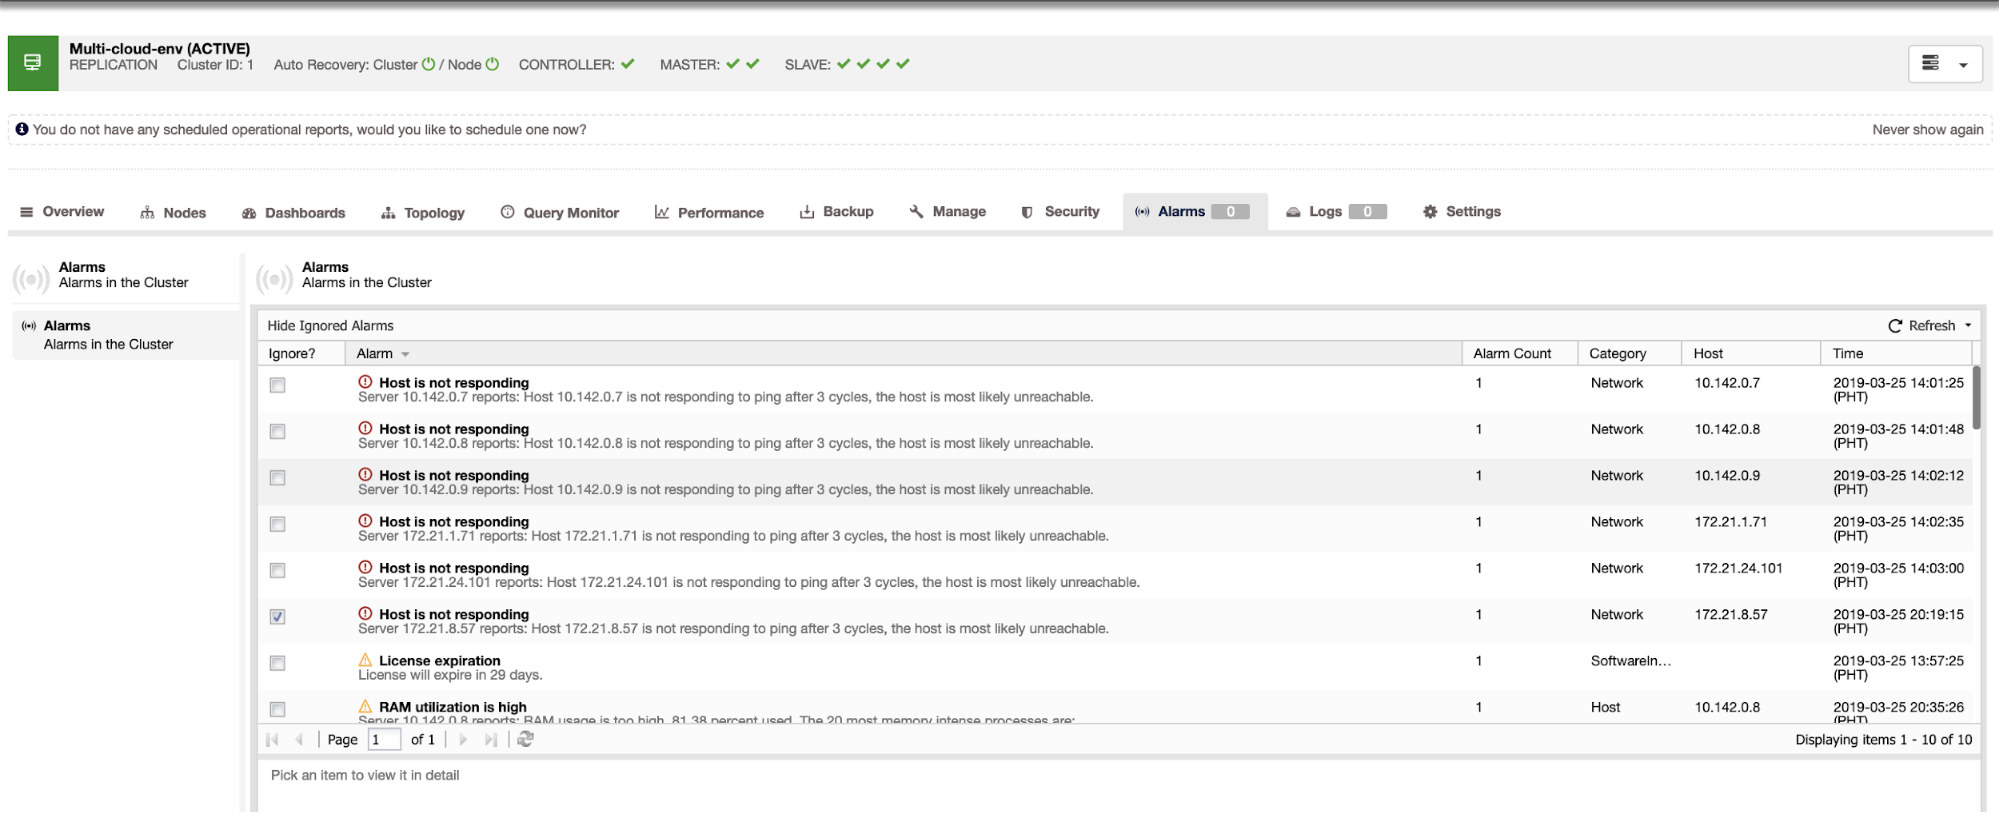
It tells us that utilization is high or host is not responding. Although this was just a ping response failure, you can ignore the alert to stop you from bombarding it. Hence, you can ‘un-ignore’ it if needed by going to Cluster -> Alarms in the Clustercontrol. See below:

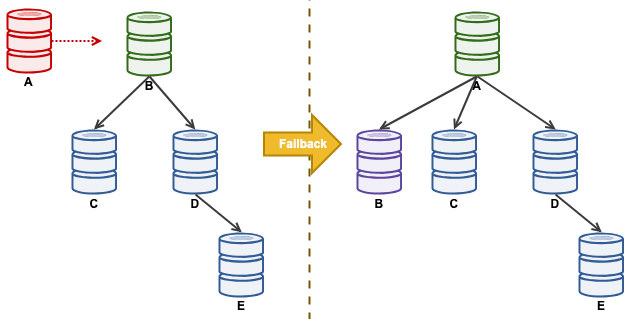
Managing Failures and Performing Failover

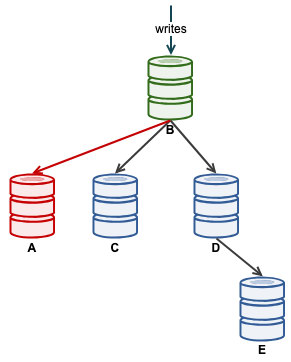
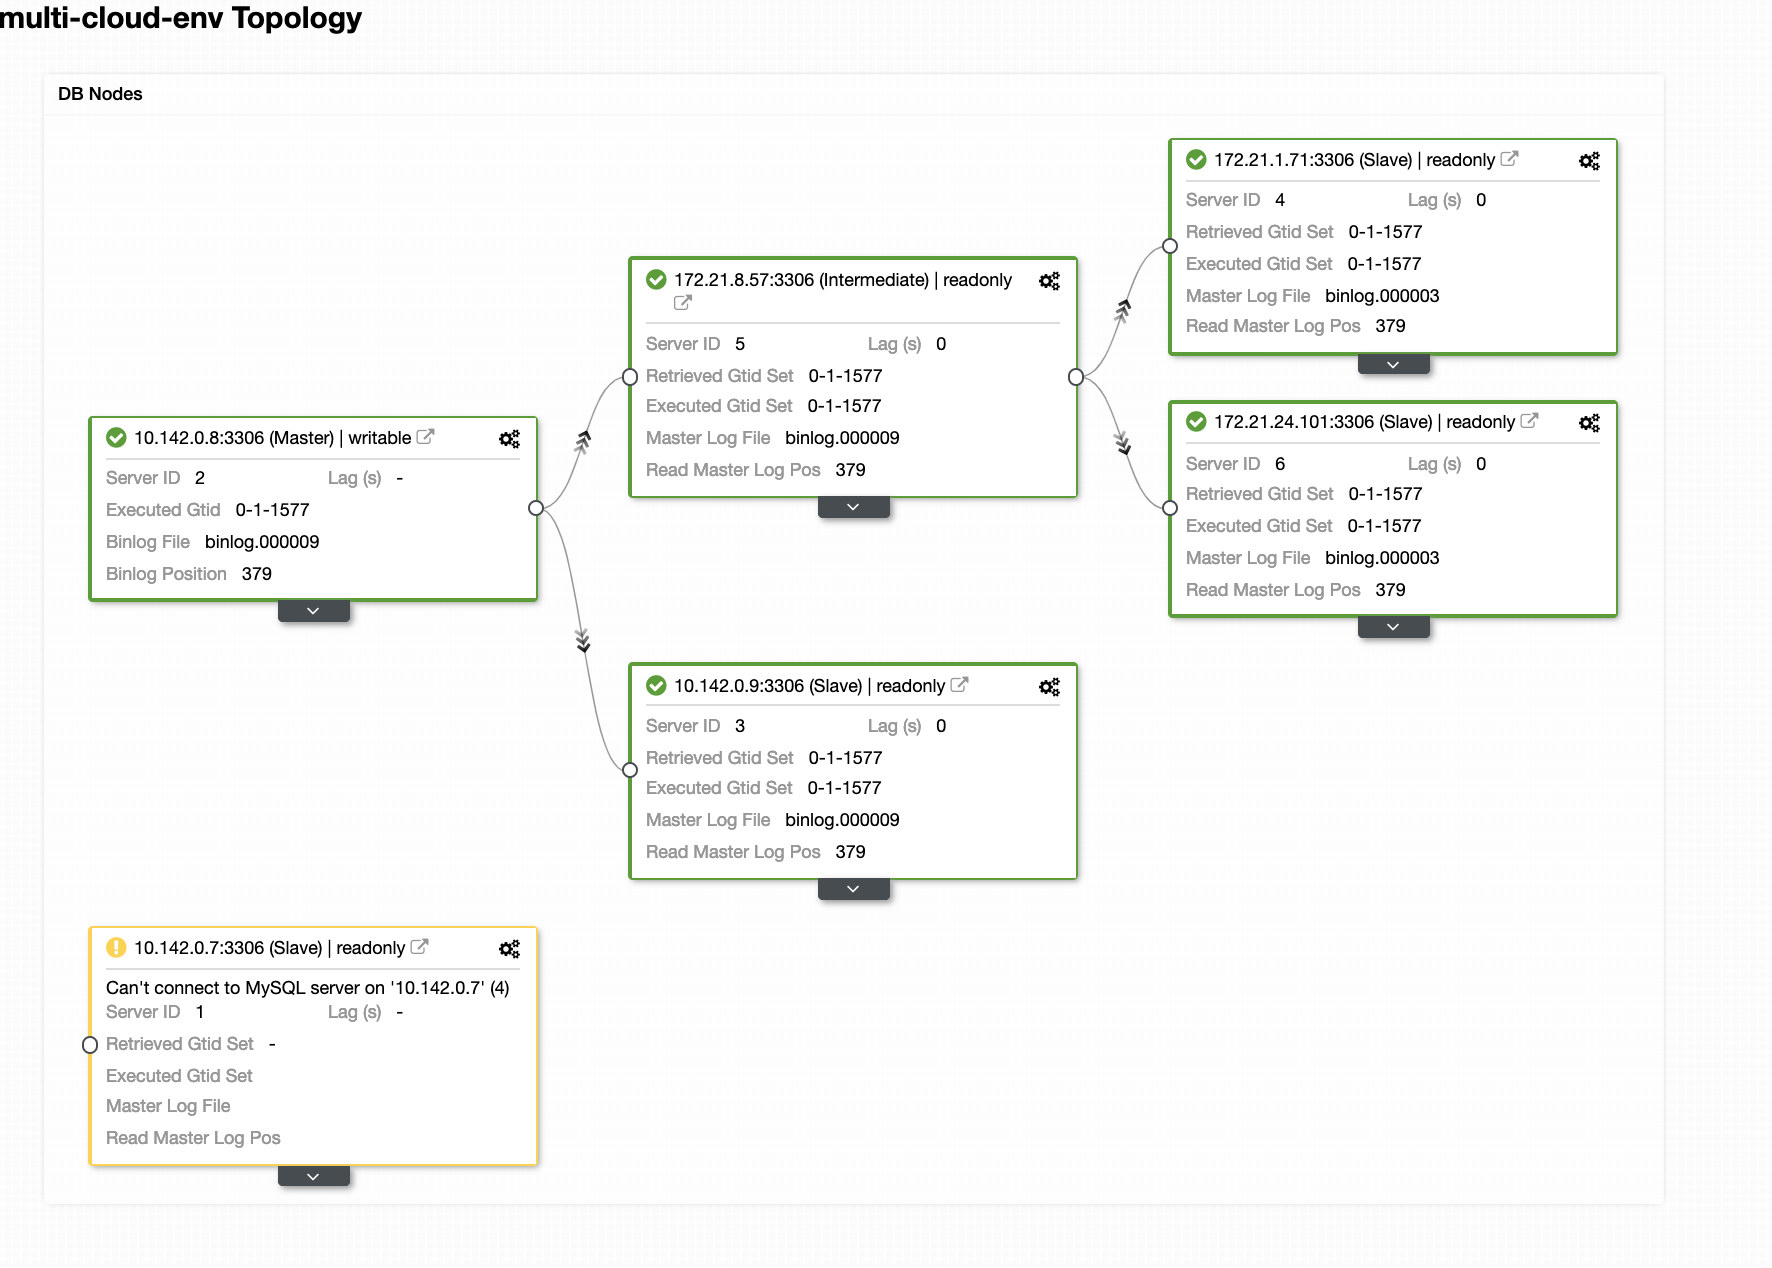
Let's say that the us-east1 master node failed, or requires a major overhaul because of system or hardware upgrade. Let's say this is the topology right now (see image below):

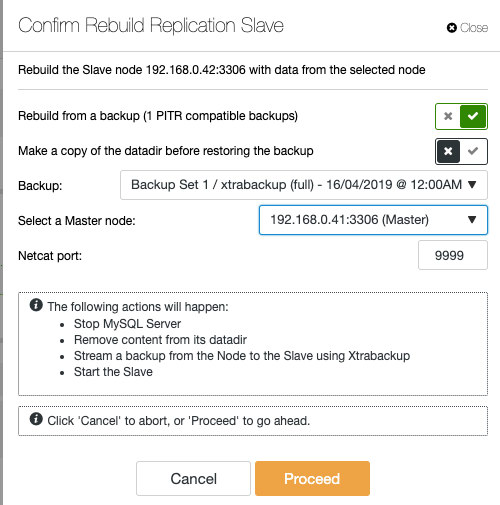
Let's try to shutdown host 10.142.0.7 which is the master under the region us-east1. See the screenshots below how ClusterControl reacts to this:

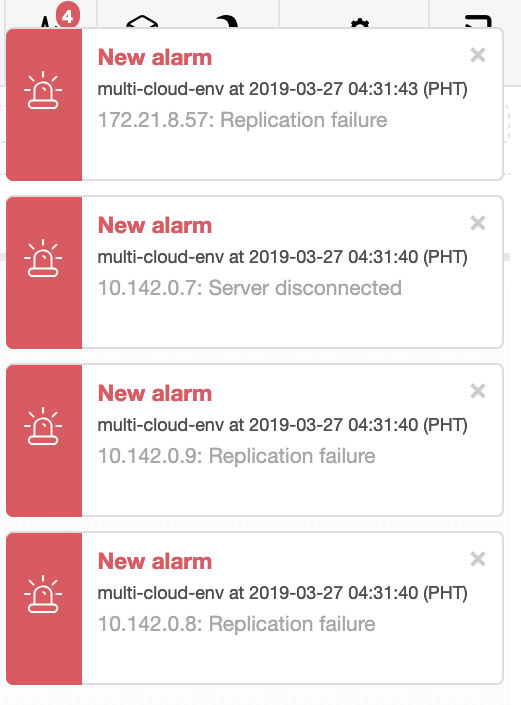
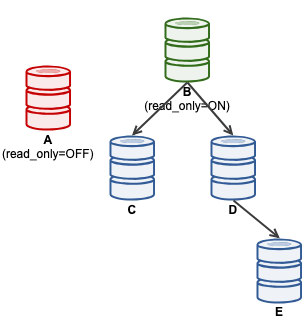
ClusterControl sends alarms once it detects anomalies in the cluster. Then it tries to do a failover to a new master by choosing the right candidate (see image below):

Then, it set aside the failed master which has been already taken out from the cluster (see image below):

This is just a glimpse of what ClusterControl can do, there are other great features such as backups, query monitoring, deploying/managing load balancers, and many more!

Conclusion

Managing your MySQL Replication setup in a multicloud can be tricky. Much care must be taken to secure our setup, so hopefully this blog gives an idea on how to define subnets and protect the database nodes. After security, there are a number of things to manage and this is where ClusterControl can be very helpful.

Try it now and do let us know how it goes. You can contact us here anytime.


MySQL Replication for High Availability - New Whitepaper

$
0
0

We’re happy to announce that our newly updated whitepaper MySQL Replication for High Availability is now available to download for free!

MySQL Replication enables data from one MySQL database server to be copied automatically to one or more MySQL database servers.

Unfortunately database downtime is often caused by sub-optimal HA setups, manual/prolonged failover times, and manual failover of applications. This technology is common knowledge for DBAs worldwide, but maintaining those high availability setups can sometimes be a challenge.

In this whitepaper, we discuss the latest features in MySQL 5.6, 5.7 & 8.0 as well as show you how to deploy and manage a replication setup. We also show how ClusterControl gives you all the tools you need to ensure your database infrastructure performs at peak proficiency.

Topics included in this whitepaper are …

  • What is MySQL Replication?
    • Replication Scheme
      • Asynchronous Replication
      • Semi-Synchronous Replication
    • Global Transaction Identifier (GTID)
      • Replication in MySQL 5.5 and Earlier
      • How GTID Solves the Problem
      • MariaDB GTID vs MySQL GTID
    • Multi-Threaded Slave
    • Crash-Safe Slave
    • Group Commit
  • Topology for MySQL Replication
    • Master with Slaves (Single Replication)
    • Master with Relay Slaves (Chain Replication)
    • Master with Active Master (Circular Replication)
    • Master with Backup Master (Multiple Replication)
    • Multiple Masters to Single Slave (Multi-Source Replication)
    • Galera with Replication Slave (Hybrid Replication)
  • Deploying a MySQL Replication Setup
    • General and SSH Settings
    • Define the MySQL Servers
    • Define Topology
    • Scaling Out
  • Connecting Application to the Replication Setup
    • Application Connector
    • Fabric-Aware Connector
    • Reverse Proxy/Load Balancer
      • MariaDB MaxScale
      • ProxySQL
      • HAProxy (Master-Slave Replication)
  • Failover with ClusterControl
    • Automatic Failover of Master
      • Whitelists and Blacklists
    • Manual Failover of Master
    • Failure of a Slave
    • Pre and Post-Failover Scripts
      • When Hooks Can Be Useful?
        • Service Discovery
        • Proxy Reconfiguration
        • Additional Logging
  • Operations - Managing Your MySQL Replication Setup
    • Show Replication Status
    • Start/Stop Replication
    • Promote Slave
    • Rebuild Replication Slave
    • Backup
    • Restore
    • Software Upgrade
    • Configuration Changes
    • Schema Changes
    • Topology Changes
  • Issues and Troubleshooting
    • Replication Status
    • Replication Lag
    • Data Drifting
    • Errant Transaction
    • Corrupted Slave
    • Recommendations

Download the whitepaper today!

ClusterControl
Single Console for Your Entire Database Infrastructure
Find out what else is new in ClusterControl

About ClusterControl

ClusterControl is the all-inclusive open source database management system for users with mixed environments that removes the need for multiple management tools. ClusterControl provides advanced deployment, management, monitoring, and scaling functionality to get your MySQL, MongoDB, and PostgreSQL databases up-and-running using proven methodologies that you can depend on to work. At the core of ClusterControl is it’s automation functionality that lets you automate many of the database tasks you have to perform regularly like deploying new databases, adding and scaling new nodes, running backups and upgrades, and more.

To learn more about ClusterControl click here.

About Severalnines

Severalnines provides automation and management software for database clusters. We help companies deploy their databases in any environment, and manage all operational aspects to achieve high-scale availability.

Severalnines' products are used by developers and administrators of all skills levels to provide the full 'deploy, manage, monitor, scale' database cycle, thus freeing them from the complexity and learning curves that are typically associated with highly available database clusters. Severalnines is often called the “anti-startup” as it is entirely self-funded by its founders. The company has enabled over 32,000 deployments to date via its popular product ClusterControl. Currently counting BT, Orange, Cisco, CNRS, Technicolor, AVG, Ping Identity and Paytrail as customers. Severalnines is a private company headquartered in Stockholm, Sweden with offices in Singapore, Japan and the United States. To see who is using Severalnines today visit, https://www.severalnines.com/company.

Database High Availability for Camunda BPM using MySQL or MariaDB Galera Cluster

$
0
0

Camunda BPM is an open-source workflow and decision automation platform. Camunda BPM ships with tools for creating workflow and decision models, operating deployed models in production, and allowing users to execute workflow tasks assigned to them.

By default, Camunda comes with an embedded database called H2, which works pretty decently within a Java environment with relatively small memory footprint. However, when it comes to scaling and high availability, there are other database backends that might be more appropriate.

In this blog post, we are going to deploy Camunda BPM 7.10 Community Edition on Linux, with a focus on achieving database high availability. Camunda supports major databases through JDBC drivers, namely Oracle, DB2, MySQL, MariaDB and PostgreSQL. This blog only focuses on MySQL and MariaDB Galera Cluster, with different implementation on each - one with ProxySQL as database load balancer, and the other using the JDBC driver to connect to multiple database instances. Take note that this article does not cover on high availability for the Camunda application itself.

Prerequisite

Camunda BPM runs on Java. In our CentOS 7 box, we have to install JDK and the best option is to use the one from Oracle, and skip using the OpenJDK packages provided in the repository. On the application server where Camunda should run, download the latest Java SE Development Kit (JDK) from Oracle by sending the acceptance cookie:

$ wget --header "Cookie: oraclelicense=accept-securebackup-cookie" https://download.oracle.com/otn-pub/java/jdk/12+33/312335d836a34c7c8bba9d963e26dc23/jdk-12_linux-x64_bin.rpm

Install it on the host:

$ yum localinstall jdk-12_linux-x64_bin.rpm

Verify with:

$ java --version
java 12 2019-03-19
Java(TM) SE Runtime Environment (build 12+33)
Java HotSpot(TM) 64-Bit Server VM (build 12+33, mixed mode, sharing)

Create a new directory and download Camunda Community for Apache Tomcat from the official download page:

$ mkdir ~/camunda
$ cd ~/camunda
$ wget --content-disposition 'https://camunda.org/release/camunda-bpm/tomcat/7.10/camunda-bpm-tomcat-7.10.0.tar.gz'

Extract it:

$ tar -xzf camunda-bpm-tomcat-7.10.0.tar.gz

There are a number of dependencies we have to configure before starting up Camunda web application. This depends on the chosen database platform like datastore configuration, database connector and CLASSPATH environment. The next sections explain the required steps for MySQL Galera (using Percona XtraDB Cluster) and MariaDB Galera Cluster.

Note that the configurations shown in this blog are based on Apache Tomcat environment. If you are using JBOSS or Wildfly, the datastore configuration will be a bit different. Refer to Camunda documentation for details.

MySQL Galera Cluster (with ProxySQL and Keepalived)

We will use ClusterControl to deploy MySQL-based Galera cluster with Percona XtraDB Cluster. There are some Galera-related limitations mentioned in the Camunda docs surrounding Galera multi-writer conflicts handling and InnoDB isolation level. In case you are affected by these, the safest way is to use the single-writer approach, which is achievable with ProxySQL hostgroup configuration. To provide no single-point of failure, we will deploy two ProxySQL instances and tie them with a virtual IP address by Keepalived.

The following diagram illustrates our final architecture:

First, deploy a three-node Percona XtraDB Cluster 5.7. Install ClusterControl, generate a SSH key and setup passwordless SSH from ClusterControl host to all nodes (including ProxySQL). On ClusterControl node, do:

$ whoami
root
$ ssh-keygen -t rsa
$ for i in 192.168.0.21 192.168.0.22 192.168.0.23 192.168.0.11 192.168.0.12; do ssh-copy-id $i; done

Before we deploy our cluster, we have to modify the MySQL configuration template file that ClusterControl will use when installing MySQL servers. The template file name is my57.cnf.galera and located under /usr/share/cmon/templates/ on the ClusterControl host. Make sure the following lines exist under [mysqld] section:

[mysqld]
...
transaction-isolation=READ-COMMITTED
wsrep_sync_wait=7
...

Save the file and we are good to go. The above are the requirements as stated in Camunda docs, especially on the supported transaction isolation for Galera. Variable wsrep_sync_wait is set to 7 to perform cluster-wide causality checks for READ (including SELECT, SHOW, and BEGIN or START TRANSACTION), UPDATE, DELETE, INSERT, and REPLACE statements, ensuring that the statement is executed on a fully synced node. Keep in mind that value other than 0 can result in increased latency.

Go to ClusterControl -> Deploy -> MySQL Galera and specify the following details (if not mentioned, use the default value):

  • SSH User: root
  • SSH Key Path: /root/.ssh/id_rsa
  • Cluster Name: Percona XtraDB Cluster 5.7
  • Vendor: Percona
  • Version: 5.7
  • Admin/Root Password: {specify a password}
  • Add Node: 192.168.0.21 (press Enter), 192.168.0.22 (press Enter), 192.168.0.23 (press Enter)

Make sure you got all the green ticks, indicating ClusterControl is able to connect to the node passwordlessly. Click "Deploy" to start the deployment.

Create the database, MySQL user and password on one of the database nodes:

mysql> CREATE DATABASE camunda;
mysql> CREATE USER camunda@'%' IDENTIFIED BY 'passw0rd';
mysql> GRANT ALL PRIVILEGES ON camunda.* TO camunda@'%';

Or from the ClusterControl interface, you can use Manage -> Schema and Users instead:

Once cluster is deployed, install ProxySQL by going to ClusterControl -> Manage -> Load Balancer -> ProxySQL -> Deploy ProxySQL and enter the following details:

  • Server Address: 192.168.0.11
  • Administration Password:
  • Monitor Password:
  • DB User: camunda
  • DB Password: passw0rd
  • Are you using implicit transactions?: Yes

Repeat the ProxySQL deployment step for the second ProxySQL instance, by changing the Server Address value to 192.168.0.12. The virtual IP address provided by Keepalived requires at least two ProxySQL instances deployed and running. Finally, deploy virtual IP address by going to ClusterControl -> Manage -> Load Balancer -> Keepalived and pick both ProxySQL nodes and specify the virtual IP address and network interface for the VIP to listen:

Our database backend is now complete. Next, import the SQL files into the Galera Cluster as the created MySQL user. On the application server, go to the "sql" directory and import them into one of the Galera nodes (we pick 192.168.0.21):

$ cd ~/camunda/sql/create
$ yum install mysql #install mysql client
$ mysql -ucamunda -p -h192.168.0.21 camunda < mysql_engine_7.10.0.sql
$ mysql -ucamunda -p -h192.168.0.21 camunda < mysql_identity_7.10.0.sql

Camunda does not provide MySQL connector for Java since its default database is H2. On the application server, download MySQL Connector/J from MySQL download page and copy the JAR file into Apache Tomcat bin directory:

$ wget https://dev.mysql.com/get/Downloads/Connector-J/mysql-connector-java-8.0.15.tar.gz
$ tar -xzf mysql-connector-java-8.0.15.tar.gz
$ cd mysql-connector-java-8.0.15
$ cp mysql-connector-java-8.0.15.jar ~/camunda/server/apache-tomcat-9.0.12/bin/

Then, set the CLASSPATH environment variable to include the database connector. Open setenv.sh using text editor:

$ vim ~/camunda/server/apache-tomcat-9.0.12/bin/setenv.sh

And add the following line:

export CLASSPATH=$CLASSPATH:$CATALINA_HOME/bin/mysql-connector-java-8.0.15.jar

Open ~/camunda/server/apache-tomcat-9.0.12/conf/server.xml and change the lines related to datastore. Specify the virtual IP address as the MySQL host in the connection string, with ProxySQL port 6033:

<Resource name="jdbc/ProcessEngine"
              ...
              driverClassName="com.mysql.jdbc.Driver" 
              defaultTransactionIsolation="READ_COMMITTED"
              url="jdbc:mysql://192.168.0.10:6033/camunda"
              username="camunda"  
              password="passw0rd"
              ...
/>

Finally, we can start the Camunda service by executing start-camunda.sh script:

$ cd ~/camunda
$ ./start-camunda.sh
starting camunda BPM platform on Tomcat Application Server
Using CATALINA_BASE:   ./server/apache-tomcat-9.0.12
Using CATALINA_HOME:   ./server/apache-tomcat-9.0.12
Using CATALINA_TMPDIR: ./server/apache-tomcat-9.0.12/temp
Using JRE_HOME:        /
Using CLASSPATH:       :./server/apache-tomcat-9.0.12/bin/mysql-connector-java-8.0.15.jar:./server/apache-tomcat-9.0.12/bin/bootstrap.jar:./server/apache-tomcat-9.0.12/bin/tomcat-juli.jar
Tomcat started.

Make sure the CLASSPATH shown in the output includes the path to the MySQL Connector/J JAR file. After the initialization completes, you can then access Camunda webapps on port 8080 at http://192.168.0.8:8080/camunda/. The default username is demo with password 'demo':

You can then see the digested capture queries from Nodes -> ProxySQL -> Top Queries, indicating the application is interacting correctly with the Galera Cluster:

There is no read-write splitting configured for ProxySQL. Camunda uses "SET autocommit=0" on every SQL statement to initialize transaction and the best way for ProxySQL to handle this by sending all the queries to the same backend servers of the target hostgroup. This is the safest method alongside better availability. However, all connections might end up reaching a single server, so there is no load balancing.

MariaDB Galera

MariaDB Connector/J is able to handle a variety of connection modes - failover, sequential, replication and aurora - but Camunda only supports failover and sequential. Taken from MariaDB Connector/J documentation:

ModeDescription
sequential
(available since 1.3.0)
This mode supports connection failover in a multi-master environment, such as MariaDB Galera Cluster. This mode does not support load-balancing reads on slaves. The connector will try to connect to hosts in the order in which they were declared in the connection URL, so the first available host is used for all queries. For example, let's say that the connection URL is the following:
jdbc:mariadb:sequential:host1,host2,host3/testdb
When the connector tries to connect, it will always try host1 first. If that host is not available, then it will try host2. etc. When a host fails, the connector will try to reconnect to hosts in the same order.
failover
(available since 1.2.0)
This mode supports connection failover in a multi-master environment, such as MariaDB Galera Cluster. This mode does not support load-balancing reads on slaves. The connector performs load-balancing for all queries by randomly picking a host from the connection URL for each connection, so queries will be load-balanced as a result of the connections getting randomly distributed across all hosts.

Using "failover" mode poses a higher potential risk of deadlock, since writes will be distributed to all backend servers almost equally. Single-writer approach is a safe way to run, which means using sequential mode should do the job pretty well. You also can skip the load-balancer tier in the architecture. Hence with MariaDB Java connector, we can deploy our architecture as simple as below:

Before we deploy our cluster, modify the MariaDB configuration template file that ClusterControl will use when installing MariaDB servers. The template file name is my.cnf.galera and located under /usr/share/cmon/templates/ on ClusterControl host. Make sure the following lines exist under [mysqld] section:

[mysqld]
...
transaction-isolation=READ-COMMITTED
wsrep_sync_wait=7
performance_schema = ON
...

Save the file and we are good to go. A bit of explanation, the above list are the requirements as stated in Camunda docs, especially on the supported transaction isolation for Galera. Variable wsrep_sync_wait is set to 7 to perform cluster-wide causality checks for READ (including SELECT, SHOW, and BEGIN or START TRANSACTION), UPDATE, DELETE, INSERT, and REPLACE statements, ensuring that the statement is executed on a fully synced node. Keep in mind that value other than 0 can result in increased latency. Enabling Performance Schema is optional for ClusterControl query monitoring feature.

Now we can start the cluster deployment process. Install ClusterControl, generate a SSH key and setup passwordless SSH from ClusterControl host to all Galera nodes. On ClusterControl node, do:

$ whoami
root
$ ssh-keygen -t rsa
$ for i in 192.168.0.41 192.168.0.42 192.168.0.43; do ssh-copy-id $i; done

Go to ClusterControl -> Deploy -> MySQL Galera and specify the following details (if not mentioned, use the default value):

  • SSH User: root
  • SSH Key Path: /root/.ssh/id_rsa
  • Cluster Name: MariaDB Galera 10.3
  • Vendor: MariaDB
  • Version: 10.3
  • Admin/Root Password: {specify a password}
  • Add Node: 192.168.0.41 (press Enter), 192.168.0.42 (press Enter), 192.168.0.43 (press Enter)

Make sure you got all the green ticks when adding nodes, indicating ClusterControl is able to connect to the node passwordlessly. Click "Deploy" to start the deployment.

Create the database, MariaDB user and password on one of the Galera nodes:

mysql> CREATE DATABASE camunda;
mysql> CREATE USER camunda@'%' IDENTIFIED BY 'passw0rd';
mysql> GRANT ALL PRIVILEGES ON camunda.* TO camunda@'%';

For ClusterControl user, you can use ClusterControl -> Manage -> Schema and Users instead:

Our database cluster deployment is now complete. Next, import the SQL files into the MariaDB cluster. On the application server, go to the "sql" directory and import them into one of the MariaDB nodes (we chose 192.168.0.41):

$ cd ~/camunda/sql/create
$ yum install mysql #install mariadb client
$ mysql -ucamunda -p -h192.168.0.41 camunda < mariadb_engine_7.10.0.sql
$ mysql -ucamunda -p -h192.168.0.41 camunda < mariadb_identity_7.10.0.sql

Camunda does not provide MariaDB connector for Java since its default database is H2. On the application server, download MariaDB Connector/J from MariaDB download page and copy the JAR file into Apache Tomcat bin directory:

$ wget https://downloads.mariadb.com/Connectors/java/connector-java-2.4.1/mariadb-java-client-2.4.1.jar
$ cp mariadb-java-client-2.4.1.jar ~/camunda/server/apache-tomcat-9.0.12/bin/

Then, set the CLASSPATH environment variable to include the database connector. Open setenv.sh via text editor:

$ vim ~/camunda/server/apache-tomcat-9.0.12/bin/setenv.sh

And add the following line:

export CLASSPATH=$CLASSPATH:$CATALINA_HOME/bin/mariadb-java-client-2.4.1.jar

Open ~/camunda/server/apache-tomcat-9.0.12/conf/server.xml and change the lines related to datastore. Use the sequential connection protocol and list out all the Galera nodes separated by comma in the connection string:

<Resource name="jdbc/ProcessEngine"
              ...
              driverClassName="org.mariadb.jdbc.Driver" 
              defaultTransactionIsolation="READ_COMMITTED"
              url="jdbc:mariadb:sequential://192.168.0.41:3306,192.168.0.42:3306,192.168.0.43:3306/camunda"
              username="camunda"  
              password="passw0rd"
              ...
/>

Finally, we can start the Camunda service by executing start-camunda.sh script:

$ cd ~/camunda
$ ./start-camunda.sh
starting camunda BPM platform on Tomcat Application Server
Using CATALINA_BASE:   ./server/apache-tomcat-9.0.12
Using CATALINA_HOME:   ./server/apache-tomcat-9.0.12
Using CATALINA_TMPDIR: ./server/apache-tomcat-9.0.12/temp
Using JRE_HOME:        /
Using CLASSPATH:       :./server/apache-tomcat-9.0.12/bin/mariadb-java-client-2.4.1.jar:./server/apache-tomcat-9.0.12/bin/bootstrap.jar:./server/apache-tomcat-9.0.12/bin/tomcat-juli.jar
Tomcat started.

Make sure the CLASSPATH shown in the output includes the path to the MariaDB Java client JAR file. After the initialization completes, you can then access Camunda webapps on port 8080 at http://192.168.0.8:8080/camunda/. The default username is demo with password 'demo':

You can see the digested capture queries from ClusterControl -> Query Monitor -> Top Queries, indicating the application is interacting correctly with the MariaDB Cluster:

With MariaDB Connector/J, we do not need load balancer tier which simplifies our overall architecture. The sequential connection mode should do the trick to avoid multi-writer deadlocks - which can happen in Galera. This setup provides high availability with each Camunda instance configured with JDBC to access the cluster of MySQL or MariaDB nodes. Galera takes care of synchronizing the data between the database instances in real time.

How to Deploy Open Source Databases - New Whitepaper

$
0
0

We’re happy to announce that our new whitepaper How to Deploy Open Source Databases is now available to download for free!

Choosing which DB engine to use between all the options we have today is not an easy task. An that is just the beginning. After deciding which engine to use, you need to learn about it and actually deploy it to play with it. We plan to help you on that second step, and show you how to install, configure and secure some of the most popular open source DB engines.

In this whitepaper we are going to explore the top open source databases and how to deploy each technology using proven methodologies that are battle-tested.

Topics included in this whitepaper are …

  • An Overview of Popular Open Source Databases
    • Percona
    • MariaDB
    • Oracle MySQL
    • MongoDB
    • PostgreSQL
  • How to Deploy Open Source Databases
    • Percona Server for MySQL
    • Oracle MySQL Community Server
      • Group Replication
    • MariaDB
      • MariaDB Cluster Configuration
    • Percona XtraDB Cluster
    • NDB Cluster
    • MongoDB
    • Percona Server for MongoDB
    • PostgreSQL
  • How to Deploy Open Source Databases by Using ClusterControl
    • Deploy
    • Scaling
    • Load Balancing
    • Management   

Download the whitepaper today!

ClusterControl
Single Console for Your Entire Database Infrastructure
Find out what else is new in ClusterControl

About ClusterControl

ClusterControl is the all-inclusive open source database management system for users with mixed environments that removes the need for multiple management tools. ClusterControl provides advanced deployment, management, monitoring, and scaling functionality to get your MySQL, MongoDB, and PostgreSQL databases up-and-running using proven methodologies that you can depend on to work. At the core of ClusterControl is it’s automation functionality that lets you automate many of the database tasks you have to perform regularly like deploying new databases, adding and scaling new nodes, running backups and upgrades, and more.

To learn more about ClusterControl click here.

About Severalnines

Severalnines provides automation and management software for database clusters. We help companies deploy their databases in any environment, and manage all operational aspects to achieve high-scale availability.

Severalnines' products are used by developers and administrators of all skill levels to provide the full 'deploy, manage, monitor, scale' database cycle, thus freeing them from the complexity and learning curves that are typically associated with highly available database clusters. Severalnines is often called the “anti-startup” as it is entirely self-funded by its founders. The company has enabled over 32,000 deployments to date via its popular product ClusterControl. Currently counting BT, Orange, Cisco, CNRS, Technicolor, AVG, Ping Identity and Paytrail as customers. Severalnines is a private company headquartered in Stockholm, Sweden with offices in Singapore, Japan and the United States. To see who is using Severalnines today visit, https://www.severalnines.com/company.

How to Perform a Failback Operation for MySQL Replication Setup

$
0
0

MySQL master-slave replication is pretty easy and straightforward to set up. This is the main reason why people choose this technology as the first step to achieve better database availability. However, it comes at the price of complexity in management and maintenance; it is up to the admin to maintain the data integrity, especially during failover, failback, maintenance, upgrade and so on.

There are many articles out there describing on how to perform failover operation for replication setup. We have also covered this topic in this blog post, Introduction to Failover for MySQL Replication - the 101 Blog. In this blog post, we are going to cover the post-disaster tasks when restoring to the original topology - performing failback operation.

Why Do We Need Failback?

The replication leader (master) is the most critical node in a replication setup. It requires good hardware specs to ensure it can process writes, generate replication events, process critical reads and so on in a stable way. When failover is required during disaster recovery or maintenance, it might not be uncommon to find us promoting a new leader with inferior hardware. This situation might be okay temporarily, however for a long run, the designated master must be brought back to lead the replication after it is deemed healthy.

Contrary to failover, failback operation usually happens in a controlled environment through switchover, it rarely happens in panic-mode. This gives the operation team some time to plan carefully and rehearse the exercise for a smooth transition. The main objective is simply to bring back the good old master to the latest state and restore the replication setup to its original topology. However, there are some cases where failback is critical, for example when the newly promoted master did not work as expected and affecting the overall database service.

How to Perform Failback Safely?

After failover happened, the old master would be out of the replication chain for maintenance or recovery. To perform the switchover, one must do the following:

  1. Provision the old master to the correct state, by making it the most up-to-date slave.
  2. Stop the application.
  3. Verify all slaves are caught up.
  4. Promote the old master as the new leader.
  5. Repoint all slaves to the new master.
  6. Start up the application by writing to the new master.

Consider the following replication setup:

"A" was a master until a disk-full event causing havoc to the replication chain. After a failover event, our replication topology was lead by B and replicates onto C till E. The failback exercise will bring back A as the leader and restore the original topology before the disaster. Take note that all nodes are running on MySQL 8.0.15 with GTID enabled. Different major version might use different commands and steps.

While this is what our architecture looks like now after failover (taken from ClusterControl's Topology view):

Node Provisioning

Before A can be a master, it must be brought up-to-date with the current database state. The best way to do this is to turn A as slave to the active master, B. Since all nodes are configured with log_slave_updates=ON (it means a slave also produces binary logs), we can actually pick other slaves like C and D as the source of truth for initial syncing. However, the closer to the active master, the better. Keep in mind of the additional load it might cause when taking the backup. This part takes the most of the failback hours. Depending on the node state and dataset size, syncing up the old master could take some time (it could be hours and days).

Once problem on "A" is resolved and ready to join the replication chain, the best first step is to attempt replicating from "B" (192.168.0.42) with CHANGE MASTER statement:

mysql> SET GLOBAL read_only = 1; /* enable read-only */
mysql> CHANGE MASTER TO MASTER_HOST = '192.168.0.42', MASTER_USER = 'rpl_user', MASTER_PASSWORD = 'p4ss', MASTER_AUTO_POSITION = 1; /* master information to connect */
mysql> START SLAVE; /* start replication */
mysql> SHOW SLAVE STATUS\G /* check replication status */

If replication works, you should see the following in the replication status:

             Slave_IO_Running: Yes
            Slave_SQL_Running: Yes

If the replication fails, look at the Last_IO_Error or Last_SQL_Error from slave status output. For example, if you see the following error:

Last_IO_Error: error connecting to master 'rpl_user@192.168.0.42:3306' - retry-time: 60  retries: 2

Then, we have to create the replication user on the current active master, B:

mysql> CREATE USER rpl_user@192.168.0.41 IDENTIFIED BY 'p4ss';
mysql> GRANT REPLICATION SLAVE ON *.* TO rpl_user@192.168.0.41;

Then, restart the slave on A to start replicating again:

mysql> STOP SLAVE;
mysql> START SLAVE;

Other common error you would see is this line:

Last_IO_Error: Got fatal error 1236 from master when reading data from binary log: ...

That probably means the slave is having problem reading the binary log file from the current master. In some occasions, the slave might be way behind whereby the required binary events to start the replication have been missing from the current master, or the binary on the master has been purged during the failover and so on. In this case, the best way is to perform a full sync by taking a full backup on B and restore it on A. On B, you can use either mysqldump or Percona Xtrabackup to take a full backup:

$ mysqldump -uroot -p --all-databases --single-transaction --triggers --routines > dump.sql # for mysqldump
$ xtrabackup --defaults-file=/etc/my.cnf --backup --parallel 1 --stream=xbstream --no-timestamp | gzip -6 - > backup-full-2019-04-16_071649.xbstream.gz # for xtrabackup

Transfer the backup file to A, reinitialize the existing MySQL installation for a proper cleanup and perform database restoration:

$ systemctl stop mysqld # if mysql is still running
$ rm -Rf /var/lib/mysql # wipe out old data
$ mysqld --initialize --user=mysql # initialize database
$ systemctl start mysqld # start mysql
$ grep -i 'temporary password' /var/log/mysql/mysqld.log # retrieve the temporary root password
$ mysql -uroot -p -e 'ALTER USER root@localhost IDENTIFIED BY "p455word"' # mandatory root password update
$ mysql -uroot -p < dump.sql # restore the backup using the new root password

Once restored, setup the replication link to the active master B (192.168.0.42) and enable read-only. On A, run the following statements:

mysql> SET GLOBAL read_only = 1; /* enable read-only */
mysql> CHANGE MASTER TO MASTER_HOST = '192.168.0.42', MASTER_USER = 'rpl_user', MASTER_PASSWORD = 'p4ss', MASTER_AUTO_POSITION = 1; /* master information to connect */
mysql> START SLAVE; /* start replication */
mysql> SHOW SLAVE STATUS\G /* check replication status */

For Percona Xtrabackup, please refer to the documentation page on how to restore to A. It involves a prerequisite step to prepare the backup first before replacing the MySQL data directory.

Once A has started replicating correctly, monitor the Seconds_Behind_Master in the slave status. This will give you an idea on how far the slave has left behind and how long you need to wait before it catches up. At this point, our architecture looks like this:

Once Seconds_Behind_Master falls back to 0, that's the moment when A has caught up as an up-to-date slave.

If you are using ClusterControl, you have the option to resync the node by restoring from an existing backup or create and stream the backup directly from the active master node:

Staging the slave with existing backup is the recommended way to do in order to build the slave, since it doesn't bring any impact the active master server when preparing the node.

Promote the Old Master

Before promoting A as the new master, the safest way is to stop all writes operation on B. If this is not possible, simply force B to operate in read-only mode:

mysql> SET GLOBAL read_only = 'ON';
mysql> SET GLOBAL super_read_only = 'ON';

Then, on A, run SHOW SLAVE STATUS and check the following replication status:

Read_Master_Log_Pos: 45889974
Exec_Master_Log_Pos: 45889974
Seconds_Behind_Master: 0
Slave_SQL_Running_State: Slave has read all relay log; waiting for more updates

The value of Read_Master_Log_Pos and Exec_Master_Log_Pos must be identical, while Seconds_Behind_Master is 0 and the state must be 'Slave has read all relay log'. Make sure that all slaves have processed any statements in their relay log, otherwise you will risk that the new queries will affect transactions from the relay log, triggering all sorts of problems (for example, an application may remove some rows which are accessed by transactions from relay log).

On A, stop the replication and use RESET SLAVE ALL statement to remove all replication-related configuration and disable read only:

mysql> STOP SLAVE;
mysql> RESET SLAVE ALL;
mysql> SET GLOBAL read_only = 'OFF';
mysql> SET GLOBAL super_read_only = 'OFF';

At this point, A is ready to accept writes (read_only=OFF), however slaves are not connected to it, as illustrated below:

For ClusterControl users, promoting A can be done by using "Promote Slave" feature under Node Actions. ClusterControl will automatically demote the active master B, promote slave A as master and repoint C and D to replicate from A. B will be put aside and user has to explicitly choose "Change Replication Master" to rejoin B replicating from A at a later stage.

ClusterControl
Single Console for Your Entire Database Infrastructure
Find out what else is new in ClusterControl

Slave Repointing

It's now safe to change the master on related slaves to replicate from A (192.168.0.41). On all slaves except E, configure the following:

mysql> STOP SLAVE;
mysql> CHANGE MASTER TO MASTER_HOST = '192.168.0.41', MASTER_USER = 'rpl_user', MASTER_PASSWORD = 'p4ss', MASTER_AUTO_POSITION = 1;
mysql> START SLAVE;

If you are a ClusterControl user, you may skip this step as repointing is being performed automatically when you decided to promote A previously.

We can then start our application to write on A. At this point, our architecture is looking something like this:

From ClusterControl topology view, we have restored our replication cluster to its original architecture which looks like this:

Take note that failback exercise is much less risky if compared to failover. It's important to schedule this exercise during off-peak hours to minimize the impact to your business.

Final Thoughts

Failover and failback operation must be performed carefully. The operation is fairly simple if you have a small number of nodes but for multiple nodes with complex replication chain, it could be a risky and error-prone exercise. We also showed how ClusterControl can be used to simplify complex operations by performing them through the UI, plus the topology view is visualized in real-time so you have the understanding on the replication topology you want to build.

Benchmarking Manual Database Deployments vs Automated Deployments

$
0
0

There are multiple ways of deploying a database. You can install it by hand, you can rely on the widely available infrastructure orchestration tools like Ansible, Chef, Puppet or Salt. Those tools are very popular and it is quite easy to find scripts, recipes, playbooks, you name it, which will help you automate the installation of a database cluster. There are also more specialized database automation platforms, like ClusterControl, which can also be used to automated deployment. What would be the best way of deploying your cluster? How much time you will actually need to deploy it?

First, let us clarify what we want to do. Let’s assume we will be deploying Percona XtraDB Cluster 5.7. It will consist of three nodes and for that we will use three Vagrant virtual machines running Ubuntu 16.04 (bento/ubuntu-16.04 image). We will attempt to deploy a cluster manually, then using Ansible and ClusterControl. Let’s see how the results will look like.

Manual Deployment

Repository Setup - 1 minute, 45 seconds.

First of all, we have to configure Percona repositories on all Ubuntu nodes. Quick google search, ssh into the virtual machines and running required commands takes 1m45s

We found the following page with instructions:
https://www.percona.com/doc/percona-repo-config/percona-release.html

and we executed steps described in “DEB-BASED GNU/LINUX DISTRIBUTIONS” section. We also ran apt update, to refresh apt’s cache.

Installing PXC Nodes - 2 minutes 45 seconds

This step basically consists of executing:

root@vagrant:~# apt install percona-xtradb-cluster-5.7

The rest is mostly dependent on your internet connection speed as packages are being downloaded. Your input will also be needed (you’ll be passing a password for the superuser) so it is not unattended installation. When everything is done, you will end up with three running Percona XtraDB Cluster nodes:

root     15488  0.0  0.2   4504  1788 ?        S    10:12   0:00 /bin/sh /usr/bin/mysqld_safe
mysql    15847  0.3 28.3 1339576 215084 ?      Sl   10:12   0:00  \_ /usr/sbin/mysqld --basedir=/usr --datadir=/var/lib/mysql --plugin-dir=/usr/lib/mysql/plugin --user=mysql --wsrep-provider=/usr/lib/galera3/libgalera_smm.so --log-error=/var/log/mysqld.log --pid-file=/var/run/mysqld/mysqld.pid --socket=/var/run/mysqld/mysqld.sock --wsrep_start_position=00000000-0000-0000-0000-000000000000:-1

Configuring PXC nodes - 3 minutes, 25 seconds

Here starts the tricky part. It is really hard to quantify experience and how much time one would need to actually understand what is needed to be done. What is good, google search “how to install percona xtrabdb cluster” points to Percona’s documentation, which describes how the process should look like. It still may take more or less time, depending on how familiar you are with the PXC and Galera in general. Worst case scenario you will not be aware of any additional required actions and you will connect to your PXC and start working with it, not realizing that, in fact, you have three nodes, each forming a cluster of its own.

Let’s assume we follow the recommendation from Percona and time just those steps to be executed. In short, we modified configuration files as per instructions on the Percona website, we also attempted to bootstrap the first node:

root@vagrant:~# /etc/init.d/mysql bootstrap-pxc
mysqld: [ERROR] Found option without preceding group in config file /etc/mysql/my.cnf at line 10!
mysqld: [ERROR] Fatal error in defaults handling. Program aborted!
mysqld: [ERROR] Found option without preceding group in config file /etc/mysql/my.cnf at line 10!
mysqld: [ERROR] Fatal error in defaults handling. Program aborted!
mysqld: [ERROR] Found option without preceding group in config file /etc/mysql/my.cnf at line 10!
mysqld: [ERROR] Fatal error in defaults handling. Program aborted!
mysqld: [ERROR] Found option without preceding group in config file /etc/mysql/my.cnf at line 10!
mysqld: [ERROR] Fatal error in defaults handling. Program aborted!
 * Bootstrapping Percona XtraDB Cluster database server mysqld                                                                                                                                                                                                                     ^C

This did not look correct. Unfortunately, instructions weren’t crystal clear. Again, if you don’t know what is going on, you will spend more time trying to understand what happened. Luckily, stackoverflow.com comes very helpful (although not the first response on the list that we got) and you should realise that you miss [mysqld] section header in your /etc/mysql/my.cnf file. Adding this on all nodes and repeating the bootstrap process solved the issue. In total we spent 3 minutes and 25 seconds (not including googling for the error as we noticed immediately what was the problem).

Configuring for SST, Bringing Other Nodes Into the Cluster - Starting From 8 Minutes to Infinity

The instructions on Percona web site are quite clear. Once you have one node up and running, just start remaining nodes and you will be fine. We tried that and we were unable to see more nodes joining the cluster. This is where it is virtually impossible to tell how long it will take to diagnose the issue. It took us 6-7 minutes but to be able to do it quickly you have to:

  1. Be familiar with how PXC configuration is structured:
    root@vagrant:~# tree  /etc/mysql/
    /etc/mysql/
    ├── conf.d
    │   ├── mysql.cnf
    │   └── mysqldump.cnf
    ├── my.cnf -> /etc/alternatives/my.cnf
    ├── my.cnf.fallback
    ├── my.cnf.old
    ├── percona-xtradb-cluster.cnf
    └── percona-xtradb-cluster.conf.d
        ├── client.cnf
        ├── mysqld.cnf
        ├── mysqld_safe.cnf
        └── wsrep.cnf
  2. Know how the !include and !includedir directives work in MySQL configuration files
  3. Know how MySQL handles the same variables included in multiple files
  4. Know what to look for and be aware of configurations that would result in node bootstrapping itself to form a cluster on its own

The problem was related to the fact that instructions did not mention any file except for /etc/mysql/my.cnf where, in fact, we should have been modifying /etc/mysql/percona-xtradb-cluster.conf.d/wsrep.cnf. That file contained empty variable:

wsrep_cluster_address=gcomm://

and such configuration forces node to bootstrap as it does not have information about other nodes to join to. We set that variable in /etc/mysql/my.cnf but later wsrep.cnf file was included, overwriting our setup.

This issue might be a serious blocker for people who are not really familiar with how MySQL and Galera works, resulting even in hours if not more of debugging.

Total Installation Time - 16 minutes (If You Are MySQL DBA Like I Am)

We managed to install Percona XtraDB Cluster in 16 minutes. You have to keep in mind a couple of things - we did not tune the configuration. This is something which will require more time and knowledge. PXC node comes with some simple configuration, related mostly to binary logging and Galera writeset replication. There is no InnoDB tuning. If you are not familiar with MySQL internals, this is hours if not days of reading and familiarizing yourself with internal mechanisms. Another important thing is that this is a process you would have to re-apply for every cluster you deploy. Finally, we managed to identify the issue and solve it very fast due to our experience with Percona XtraDB Cluster and MySQL in general. Casual user will most likely spend significantly more time trying to understand what is going on and why.

Ansible Playbook

Now, on to automation with Ansible. Let’s try to find and use an ansible playbook, which we could reuse for all further deployments. Let’s see how long will it take to do that.

Configuring SSH Connectivity - 1 minute

Ansible requires SSH connectivity across all the nodes to connect and configure them. We generated a SSH key and manually distributed it across the nodes.

Finding Ansible Playbook - 2 minutes 15 seconds

The main issue here is that there are so many playbooks available out there that it is impossible to decide what’s best. As such, we decided to go with top 3 Google results and try to pick one. We decided on https://github.com/cdelgehier/ansible-role-XtraDB-Cluster as it seems to be more configurable than the remaining ones.

Cloning Repository and Installing Ansible - 30 seconds

This is quick, all we needed was to

apt install ansible git
git clone https://github.com/cdelgehier/ansible-role-XtraDB-Cluster.git

Preparing Inventory File - 1 minute 10 seconds

This step was also very simple, we created an inventory file using example from documentation. We just substituted IP addresses of the nodes to what we have configured in our environment.

Preparing a Playbook - 1 minute 45 seconds

We decided to use the most extensive example from the documentation, which includes also a bit of the configuration tuning. We prepared a correct structure for the Ansible (there was no such information in the documentation):

/root/pxcansible/
├── inventory
├── pxcplay.yml
└── roles
    └── ansible-role-XtraDB-Cluster

Then we ran it but immediately we got an error:

root@vagrant:~/pxcansible# ansible-playbook pxcplay.yml
 [WARNING]: provided hosts list is empty, only localhost is available

ERROR! no action detected in task

The error appears to have been in '/root/pxcansible/roles/ansible-role-XtraDB-Cluster/tasks/main.yml': line 28, column 3, but may
be elsewhere in the file depending on the exact syntax problem.

The offending line appears to be:


- name: "Include {{ ansible_distribution }} tasks"
  ^ here
We could be wrong, but this one looks like it might be an issue with
missing quotes.  Always quote template expression brackets when they
start a value. For instance:

    with_items:
      - {{ foo }}

Should be written as:

    with_items:
      - "{{ foo }}"

This took 1 minute and 45 seconds.

Fixing the Playbook Syntax Issue - 3 minutes 25 seconds

The error was misleading but the general rule of thumb is to try more recent Ansible version, which we did. We googled and found good instructions on Ansible website. Next attempt to run the playbook also failed:

TASK [ansible-role-XtraDB-Cluster : Delete anonymous connections] *****************************************************************************************************************************************************************************************************************
fatal: [node2]: FAILED! => {"changed": false, "msg": "The PyMySQL (Python 2.7 and Python 3.X) or MySQL-python (Python 2.X) module is required."}
fatal: [node3]: FAILED! => {"changed": false, "msg": "The PyMySQL (Python 2.7 and Python 3.X) or MySQL-python (Python 2.X) module is required."}
fatal: [node1]: FAILED! => {"changed": false, "msg": "The PyMySQL (Python 2.7 and Python 3.X) or MySQL-python (Python 2.X) module is required."}

Setting up new Ansible version and running the playbook up to this error took 3 minutes and 25 seconds.

Fixing the Missing Python Module - 3 minutes 20 seconds

Apparently, the role we used did not take care of its prerequisites and a Python module was missing for connecting to and securing the Galera cluster. We first tried to install MySQL-python via pip but it became apparent that it will take more time as it required mysql_config:

root@vagrant:~# pip install MySQL-python
Collecting MySQL-python
  Downloading https://files.pythonhosted.org/packages/a5/e9/51b544da85a36a68debe7a7091f068d802fc515a3a202652828c73453cad/MySQL-python-1.2.5.zip (108kB)
    100% |████████████████████████████████| 112kB 278kB/s
    Complete output from command python setup.py egg_info:
    sh: 1: mysql_config: not found
    Traceback (most recent call last):
      File "<string>", line 1, in <module>
      File "/tmp/pip-build-zzwUtq/MySQL-python/setup.py", line 17, in <module>
        metadata, options = get_config()
      File "/tmp/pip-build-zzwUtq/MySQL-python/setup_posix.py", line 43, in get_config
        libs = mysql_config("libs_r")
      File "/tmp/pip-build-zzwUtq/MySQL-python/setup_posix.py", line 25, in mysql_config
        raise EnvironmentError("%s not found" % (mysql_config.path,))
    EnvironmentError: mysql_config not found

    ----------------------------------------
Command "python setup.py egg_info" failed with error code 1 in /tmp/pip-build-zzwUtq/MySQL-python/

That is provided by MySQL development libraries so we would have to install them manually, which was pretty much pointless. We decided to go with PyMySQL, which did not require other packages to install. This brought us to another issue:

TASK [ansible-role-XtraDB-Cluster : Delete anonymous connections] *****************************************************************************************************************************************************************************************************************
fatal: [node3]: FAILED! => {"changed": false, "msg": "unable to connect to database, check login_user and login_password are correct or /root/.my.cnf has the credentials. Exception message: (1698, u\"Access denied for user 'root'@'localhost'\")"}
fatal: [node2]: FAILED! => {"changed": false, "msg": "unable to connect to database, check login_user and login_password are correct or /root/.my.cnf has the credentials. Exception message: (1698, u\"Access denied for user 'root'@'localhost'\")"}
fatal: [node1]: FAILED! => {"changed": false, "msg": "unable to connect to database, check login_user and login_password are correct or /root/.my.cnf has the credentials. Exception message: (1698, u\"Access denied for user 'root'@'localhost'\")"}
    to retry, use: --limit @/root/pxcansible/pxcplay.retry

Up to this point we spent 3 minutes and 20 seconds.

Fixing “Access Denied” Error - 18 minutes 55 seconds

As per error, we did ensure that MySQL config is prepared correctly and that it included correct user and password to connect to the database. This, unfortunately, did not work as expected. We did investigate further and found that the role did not create root user properly, even though it marked the step as completed. We did a short investigation but decided to make the manual fix instead of trying to debug the playbook, which would take way more time than the steps which we did. We just created manually users root@127.0.0.1 and root@localhost with correct passwords. This allowed us to pass this step and onto another error:

TASK [ansible-role-XtraDB-Cluster : Start the master node] ************************************************************************************************************************************************************************************************************************
skipping: [node1]
skipping: [node2]
skipping: [node3]

TASK [ansible-role-XtraDB-Cluster : Create SST user] ******************************************************************************************************************************************************************************************************************************
skipping: [node1]
skipping: [node2]
skipping: [node3]

TASK [ansible-role-XtraDB-Cluster : Start the slave nodes] ************************************************************************************************************************************************************************************************************************
fatal: [node3]: FAILED! => {"changed": false, "msg": "Unable to start service mysql: Job for mysql.service failed because the control process exited with error code. See \"systemctl status mysql.service\" and \"journalctl -xe\" for details.\n"}
fatal: [node2]: FAILED! => {"changed": false, "msg": "Unable to start service mysql: Job for mysql.service failed because the control process exited with error code. See \"systemctl status mysql.service\" and \"journalctl -xe\" for details.\n"}
fatal: [node1]: FAILED! => {"changed": false, "msg": "Unable to start service mysql: Job for mysql.service failed because the control process exited with error code. See \"systemctl status mysql.service\" and \"journalctl -xe\" for details.\n"}
    to retry, use: --limit @/root/pxcansible/pxcplay.retry

For this section we spent 18 minutes and 55 seconds.

Fixing “Start the Slave Nodes” Issue (part 1) - 7 minutes 40 seconds

We tried a couple of things to solve this problem. We tried to specify node using its name, we tried to switch group names, nothing solved the issue. We decided to clean up the environment using the script provided in the documentation and start from scratch. It did not clean it but just made things even worse. After 7 minutes and 40 seconds we decided to wipe out the virtual machines, recreate the environment and start from scratch hoping that when we add the Python dependencies, this will solve our issue.

Fixing “Start the Slave Nodes” Issue (part 2) - 13 minutes 15 seconds

Unfortunately, setting up Python prerequisites did not help at all. We decided to finish the process manually, bootstrapping the first node and then configuring SST user and starting remaining slaves. This completed the “automated” setup and it took us 13 minutes and 15 seconds to debug and then finally accept that it will not work like the playbook designer expected.

Further Debugging - 10 minutes 45 seconds

We did not stop there and decided that we’ll try one more thing. Instead of relying on Ansible variables we just put the IP of one of the nodes as the master node. This solved that part of the problem and we ended up with:

TASK [ansible-role-XtraDB-Cluster : Create SST user] ******************************************************************************************************************************************************************************************************************************
skipping: [node2]
skipping: [node3]
fatal: [node1]: FAILED! => {"changed": false, "msg": "unable to connect to database, check login_user and login_password are correct or /root/.my.cnf has the credentials. Exception message: (1045, u\"Access denied for user 'root'@'::1' (using password: YES)\")"}

This was the end of our attempts - we tried to add this user but it did not work correctly through the ansible playbook while we could use IPv6 localhost address to connect to when using MySQL client.

Total Installation Time - Unknown (Automated Installation Failed)

In total we spent 64 minutes and we still haven’t managed to get things going automatically. The remaining problems are root password creation which doesn’t seem to work and then getting the Galera Cluster started (SST user issue). It is hard to tell how long will it take to debug it further. It is sure possible - it is just hard to quantify because it really depends on the experience with Ansible and MySQL. It is definitely not something anyone can just download, configure and run. Well, maybe another playbook would have worked differently? It is possible, but it may as well result in different issues. Ok, so there is a learning curve to climb and debugging to make but then, when you are all set, you will just run a script. Well, that’s sort of true. As long as changes introduced by the maintainer won’t break something you depend on or new Ansible version will break the playbook or the maintainer will just forget about the project and stop developing it (for the role that we used there’s quite useful pull request waiting already for almost a year, which might be able to solve the Python dependency issue - it has not been merged). Unless you accept that you will have to maintain this code, you cannot really rely on it being 100% accurate and working in your environment, especially given that the original developer has no incentives in keeping the code up to date. Also, what about other versions? You cannot use this particular playbook to install PXC 5.6 or any MariaDB version. Sure, there are other playbooks you can find. Will they work better or maybe you’ll spend another bunch of hours trying to make them to work?

ClusterControl
Single Console for Your Entire Database Infrastructure
Find out what else is new in ClusterControl

ClusterControl

Finally, let’s take a look at how ClusterControl can be used to deploy Percona XtraDB Cluster.

Configuring SSH Connectivity - 1 minute

ClusterControl requires SSH connectivity across all the nodes to connect and configure them. We generated a SSH key and manually distributed it across the nodes.

Setting Up ClusterControl - 3 minutes 15 seconds

Quick search “ClusterControl install” pointed us to relevant ClusterControl documentation page. We were looking for a “simpler way to install ClusterControl” therefore we followed the link and found following instructions.

Downloading the script and running it took 3 minutes and 15 seconds, we had to take some actions while installation proceeded so it is not unattended installation.

Logging Into UI and Deployment Start - 1 minute 10 seconds

We pointed our browser to the IP of ClusterControl node.

We passed the required contact information and we were presented with the Welcome screen:

Next step - we picked the deployment option.

We had to pass SSH connectivity details.

We also decided on the vendor, version, password and hosts to use. This whole process took 1 minute and 10 seconds.

Percona XtraDB Cluster Deployment - 12 minutes 5 seconds

The only thing left was to wait for ClusterControl to finish the deployment. After 12 minutes and 5 seconds the cluster was ready:

Total Installation Time - 17 minutes 30 seconds

We managed to deploy ClusterControl and then PXC cluster using ClusterControl in 17 minutes and 30 seconds. The PXC deployment itself took 12 minutes and 5 seconds. At the end we have a working cluster, deployed according to the best practices. ClusterControl also ensures that the configuration of the cluster makes sense. In short, even if you don't really know anything about MySQL or Galera Cluster, you can have a production-ready cluster deployed in a couple of minutes. ClusterControl is not just a deployment tool, it is also management platform - makes things even easier for people not experienced with MySQL and Galera to identify performance problems (through advisors) and do management actions (scaling the cluster up and down, running backups, creating asynchronous slaves to Galera). What is important, ClusterControl will always be maintained and can be used to deploy all MySQL flavors (and not only MySQL/MariaDB, it also supports TimeScaleDB, PostgreSQL and MongoDB). It also worked out of the box, something which cannot be said about other methods we tested.

If you would like to experience the same, you can download ClusterControl for free. Let us know how you liked it.

What’s New in ProxySQL 2.0

$
0
0

ProxySQL is one of the best proxies out there for MySQL. It introduced a great deal of options for database administrators. It made possible to shape the database traffic by delaying, caching or rewriting queries on the fly. It can also be used to create an environment in which failovers will not affect applications and will be transparent to them. We already covered the most important ProxySQL features in previous blog posts:

We even have a tutorial covering ProxySQL showing how it can be used in MySQL and MariaDB setups.

Quite recently ProxySQL 2.0.3 has been released, being a patch release for the 2.0 series. Bugs are being fixed and the 2.0 line seems to start getting the traction it deserves. In this blog post we would like to discuss major changes introduced in ProxySQL 2.0.

Causal Reads Using GTID

Everyone who had to deal with replication lag and struggled with read-after-write scenarios that are affected by the replication lag will definitely be very happy with this feature. So far, in MySQL replication environments, the only way to ensure causal reads was to read from the master (and it doesn’t matter if you use asynchronous or semisynchronous replication). Another option was to go for Galera, which had an option for enforcing causal reads since, like, always (first it used to be wsrep-causal-reads and now it is wsrep-sync-wait). Quite recently (in 8.0.14) MySQL Group replication got similar feature. Regular replication, though, on its own, cannot deal with this issue. Luckily, ProxySQL is here and it brings us an option to define on per-query rule basis with what hostgroup reads which match that query rule should be consistent. The implementation comes with ProxySQL binlog reader and it can work with ROW binlog format for MySQL 5.7 and newer. Only Oracle MySQL is supported due to lack of required functionality in MariaDB. This feature and its technical details have been explained on ProxySQL official blog.

SSL for Frontend Connections

ProxySQL always had support for backend SSL connection but it lacked SSL encryption for the connections coming from clients. This was not that big of a deal given the recommended deployment pattern was to collocate ProxySQL on application nodes and use a secure Unix socket to connect from the app to the proxy. This is still a recommendation, especially if you use ProxySQL for caching queries (Unix sockets are faster than TCP connection, even local ones and with cache it’s good to avoid introducing unnecessary latency). What’s good is that with ProxySQL 2.0 there’s a choice now as it introduced SSL support for incoming connections. You can easily enable it by setting mysql-have_ssl to ‘true’. Enabling SSL does not come with unacceptable performance impact. Contrary, as per results from the official ProxySQL blog, the performance drop is very low.

ClusterControl
Single Console for Your Entire Database Infrastructure
Find out what else is new in ClusterControl

Native Support for Galera Cluster

Galera Cluster has been supported by ProxySQL almost since beginning but so far it was done through the external script that (typically) has been called from ProxySQL’s internal scheduler. It was up to the script to ensure that ProxySQL configuration was proper, the writer (or writers) has been correctly detected and configured in the writers hostgroup. The script was able to detect the different states Galera node may have (Primary, non-Primary, Synced, Donor/Desync, Joining, Joined) and mark the node accordingly as either available or not. The main issue is that the original script never was intended as anything other than the proof of concept written in Bash. Yet as it was distributed along with ProxySQL, it started to be improved, modified by external contributors. Others (like Percona) looked into creating their own scripts, bundled with their software. Some fixes have been introduced in the script from ProxySQL repository, some have been introduced into Percona version of the script. This led to confusion and even though all commonly used scripts handled 95% of the use cases, none of the popular ones really covered all the different situations and variables Galera cluster may end up using. Luckily, the ProxySQL 2.0 comes with native support for Galera Cluster. This makes ProxySQL support internally MySQL replication, MySQL Group Replication and now Galera Cluster. The way in how it’s done is very similar. We would like to cover the configuration of this feature as it might be not clear at the first glance.

As with MySQL replication and MySQL Group Replication, a table has been created in ProxySQL:

mysql> show create table mysql_galera_hostgroups\G
*************************** 1. row ***************************
       table: mysql_galera_hostgroups
Create Table: CREATE TABLE mysql_galera_hostgroups (
    writer_hostgroup INT CHECK (writer_hostgroup>=0) NOT NULL PRIMARY KEY,
    backup_writer_hostgroup INT CHECK (backup_writer_hostgroup>=0 AND backup_writer_hostgroup<>writer_hostgroup) NOT NULL,
    reader_hostgroup INT NOT NULL CHECK (reader_hostgroup<>writer_hostgroup AND backup_writer_hostgroup<>reader_hostgroup AND reader_hostgroup>0),
    offline_hostgroup INT NOT NULL CHECK (offline_hostgroup<>writer_hostgroup AND offline_hostgroup<>reader_hostgroup AND backup_writer_hostgroup<>offline_hostgroup AND offline_hostgroup>=0),
    active INT CHECK (active IN (0,1)) NOT NULL DEFAULT 1,
    max_writers INT NOT NULL CHECK (max_writers >= 0) DEFAULT 1,
    writer_is_also_reader INT CHECK (writer_is_also_reader IN (0,1,2)) NOT NULL DEFAULT 0,
    max_transactions_behind INT CHECK (max_transactions_behind>=0) NOT NULL DEFAULT 0,
    comment VARCHAR,
    UNIQUE (reader_hostgroup),
    UNIQUE (offline_hostgroup),
    UNIQUE (backup_writer_hostgroup))
1 row in set (0.00 sec)

There are numerous settings to configure and we will go over them one by one. First of all, there are four hostgroups:

  • Writer_hostgroup - it will contain all the writers (with read_only=0) up to the ‘max_writers’ setting. By default it is just only one writer
  • Backup_writer_hostgroup - it contains remaining writers (read_only=0) that are left after ‘max_writers’ has been added to writer_hostgroup
  • Reader_hostgroup - it contains readers (read_only=1), it may also contain backup writers, as per ‘writer_is_also_reader’ setting
  • Offline_hostgroup - it contains nodes which were deemed not usable (either offline or in a state which makes them impossible to handle traffic)

Then we have remaining settings:

  • Active - whether the entry in mysql_galera_hostgroups is active or not
  • Max_writers - how many nodes at most can be put in the writer_hostgroup
  • Writer_is_also_reader - if set to 0, writers (read_only=0) will not be put into reader_hostgroup. If set to 1, writers (read_only=0) will be put into reader_hostgroup. If set to 2, nodes from backup_writer_hostgroup will be put into reader_hostgroup. This one is a bit complex therefore we will present an example later in this blog post
  • Max_transactions_behind - based on wsrep_local_recv_queue, the max queue that’s acceptable. If queue on the node exceeds max_transactions_behind given node will be marked as SHUNNED and it will not be available for the traffic

The main surprise might be handling of the readers, which is different than how the script included in ProxySQL worked. First of all, what you have to keep in mind, is the fact, that ProxySQL uses read_only=1 to decide if node is a reader or not. This is common in replication setups, not that common in Galera. Therefore, most likely, you will want to use ‘writer_is_also_reader’ setting to configure how readers should be added to the reader_hostgroup. Let’s consider three Galera nodes, all of them have read_only=0. We also have max_writers=1 as we want to direct all the writes towards one node. We configured mysql_galera_hostgroups as follows:

SELECT * FROM mysql_galera_hostgroups\G
*************************** 1. row ***************************
       writer_hostgroup: 10
backup_writer_hostgroup: 30
       reader_hostgroup: 20
      offline_hostgroup: 40
                 active: 1
            max_writers: 1
  writer_is_also_reader: 0
max_transactions_behind: 0
                comment: NULL
1 row in set (0.00 sec)

Let’s go through all the options:

writer_is_also_reader=0

mysql> SELECT hostgroup_id, hostname FROM runtime_mysql_servers;
+--------------+------------+
| hostgroup_id | hostname   |
+--------------+------------+
| 10           | 10.0.0.103 |
| 30           | 10.0.0.101 |
| 30           | 10.0.0.102 |
+--------------+------------+
3 rows in set (0.00 sec)

This outcome is different than you would see in the scripts - there you would have remaining nodes marked as readers. Here, given that we don’t want writers to be readers and given that there is no node with read_only=1, no readers will be configured. One writer (as per max_writers), remaining nodes in backup_writer_hostgroup.

writer_is_also_reader=1

mysql> SELECT hostgroup_id, hostname FROM runtime_mysql_servers;
+--------------+------------+
| hostgroup_id | hostname   |
+--------------+------------+
| 10           | 10.0.0.103 |
| 20           | 10.0.0.101 |
| 20           | 10.0.0.102 |
| 20           | 10.0.0.103 |
| 30           | 10.0.0.101 |
| 30           | 10.0.0.102 |
+--------------+------------+
6 rows in set (0.00 sec)

Here we want our writers to act as readers therefore all of them (active and backup) will be put into the reader_hostgroup.

writer_is_also_reader=2

mysql> SELECT hostgroup_id, hostname FROM runtime_mysql_servers;
+--------------+------------+
| hostgroup_id | hostname   |
+--------------+------------+
| 10           | 10.0.0.103 |
| 20           | 10.0.0.101 |
| 20           | 10.0.0.102 |
| 30           | 10.0.0.101 |
| 30           | 10.0.0.102 |
+--------------+------------+
5 rows in set (0.00 sec)

This is a setting for those who do not want their active writer to handle reads. In this case only nodes from backup_writer_hostgroup will be used for reads. Please also keep in mind that number of readers will change if you will set max_writers to some other value. If we’d set it to 3, there would be no backup writers (all nodes would end up in the writer hostgroup) thus, again, there would be no nodes in the reader hostgroup.

Of course, you will want to configure query rules accordingly to the hostgroup configuration. We will not go through this process here, you can check how it can be done in ProxySQL blog. If you would like to test how it works in a Docker environment, we have a blog which covers how to run Galera cluster and ProxySQL 2.0 on Docker.

Other Changes

What we described above are the most notable improvements in ProxySQL 2.0. There are many others, as per the changelog. Worth mentioning are improvements around query cache (for example, addition of PROXYSQL FLUSH QUERY CACHE) and change that allows ProxySQL to rely on super_read_only to determine master and slaves in replication setup.

We hope this short overview of the changes in ProxySQL 2.0 will help you to determine which version of the ProxySQL you should use. Please keep in mind that 1.4 branch, even if it will not get any new features, it still is maintained.

How to Execute and Manage MySQL Backups for Oracle DBA’s

$
0
0

Migrating from Oracle database to open source can bring a number of benefits. The lower cost of ownership is tempting, and pushes a lot of companies to migrate. At the same time DevOps, SysOps or DBA’s need to keep tight SLA’s to address business needs.

One of the key concerns when you plan data migration to another database, especially open source is to how to avoid data loss. It’s not too far fetched that someone accidentally deleted part of the database, someone forgot to include a WHERE clause in a DELETE query or run DROP TABLE accidentally. The question is how to recover from such situations.

Things like that may and will happen, it is inevitable but the impact can be disastrous. As somebody said, “It’s all fun and games until backup fails”. The most valuable asset cannot be compromised. Period.

The fear of the unknown is natural if you are not familiar with new technology. In fact, the knowledge of Oracle database solutions, reliability and great features which Oracle Recovery Manager (RMAN) offers can discourage you or your team to migrate to a new database system. We like to use things we know, so why migrate when our current solution works. Who knows how many projects were put on hold because the team or individual was not convinced about the new technology?

Logical Backups (exp/imp, expdp/impdb)

According to MySQL documentation, logical backup is “a backup that reproduces table structure and data, without copying the actual data files.” This definition can apply to both MySQL and Oracle worlds. The same is “why” and “when” you will use the logical backup.

Logical backups are a good option when we know what data will be modified so you can backup only the part you need. It simplifies potential restore in terms of time and complexity. It’s also very useful if we need to move some portion of small/medium size data set and copy back to another system (often on a different database version). Oracle use export utilities like exp and expdp to read database data and then export it into a file at the operating system level. You can then import the data back into a database using the import utilities imp or impdp.

The Oracle Export Utilities gives us a lot of options to choose what data that needs to be exported. You will definitely not find the same number of features with mysql, but most of the needs are covered and the rest can be done with additional scripting or external tools (check mydumper).

MySQL comes with a package of tools that offer very basic functionality. They are mysqldump, mysqlpump (the modern version of mysqldump that has native support for parallelization) and MySQL client which can be used to extract data to a flat file.

Below you can find several examples of how to use them:

Backup database structure only

mysqldump --no-data -h localhost -u root -ppassword mydatabase > mydatabase_backup.sql

Backup table structure

mysqldump --no-data --single- transaction -h localhost -u root -ppassword mydatabase table1 table2 > mydatabase_backup.sql

Backup specific rows

mysqldump -h localhost --single- transaction -u root -ppassword mydatabase table_name --where="date_created='2019-05-07'"> table_with_specific_rows_dump.sql

Importing the Table

mysql -u username -p -D dbname < tableName.sql

The above command will stop load if an error occurs.

If you load data directly from the mysql client, the errors will be ignored and the client will proceed

mysql> source tableName.sql

To log output, you need to use

mysql> tee import_tableName.log

You can find all flags explained under below links:

If you plan to use logical backup across different database versions, make sure you have the right collation setup. The following statement can be used to check the default character set and collation for a given database:

USE mydatabase;
SELECT @@character_set_database, @@collation_database;

Another way to retrieve the collation_database system variable is to use the SHOW VARIABLES.

SHOW VARIABLES LIKE 'collation%';

Because of the limitations of the mysql dump, we often have to modify the output. An example of such modification can be a need to remove some lines. Fortunately, we have the flexibility of viewing and modifying the output using standard text tools before restoring. Tools like awk, grep, sed can become your friend. Below is a simple example of how to remove the third line from the dump file.

sed -i '1,3d' file.txt

The possibilities are endless. This is something that we will not find with Oracle as data is written in binary format.

There are a few things you need to consider when you execute logical mysql. One of the main limitations is pure support of parallelism and the object locking.

Logical backup considerations

When such backup is executed, the following steps will be performed.

  • LOCK TABLE table.
  • SHOW CREATE TABLE table.
  • SELECT * FROM table INTO OUTFILE temporary file.
  • Write the contents of the temporary file to the end of the dump file.
  • UNLOCK TABLES

By default mysqldump doesn’t include routines and events in its output - you have to explicitly set --routines and --events flags.

Another important consideration is an engine that you use to store your data. Hopefully these days most of productions systems use ACID compliant engine called InnoDB. Older engine MyISAM had to lock all tables to ensure consistency. This is when FLUSH TABLES WITH READ LOCK was executed. Unfortunately, it is the only way to guarantee a consistent snapshot of MyISAM tables while the MySQL server is running. This will make the MySQL server become read-only until UNLOCK TABLES is executed.

For tables on InnoDB storage engine, it is recommended to use --single- transaction option. MySQL then produces a checkpoint that allows the dump to capture all data prior to the checkpoint while receiving incoming changes.

The --single-transaction option of mysqldump does not do FLUSH TABLES WITH READ LOCK. It causes mysqldump to set up a REPEATABLE READ transaction for all tables being dumped.

A mysqldump backup is much slower than Oracle tools exp, expdp. Mysqldump is a single-threaded tool and this is its most significant drawback - performance is ok for small databases but it quickly becomes unacceptable if the data set grows to tens of gigabytes.

  • START TRANSACTION WITH CONSISTENT SNAPSHOT.
  • For each database schema and table, a dump performs these steps:
    • SHOW CREATE TABLE table.
    • SELECT * FROM table INTO OUTFILE temporary file.
    • Write the contents of the temporary file to the end of the dump file.
  • COMMIT.

Physical backups (RMAN)

Fortunately, most of the limitations of logical backup can be solved with Percona Xtrabackup tool. Percona XtraBackup is the most popular, open-source, MySQL/MariaDB hot backup software that performs non-blocking backups for InnoDB and XtraDB databases. It falls into the physical backup category, which consists of exact copies of the MySQL data directory and files underneath it.

It’s the same category of tools like Oracle RMAN. RMAN comes as part of the database software, XtraBackup needs to be downloaded separately. Xtrabackup is available as rpm and deb package and supports only Linux platforms. The installation is very simple:

$ wget https://www.percona.com/downloads/XtraBackup/Percona-XtraBackup-8.0.4/binary/redhat/7/x86_64/percona-XtraBackup-80-8.0.4-1.el7.x86_64.rpm
$ yum localinstall percona-XtraBackup-80-8.0.4-1.el7.x86_64.rpm

XtraBackup does not lock your database during the backup process. For large databases (100+ GB), it provides much better restoration time as compared to mysqldump. The restoration process involves preparing MySQL data from the backup files, before replacing or switching it with the current data directory on the target node.

Percona XtraBackup works by remembering the log sequence number (LSN) when it starts and then copying away the data files to another location. Copying data takes some time, and if the files are changing, they reflect the state of the database at different points in time. At the same time, XtraBackup runs a background process that keeps an eye on the transaction log (aka redo log) files, and copies changes from it. This has to be done continually because the transaction logs are written in a round-robin fashion, and can be reused after a while. XtraBackup needs the transaction log records for every change to the data files since it began execution.

When XtraBackup is installed you can finally perform your first physical backups.

xtrabackup --user=root --password=PASSWORD --backup --target-dir=/u01/backups/

Another useful option which MySQL administrators do is the streaming of backup to another server. Such stream can be performed with the use of xbstream tool, like on the below example:

Start a listener on the external server on the preferable port (in this example 1984)

nc -l 1984 | pigz -cd - | pv | xbstream -x -C /u01/backups

Run backup and transfer to an external host

innobackupex --user=root --password=PASSWORD --stream=xbstream /var/tmp | pigz  | pv | nc external_host.com 1984

As you may notice restore process is divided into two major steps (similar to Oracle). The steps are restored (copy back) and recovery (apply log).

XtraBackup --copy-back --target-dir=/var/lib/data
innobackupex --apply-log --use-memory=[values in MB or GB] /var/lib/data

The difference is that we can only perform recovery to the point when the backup was taken. To apply changes after the backup we need to do it manually.

Point in Time Restore (RMAN recovery)

In Oracle, RMAN does all the steps when we perform recovery of the database. It can be done either to SCN or time or based on the backup data set.

RMAN> run
{
allocate channel dev1 type disk;
set until time "to_date('2019-05-07:00:00:00', 'yyyy-mm-dd:hh24:mi:ss')";
restore database;
recover database; }

In mysql, we need another tool to perform to extract data from binary logs (similar to Oracle’s archivelogs) mysqlbinlog. mysqlbinlog can read the binary logs and convert them to files. What we need to do is

The basic procedure would be

  • Restore full backup
  • Restore incremental backups
  • To identify the start and end times for recovery (that could be the end of backup and the position number before unfortunately drop table).
  • Convert necessary binglogs to SQL and apply newly created SQL files in the proper sequence - make sure to run a single mysqlbinlog command.
    > mysqlbinlog binlog.000001 binlog.000002 | mysql -u root -p

Encrypt Backups (Oracle Wallet)

Percona XtraBackup can be used to encrypt or decrypt local or streaming backups with xbstream option to add another layer of protection to the backups. Both --encrypt-key option and --encryptkey-file option can be used to specify the encryption key. Encryption keys can be generated with commands like

$ openssl rand -base64 24
$ bWuYY6FxIPp3Vg5EDWAxoXlmEFqxUqz1

This value then can be used as the encryption key. Example of the innobackupex command using the --encrypt-key:

$ innobackupex --encrypt=AES256 --encrypt-key=”bWuYY6FxIPp3Vg5EDWAxoXlmEFqxUqz1” /storage/backups/encrypted

To decrypt, simply use the --decrypt option with appropriate --encrypt-key:

$ innobackupex --decrypt=AES256 --encrypt-key=”bWuYY6FxIPp3Vg5EDWAxoXlmEFqxUqz1”
/storage/backups/encrypted/2019-05-08_11-10-09/

Backup policies

There is no build in backup policy functionality either in MySQL/MariaDB or even Percona’s tool. If you would like to manage your MySQL logical or physical backups you can use ClusterControl for that.

ClusterControl is the all-inclusive open source database management system for users with mixed environments. It provides advanced backup management functionality for MySQL or MariaDB.

With ClusterControl you can:

  • Create backup policies
  • Monitor backup status, executions, and servers without backups
  • Execute backups and restores (including a point in time recovery)
  • Control backup retention
  • Save backups in cloud storage
  • Validate backups (full test with the restore on the standalone server)
  • Encrypt backups
  • Compress backups
  • And many others
ClusterControl: Backup Management

Keep backups in the cloud

Organizations have historically deployed tape backup solutions as a means to protect
data from failures. However, the emergence of public cloud computing has also enabled new models with lower TCO than what has traditionally been available. It makes no business sense to abstract the cost of a DR solution from the design of it, so organizations have to implement the right level of protection at the lowest possible cost.

The cloud has changed the data backup industry. Because of its affordable price point, smaller businesses have an offsite solution that backs up all of their data (and yes, make sure it is encrypted). Both Oracle and MySQL does not offer built-in cloud storage solutions. Instead you can use the tools provided by Cloud vendors. An example here could be s3.

aws s3 cp severalnines.sql s3://severalnine-sbucket/mysql_backups

Conclusion

There are a number of ways to backup your database, but it is important to review business needs before deciding on a backup strategy. As you can see there are many similarities between MySQL and Oracle backups which hopefully can meet you your SLA’s.

Always make sure that you practice these commands. Not only when you are new to the technology but whenever DBMS becomes unusable so you know what to do.

If you would like to learn more about MySQL please check our whitepaper The DevOps Guide to Database Backups for MySQL and MariaDB.


Popular Docker Images for MySQL and MariaDB Server

$
0
0

A Docker image can be built by anyone who has the ability to write a script. That is why there are many similar images being built by the community, with minor differences but really serving a common purpose. A good (and popular) container image must have well-written documentation with clear explanations, an actively maintained repository and with regular updates. Check out this blog post if you want to learn how to build and publish your own Docker image for MySQL, or this blog post if you just want to learn the basics of running MySQL on Docker.

In this blog post, we are going to look at some of the most popular Docker images to run our MySQL or MariaDB server. The images we have chosen are general-purpose public images that can at least run a MySQL service. Some of them include non-essential MySQL-related applications, while others just serve as a plain mysqld instance. The listing here is based on the result of Docker Hub, the world's largest library and community for container images.

TLDR

The following table summarizes the different options:

AspectMySQL (Docker)MariaDB (Docker)Percona (Docker)MySQL (Oracle)MySQL/MariaDB (CentOS)MariaDB (Bitnami)
Downloads*10M+10M+10M+10M+10M+10M+
Docker Hubmysqlmariadbperconamysql/mysql-servermysql-80-centos7
mysql-57-centos7
mysql-56-centos7
mysql-55-centos7
mariadb-102-centos7
mariadb-101-centos7
bitnami/mariadb
Project pagemysqlmariadbpercona-dockermysql-dockermysql-containerbitnami-docker-mariadb
Base imageDebian 9Ubuntu 18.04 (bionic)
Ubuntu 14.04 (trusty)
CentOS 7Oracle Linux 7RHEL 7
CentOS 7
Debian 9 (minideb)
Oracle Linux 7
Supported database versions5.5
5.6
5.7
8.0
5.5
10.0
10.1
10.2
10.3
10.4
5.6
5.7
8.0
5.5
5.6
5.7
8.0
5.5
5.6
5.7
8.0
10.1
10.2
10.1
10.2
10.3
Supported platformsx86_64x86
x86_64
arm64v8
ppc64le
x86
x86_64
x86_64x86_64x86_64
Image size
(tag: latest)
129 MB120 MB193 MB99 MB178 MB87 MB
First commitMay 18, 2014Nov 16, 2014Jan 3, 2016May 18, 2014**Feb 15, 2015May 17, 2015
Contributors18915143020
Github Star126729211332089152
Github Fork12912451211291**14671

* Taken from Docker Hub page.
** Forked from MySQL docker project.

mysql (Docker)

The images are built and maintained by the Docker community with the help of MySQL team. It can be considered the most popular publicly available MySQL server images hosted on Docker Hub and one of the earliest on the market (the first commit was May 18, 2014). It has been forked ~1300 times with 18 active contributors. It supports the Docker version down to 1.6 on a best-effort basis. At this time of writing, all the MySQL major versions are supported - 5.5, 5.6, 5.7 and 8.0 on x86_64 architecture only.

Most of the MySQL images built by others are inspired by the way this image was built. MariaDB, Percona and MySQL Server (Oracle) images are following a similar environment variables, configuration file structure and container initialization process flow.

The following environment variables are available on most of the MySQL container images on Docker Hub:

  • MYSQL_ROOT_PASSWORD
  • MYSQL_DATABASE
  • MYSQL_USER
  • MYSQL_PASSWORD
  • MYSQL_ALLOW_EMPTY_PASSWORD
  • MYSQL_RANDOM_ROOT_PASSWORD
  • MYSQL_ONETIME_PASSWORD

The image size (tag: latest) is averagely small (129MB), easy to use, well maintained and updated regularly by the maintainer. If your application requires the latest MySQL database container, this is the most recommended public image you can use.

mariadb (Docker)

The images are maintained by Docker community with the help of MariaDB team. It uses the same style of building structure as the mysql (Docker) image, but it comes with multiple architectures support:

  • Linux x86-64 (amd64)
  • ARMv8 64-bit (arm64v8)
  • x86/i686 (i386)
  • IBM POWER8 (ppc64le)

At the time of this writing, the images support MariaDB version 5.5 up until 10.4, where image with the "latest" tag size is around 120MB. This image serves as a general-purpose image and follows the instructions, environment variables and configuration file structure as mysql (Docker). Most applications that required MySQL as the database backend is commonly compatible with MariaDB, since both are talking the same protocol.

MariaDB server used to be a fork of MySQL but now it has been diverted away from it. In terms of database architecture design, some MariaDB versions are not 100% compatible and no longer a drop-in replacement with theirs respective MySQL versions. Check out this page for details. However, there are ways to migrate between each other by using logical backup. Simply said, that once you are in the MariaDB ecosystem, you probably have to stick with it. Mixing or switching between MariaDB and MySQL in a cluster is not recommended.

If you would like to set up a more advanced MariaDB setup (replication, Galera, sharding), there are other images built to achieve that objective much more easily, e.g, bitnami/mariadb as explained further down.

percona (Docker)

Percona Server is a fork of MySQL created by Percona. These are the only official Percona Server Docker images, created and maintained by the Percona team. It supports both x86 and x86_64 architecture and the image is based on CentOS 7. Percona only maintains the latest 3 major MySQL versions for container images - 5.6, 5.7 and 8.0.

The code repository points out that first commit was Jan 3, 2016 with 15 actively contributors mostly from Percona development team. Percona Server for MySQL comes with XtraDB storage engine (a drop-in replacement for InnoDB) and follows the upstream Oracle MySQL releases very closely (including all the bug fixes in it) with some additional features like MyRocks storage engine, TokuDB as well as Percona’s own bug fixes. In a way, you can think of it as an improved version of Oracle’s MySQL. You can easily switch between MySQL and Percona Server images, provided you are running on the compatible version.

The images recognize two additional environment variables for TokuDB and RocksDB for MySQL (available since v5.6):

  • INIT_TOKUDB - Set to 1 to allow the container to be started with enabled TOKUDB storage engine.
  • INIT_ROCKSDB - Set to 1 to allow the container to be started with enabled ROCKSDB storage engine.

mysql-server (Oracle)

The repository is forked from mysql by Docker team. The images are created, maintained and supported by the MySQL team at Oracle built on top of Oracle Linux 7 base image. The MySQL 8.0 image comes with MySQL Community Server (minimal) and MySQL Shell and the server is configured to expose X protocol on port 33060 from minimal repository. The minimal package was designed for use by the official Docker images for MySQL. It cuts out some of the non-essential pieces of MySQL like innochecksum, myisampack, mysql_plugin, but is otherwise the same product. Therefore, it has a very small image footprint which is around 99 MB.

One important point to note is the images have a built-in health check script, which is very handy for some people who are in need for an accurate availability logic. Otherwise, people have to write a custom Docker's HEALTHCHECK command (or script) to check for the container health.

mysql-xx-centos7 & mariadb-xx-centos7 (CentOS)

The container images are built and maintained by CentOS team which include MySQL database server for OpenShift and general usage. For RHEL based images, you can pull them from Red Hat's Container Catalog while the CentOS based images are hosted publicly at Docker Hub on different pages for every major version (only list out images with 10M+ downloads):

The image structure is a bit different and it doesn't make use of image tag like others, thus the image name becomes a bit longer instead. Having said that, you have to go to the correct Docker Hub page to get the major version you want to pull.

According to the code repository page, 30 contributors have collaborated in the project since February 15, 2015. It supports MySQL 5.5 up until 8.0 and MariaDB 5.5 until 10.2 for x86_64 architecture only. If you heavily rely on Red Hat containerization infrastructure like OpenShift, these are probably the most popular or well-maintained images for MySQL and MariaDB.

The following environment variables influence the MySQL/MariaDB configuration file and they are all optional:

  • MYSQL_LOWER_CASE_TABLE_NAMES (default: 0)
  • MYSQL_MAX_CONNECTIONS (default: 151)
  • MYSQL_MAX_ALLOWED_PACKET (default: 200M)
  • MYSQL_FT_MIN_WORD_LEN (default: 4)
  • MYSQL_FT_MAX_WORD_LEN (default: 20)
  • MYSQL_AIO (default: 1)
  • MYSQL_TABLE_OPEN_CACHE (default: 400)
  • MYSQL_KEY_BUFFER_SIZE (default: 32M or 10% of available memory)
  • MYSQL_SORT_BUFFER_SIZE (default: 256K)
  • MYSQL_READ_BUFFER_SIZE (default: 8M or 5% of available memory)
  • MYSQL_INNODB_BUFFER_POOL_SIZE (default: 32M or 50% of available memory)
  • MYSQL_INNODB_LOG_FILE_SIZE (default: 8M or 15% of available memory)
  • MYSQL_INNODB_LOG_BUFFER_SIZE (default: 8M or 15% of available memory)
  • MYSQL_DEFAULTS_FILE (default: /etc/my.cnf)
  • MYSQL_BINLOG_FORMAT (default: statement)
  • MYSQL_LOG_QUERIES_ENABLED (default: 0)

The images support MySQL auto-tuning when the MySQL image is running with the --memory parameter set and if you didn't specify value for the following parameters, their values will be automatically calculated based on the available memory:

  • MYSQL_KEY_BUFFER_SIZE (default: 10%)
  • MYSQL_READ_BUFFER_SIZE (default: 5%)
  • MYSQL_INNODB_BUFFER_POOL_SIZE (default: 50%)
  • MYSQL_INNODB_LOG_FILE_SIZE (default: 15%)
  • MYSQL_INNODB_LOG_BUFFER_SIZE (default: 15%)
Severalnines
 
DevOps Guide to Database Management
Learn about what you need to know to automate and manage your open source databases

bitnami/mariadb

The images are built and maintained by Bitnami, experts in software packaging in virtual or cloud deployment. The images are released daily with the latest distribution packages available and use a minimalist Debian-based image called minideb. Thus, the image size for the latest tag is the smallest among all which is around 87MB. The project has 20 contributors with the first commit happened on May 17, 2015. At this time of writing, it only supports MariaDB 10.1 up until 10.3.

One outstanding feature of this image is the ability to deploy a highly available MariaDB setup via Docker environment variables. A zero downtime MariaDB master-slave replication cluster can easily be setup with the Bitnami MariaDB Docker image using the following environment variables:

  • MARIADB_REPLICATION_MODE: The replication mode. Possible values master/slave. No defaults.
  • MARIADB_REPLICATION_USER: The replication user created on the master on first run. No defaults.
  • MARIADB_REPLICATION_PASSWORD: The replication users password. No defaults.
  • MARIADB_MASTER_HOST: Hostname/IP of replication master (slave parameter). No defaults.
  • MARIADB_MASTER_PORT_NUMBER: Server port of the replication master (slave parameter). Defaults to 3306.
  • MARIADB_MASTER_ROOT_USER: User on replication master with access to MARIADB_DATABASE (slave parameter). Defaults to root
  • MARIADB_MASTER_ROOT_PASSWORD: Password of user on replication master with access to
  • MARIADB_DATABASE (slave parameter). No defaults.

In a replication cluster, you can have one master and zero or more slaves. When replication is enabled the master node is in read-write mode, while the slaves are in read-only mode. For best performance its advisable to limit the reads to the slaves.

In addition, these images also support deployment on Kubernetes as Helm Charts. You can read more about the installation steps in the Bitnami MariaDB Chart GitHub repository.

Conclusions

There are tons of MySQL server images that have been contributed by the community and we can't cover them all here. Keep in mind that these images are popular because they are built for general purpose usage. Some less popular images can do much more advanced stuff, like database container orchestration, automatic bootstrapping and automatic scaling. Different images provide different approaches that can be used to address other problems.

Database-Aware Load Balancing: How to Migrate from HAProxy to ProxySQL

$
0
0

HAProxy and ProxySQL are both very popular load balancers in MySQL world, but there is a significant difference between both those proxies. We will not go into details here, you can read more about HAProxy in HAProxy Tutorial and ProxySQL in ProxySQL Tutorial. The most important difference is that ProxySQL is SQL-aware proxy, it parses the traffic and understands MySQL protocol and, as such, it can be used for advanced traffic shaping - you can block queries, rewrite them, direct them to particular hosts, cache them and many more. HAProxy, on the other hand, is a very simple yet efficient layer 4 proxy and all it does is to send packets to backend. ProxySQL can be used to perform a read-write split - it understands the SQL and it can be configured to detect if a query is SELECT or not and route them accordingly: SELECTs to all nodes, other queries to master only. This feature is unavailable in HAProxy, which has to use two separate  ports and two separate backends for master and slaves - the read-write split has to be performed on the application side.

Why Migrate to ProxySQL?

Based on the differences we explained above, we would say that the main reason why you might want to switch from HAProxy to ProxySQL is because of the lack of the read-write split in HAProxy. If you use a cluster of MySQL databases, and it doesn’t really matter if it is asynchronous replication or Galera Cluster, you probably want to be able to split reads from writes. For MySQL replication, obviously, this would be the only way to utilize your database cluster as writes always have to be sent to the master. Therefore if you cannot do the read-write split, you can only send queries to the master only. For Galera read-write split is not a must-have but definitely a good-to-have. Sure, you can configure all Galera nodes as one backend in HAProxy and send traffic to all of them in round-robin fashion but this may result in writes from multiple nodes conflicting with each other, leading to deadlocks and performance drop. We have also seen issues and bugs within Galera cluster, for which, until they have been fixed, the workaround was to direct all the writes to a single node. Thus, the best practice is to send all the writes to one Galera node as this leads to more stable behavior and better performance.

Another very good reason for migration to ProxySQL is a need to have better control over the traffic. With HAProxy you cannot do anything - it just sends the traffic to its backends. With ProxySQL you can shape your traffic using query rules (matching traffic using regular expressions, user, schema, source host and many more). You can redirect OLAP SELECTs to analytics slave (it is true for both replication and Galera). You can offload your master by redirecting some of the SELECTs off it. You can implement SQL firewall. You can add a delay to some of the queries, you can kill queries if they take more than a predefined time. You can rewrite queries to add optimizer hints. All those are not possible with HAProxy.

How to Migrate From HAProxy to ProxySQL?

First, let’s consider the following topology...

ClusterControl MySQL Topology
MySQL Replication Cluster in ClusterControl

We have here a replication cluster consisting of a master and two slaves. We have two HAProxy nodes deployed, each use two backends - on port 3307 for master (writes) and 3308 for all nodes (reads). Keepalived is used to provide a Virtual IP across those two HAProxy instances - should one of them fail, another one will be used. Our application connects directly to the VIP, through it to one of the HAProxy instances. Let’s assume our application (we will use Sysbench) cannot do the read-write split therefore we have to connect to the “writer” backend. As a result, the majority of the load is on our master (10.0.0.101).

What would be the steps to migrate to ProxySQL? Let’s think about it for a moment. First, we have to deploy and configure ProxySQL. We will have to add servers to ProxySQL, create required monitoring users and create proper query rules. Finally, we will have to deploy Keepalived on top of ProxySQL, create another Virtual IP and then ensure as seamless switch as possible for our application from HAProxy to ProxySQL .

Let’s take a look at how we can accomplish that...

How to Install ProxySQL

One can install ProxySQL in many ways. You can use repository, either from ProxySQL itself (https://repo.proxysql.com) or if you happen to use Percona XtraDB Cluster, you may also install ProxySQL from Percona repository although it may require some additional configuration as it relies on CLI admin tools created for PXC. Given we are talking about replication, using them may just make things more complex. Finally, you can as well install ProxySQL binaries after you download them from ProxySQL GitHub. Currently there are two stable versions, 1.4.x and 2.0.x. There are differences between ProxySQL 1.4 and ProxySQL 2.0 in terms of features, for this blog we will stick to the 1.4.x branch, as it is better tested and the feature set is enough for us.

We will use ProxySQL repository and we will deploy ProxySQL on two additional nodes: 10.0.0.103 and 10.0.0.104.

First, we’ll install ProxySQL using the official repository. We will also ensure that MySQL client is installed (we will use it to configure ProxySQL). Please keep in mind that the process we go through is not production-grade. For production you will want to at least change default credentials for the administrative user. You will also want to review the configuration and ensure it is in line with your expectations and requirements.

apt-get install -y lsb-release
wget -O - 'https://repo.proxysql.com/ProxySQL/repo_pub_key' | apt-key add -
echo deb https://repo.proxysql.com/ProxySQL/proxysql-1.4.x/$(lsb_release -sc)/ ./ | tee /etc/apt/sources.list.d/proxysql.list
apt-get -y update
apt-get -y install proxysql
service proxysql start

Now, as ProxySQL has been started, we will use the CLI to configure ProxySQL.

mysql -uadmin -padmin -P6032 -h127.0.0.1

First, we will define backend servers and replication hostgroups:

mysql> INSERT INTO mysql_servers (hostgroup_id, hostname) VALUES (10, '10.0.0.101'), (20, '10.0.0.102'), (20, '10.0.0.103');
Query OK, 3 rows affected (0.91 sec)
mysql> INSERT INTO mysql_replication_hostgroups (writer_hostgroup, reader_hostgroup) VALUES (10, 20);
Query OK, 1 row affected (0.00 sec)

We have three servers, we also defined that ProxySQL should use hostgroup 10 for master (node with read_only=0) and hostgroup 20 for slaves (read_only=1).

As next step, we need to add a monitoring user on the MySQL nodes so that ProxySQL could monitor them. We’ll go with defaults, ideally you will change the credentials in ProxySQL.

mysql> SHOW VARIABLES LIKE 'mysql-monitor_username';
+------------------------+---------+
| Variable_name          | Value   |
+------------------------+---------+
| mysql-monitor_username | monitor |
+------------------------+---------+
1 row in set (0.00 sec)
mysql> SHOW VARIABLES LIKE 'mysql-monitor_password';
+------------------------+---------+
| Variable_name          | Value   |
+------------------------+---------+
| mysql-monitor_password | monitor |
+------------------------+---------+
1 row in set (0.00 sec)

So, we need to create user ‘monitor’ with password ‘monitor’. To do that we will need to execute following grant on the master MySQL server:

mysql> create user monitor@'%' identified by 'monitor';
Query OK, 0 rows affected (0.56 sec)

Back to ProxySQL - we have to configure users that our application will use to access MySQL and query rules, which are intended to give us a read-write split.

mysql> INSERT INTO mysql_users (username, password, default_hostgroup) VALUES ('sbtest', 'sbtest', 10);
Query OK, 1 row affected (0.34 sec)
mysql> INSERT INTO mysql_query_rules (rule_id,active,match_digest,destination_hostgroup,apply) VALUES (100, 1, '^SELECT.*FOR UPDATE$',10,1), (200,1,'^SELECT',20,1), (300,1,'.*',10,1);
Query OK, 3 rows affected (0.01 sec)

Please note that we used password in the plain text and we will rely on ProxySQL to hash it. For the sake of security you should explicitly pass here the MySQL password hash.

Finally, we need to apply all the changes.

mysql> LOAD MYSQL SERVERS TO RUNTIME;
Query OK, 0 rows affected (0.02 sec)
mysql> LOAD MYSQL USERS TO RUNTIME;
Query OK, 0 rows affected (0.01 sec)
mysql> LOAD MYSQL QUERY RULES TO RUNTIME;
Query OK, 0 rows affected (0.01 sec)
mysql> SAVE MYSQL SERVERS TO DISK;
Query OK, 0 rows affected (0.07 sec)
mysql> SAVE MYSQL QUERY RULES TO DISK;
Query OK, 0 rows affected (0.02 sec)

We also want to load the hashed passwords from runtime: plain text passwords are hashed when loaded into the runtime configuration, to keep it hashed on disk we need to load it from runtime and then store on disk:

mysql> SAVE MYSQL USERS FROM RUNTIME;
Query OK, 0 rows affected (0.00 sec)
mysql> SAVE MYSQL USERS TO DISK;
Query OK, 0 rows affected (0.02 sec)

This is it when it comes to ProxySQL. Before making further steps you should check if you can connect to proxies from your application servers.

root@vagrant:~# mysql -h 10.0.0.103 -usbtest -psbtest -P6033 -e "SELECT * FROM sbtest.sbtest4 LIMIT 1\G"
mysql: [Warning] Using a password on the command line interface can be insecure.
*************************** 1. row ***************************
 id: 1
  k: 50147
  c: 68487932199-96439406143-93774651418-41631865787-96406072701-20604855487-25459966574-28203206787-41238978918-19503783441
pad: 22195207048-70116052123-74140395089-76317954521-98694025897

In our case, everything looks good. Now it’s time to install Keepalived.

Keepalived installation

Installation is quite simple (at least on Ubuntu 16.04, which we used):

apt install keepalived

Then you have to create configuration files for both servers:

Master keepalived node:

vrrp_script chk_haproxy {
   script "killall -0 haproxy"   # verify the pid existance
   interval 2                    # check every 2 seconds
   weight 2                      # add 2 points of prio if OK
}
vrrp_instance VI_HAPROXY {
   interface eth1                # interface to monitor
   state MASTER
   virtual_router_id 52          # Assign one ID for this route
   priority 101
   unicast_src_ip 10.0.0.103
   unicast_peer {
      10.0.0.104

   }
   virtual_ipaddress {
       10.0.0.112                        # the virtual IP
   }
   track_script {
       chk_haproxy
   }
#    notify /usr/local/bin/notify_keepalived.sh
}

Backup keepalived node:

vrrp_script chk_haproxy {
   script "killall -0 haproxy"   # verify the pid existance
   interval 2                    # check every 2 seconds
   weight 2                      # add 2 points of prio if OK
}
vrrp_instance VI_HAPROXY {
   interface eth1                # interface to monitor
   state MASTER
   virtual_router_id 52          # Assign one ID for this route
   priority 100
   unicast_src_ip 10.0.0.103
   unicast_peer {
      10.0.0.104

   }
   virtual_ipaddress {
       10.0.0.112                        # the virtual IP
   }
   track_script {
       chk_haproxy
   }
#    notify /usr/local/bin/notify_keepalived.sh

This is it, you can start keepalived on both nodes:

service keepalived start

You should see information in the logs that one of the nodes entered MASTER state and that VIP has been brought up on that node.

May  7 09:52:11 vagrant systemd[1]: Starting Keepalive Daemon (LVS and VRRP)...
May  7 09:52:11 vagrant Keepalived[26686]: Starting Keepalived v1.2.24 (08/06,2018)
May  7 09:52:11 vagrant Keepalived[26686]: Opening file '/etc/keepalived/keepalived.conf'.
May  7 09:52:11 vagrant Keepalived[26696]: Starting Healthcheck child process, pid=26697
May  7 09:52:11 vagrant Keepalived[26696]: Starting VRRP child process, pid=26698
May  7 09:52:11 vagrant Keepalived_healthcheckers[26697]: Initializing ipvs
May  7 09:52:11 vagrant Keepalived_vrrp[26698]: Registering Kernel netlink reflector
May  7 09:52:11 vagrant Keepalived_vrrp[26698]: Registering Kernel netlink command channel
May  7 09:52:11 vagrant Keepalived_vrrp[26698]: Registering gratuitous ARP shared channel
May  7 09:52:11 vagrant systemd[1]: Started Keepalive Daemon (LVS and VRRP).
May  7 09:52:11 vagrant Keepalived_vrrp[26698]: Unable to load ipset library
May  7 09:52:11 vagrant Keepalived_vrrp[26698]: Unable to initialise ipsets
May  7 09:52:11 vagrant Keepalived_vrrp[26698]: Opening file '/etc/keepalived/keepalived.conf'.
May  7 09:52:11 vagrant Keepalived_vrrp[26698]: Using LinkWatch kernel netlink reflector...
May  7 09:52:11 vagrant Keepalived_healthcheckers[26697]: Registering Kernel netlink reflector
May  7 09:52:11 vagrant Keepalived_healthcheckers[26697]: Registering Kernel netlink command channel
May  7 09:52:11 vagrant Keepalived_healthcheckers[26697]: Opening file '/etc/keepalived/keepalived.conf'.
May  7 09:52:11 vagrant Keepalived_healthcheckers[26697]: Using LinkWatch kernel netlink reflector...
May  7 09:52:11 vagrant Keepalived_vrrp[26698]: pid 26701 exited with status 256
May  7 09:52:12 vagrant Keepalived_vrrp[26698]: VRRP_Instance(VI_HAPROXY) Transition to MASTER STATE
May  7 09:52:13 vagrant Keepalived_vrrp[26698]: pid 26763 exited with status 256
May  7 09:52:13 vagrant Keepalived_vrrp[26698]: VRRP_Instance(VI_HAPROXY) Entering MASTER STATE
May  7 09:52:15 vagrant Keepalived_vrrp[26698]: pid 26806 exited with status 256
root@vagrant:~# ip a
1: lo: <LOOPBACK,UP,LOWER_UP> mtu 65536 qdisc noqueue state UNKNOWN group default qlen 1
    link/loopback 00:00:00:00:00:00 brd 00:00:00:00:00:00
    inet 127.0.0.1/8 scope host lo
       valid_lft forever preferred_lft forever
    inet6 ::1/128 scope host
       valid_lft forever preferred_lft forever
2: eth0: <BROADCAST,MULTICAST,UP,LOWER_UP> mtu 1500 qdisc pfifo_fast state UP group default qlen 1000
    link/ether 08:00:27:ee:87:c4 brd ff:ff:ff:ff:ff:ff
    inet 10.0.2.15/24 brd 10.0.2.255 scope global eth0
       valid_lft forever preferred_lft forever
    inet6 fe80::a00:27ff:feee:87c4/64 scope link
       valid_lft forever preferred_lft forever
3: eth1: <BROADCAST,MULTICAST,UP,LOWER_UP> mtu 1500 qdisc pfifo_fast state UP group default qlen 1000
    link/ether 08:00:27:fc:ac:21 brd ff:ff:ff:ff:ff:ff
    inet 10.0.0.103/24 brd 10.0.0.255 scope global eth1
       valid_lft forever preferred_lft forever
    inet 10.0.0.112/32 scope global eth1
       valid_lft forever preferred_lft forever
    inet6 fe80::a00:27ff:fefc:ac21/64 scope link
       valid_lft forever preferred_lft forever

As you can see, on node 10.0.0.103 a VIP (10.0.0.112) has been raised. We can now conclude with moving the traffic from old setup into the new one.

ClusterControl
Single Console for Your Entire Database Infrastructure
Find out what else is new in ClusterControl

Switching Traffic to a ProxySQL Setup

There are many methods on how to do it, it mostly depends on your particular environment. If you happen to use DNS to maintain a domain pointing to your HAProxy VIP, , you can just make a change there and, gradually, over time all connections will repoint to the new VIP. You can also make a change in your application, especially if the connection details are hardcoded - once you roll out the change, nodes will start connecting to the new setup. No matter how you do it, it would be great to test the new setup before you make a global switch. You sure tested it on your staging environment but it’s not a bad idea to pick a handful of app servers and redirect them to the new proxy, monitoring how they look like performance-wise. Below is a simple example utilizing iptables, which can be useful for testing.

On the ProxySQL hosts, redirect traffic from host 10.0.0.11 and port 3307 to host 10.0.0.112 and port 6033:

iptables -t nat -A OUTPUT -p tcp -d 10.0.0.111 --dport 3307 -j DNAT --to-destination 10.0.0.112:6033

Depending on your application you may need to restart the web server or other services (if your app creates a constant pool of connections to the database) or just wait as new connections will be opened against ProxySQL. You can verify that ProxySQL is receiving the traffic:

mysql> show processlist;
+-----------+--------+--------+-----------+---------+---------+-----------------------------------------------------------------------------+
| SessionID | user   | db     | hostgroup | command | time_ms | info                                                                        |
+-----------+--------+--------+-----------+---------+---------+-----------------------------------------------------------------------------+
| 12        | sbtest | sbtest | 20        | Sleep   | 0       |                                                                             |
| 13        | sbtest | sbtest | 10        | Query   | 0       | DELETE FROM sbtest23 WHERE id=49957                                         |
| 14        | sbtest | sbtest | 10        | Query   | 59      | DELETE FROM sbtest11 WHERE id=50185                                         |
| 15        | sbtest | sbtest | 20        | Query   | 59      | SELECT c FROM sbtest8 WHERE id=46054                                        |
| 16        | sbtest | sbtest | 20        | Query   | 0       | SELECT DISTINCT c FROM sbtest27 WHERE id BETWEEN 50115 AND 50214 ORDER BY c |
| 17        | sbtest | sbtest | 10        | Query   | 0       | DELETE FROM sbtest32 WHERE id=50084                                         |
| 18        | sbtest | sbtest | 10        | Query   | 26      | DELETE FROM sbtest28 WHERE id=34611                                         |
| 19        | sbtest | sbtest | 10        | Query   | 16      | DELETE FROM sbtest4 WHERE id=50151                                          |
+-----------+--------+--------+-----------+---------+---------+-----------------------------------------------------------------------------+

That was it, we have moved the traffic from HAProxy into ProxySQL setup. It took some steps but it is definitely doable with very small disruption to the service.

How to Migrate From HAProxy to ProxySQL Using ClusterControl?

In the previous section we explained how to manually deploy ProxySQL setup and then migrate into it. In this section we would like to explain how to accomplish the same objective using ClusterControl. The initial setup is exactly the same therefore we need to proceed with deployment of ProxySQL.

Deploying ProxySQL Using ClusterControl

Deployment of ProxySQL in ClusterControl is just a matter of a handful of clicks.

Deploy ProxySQL in ClusterControl

We had to pick a node’s IP or hostname, pass credentials for CLI administrative user and MySQL monitoring user. We decided to use existing MySQL and we passed access details for ‘sbtest’@’%’ user that we use in the application. We picked which nodes we want to use in the load balancer, we also increased max replication lag (if that threshold is crossed, ProxySQL will not send the traffic to that slave) from default 10 seconds to 100 as we are already suffering from the replication lag. After a short while ProxySQL nodes will be added to the cluster.

Deploying Keepalived for ProxySQL Using ClusterControl

When ProxySQL nodes have been added it’s time to deploy Keepalived.

Keepalived with ProxySQL in ClusterControl

All we had to do is to pick which ProxySQL nodes we want Keepalived to deploy on, virtual IP and interface to which VIP will be bound. When deployment will be completed, we will switch the traffic to the new setup using one of the methods mentioned in the “Switching traffic to ProxySQL setup” section above.

Monitoring ProxySQL Traffic in ClusterControl

We can verify that the traffic has switched to ProxySQL by looking at the load graph - as you can see, load is much more distributed across the nodes in the cluster. You can also see it on the graph below, which shows the queries distribution across the cluster.

ProxySQL Dashboard in ClusterControl

Finally, ProxySQL dashboard also shows that the traffic is distributed across all the nodes in the cluster:

ProxySQL Dashboard in ClusterControl

We hope you will benefit from this blog post, as you can see, with ClusterControl deploying the new architecture takes just a moment and requires just a handful of clicks to get things running. Let us know about your experience in such migrations.

Top Common Issues with MHA and How to Fix Them

$
0
0

In our previous blogs, we discussed MHA as a failover tool used in MySQL master-slave setups. Last month, we also blogged about how to handle MHA when it crashed. Today, we will see the top issues that DBAs usually encounter with MHA, and how you can fix them.

A Brief Intro To MHA (Master High Availability)

MHA stands for (Master High Availability) is still relevant and widely used today, especially in master-slave setups based on non-GTID replication. MHA performs well a failover or master-switch, but it does come with some pitfalls and limitations. Once MHA performs a master failover and slave promotion, it can automatically complete its database failover operation within ~30 seconds, which can be acceptable in a production environment. MHA can ensure the consistency of data. All this with zero performance degradation, and it requires no additional adjustments or changes to your existing deployments or setup. Apart from this, MHA is built on top of Perl and is an open-source HA solution - so it is relatively easy to create helpers or extend the tool in accordance to your desired setup. Check out this presentation for more information.

MHA software consists of two components, you need to install one of the following packages in accordance to its topology role:

MHA manager node = MHA Manager (manager)/MHA Node (data node)

Master/Slave nodes = MHA Node (data node)

MHA Manager is the software that manages the failover (automatic or manual), takes decisions on when and where to failover, and manages slave recovery during promotion of the candidate master for applying differential relay logs. If the master database dies, MHA Manager will coordinate with MHA Node agent as it applies differential relay logs to the slaves that do not have the latest binlog events from the master. The MHA Node software is a local agent that will monitor your MySQL instance and allow the MHA Manager to copy relay logs from the slaves. Typical scenario is that when the candidate master for failover is currently lagging and MHA detects it do not have the latest relay logs. Hence, it will wait for its mandate from MHA Manager as it searches for the latest slave that contains the binlog events and copies missing events from the slave using scp and applies them to itself.

Note though that MHA is currently not actively maintained, but the current version itself is stable and may be “good enough” for production. You can still echo your voice through github to address some issues or provide patches to the software.

Top Common Issues

Now let’s look at the most common issues that a DBA will encounter when using MHA.

Slave is lagging, non-interactive/automated failover failed!

This is a typical issue causing automated failover to abort or fail. This might sound simple but it does not point to only one specific problem. Slave lag may have different reasons:

  • Disk issues on the candidate master causing it to be disk I/O bound to process read and writes. It can also lead to data corruption if not mitigated.
  • Bad queries are replicated especially tables that have no primary keys or clustered indexes.
  • high server load.
  • Cold server and server hasn't yet warmed up
  • Not enough server resources. Possible that your slave can be too low in memory or server resources while replicating high intensive writes or reads.

Those can be mitigated in advance if you have proper monitoring of your database. One example with regards to slave lags in MHA is low-memory when dumping a big binary log file. As an example below, a master was marked as dead and it has to perform a non-interactive/automatic failover. However, as the candidate master was lagging and it has to apply the logs that weren't yet executed by the replication threads, MHA will locate the most up-to-date or latest slave as it will attempt to recover a slave against the oldest ones. Hence, as you can see below, while it was performing a slave recovery, the memory went too low:

vagrant@testnode20:~$ masterha_manager --conf=/etc/app1.cnf --remove_dead_master_conf --ignore_last_failover
Mon May  6 08:43:46 2019 - [warning] Global configuration file /etc/masterha_default.cnf not found. Skipping.
Mon May  6 08:43:46 2019 - [info] Reading application default configuration from /etc/app1.cnf..
Mon May  6 08:43:46 2019 - [info] Reading server configuration from /etc/app1.cnf..
…
Mon May  6 08:43:57 2019 - [info] Checking master reachability via MySQL(double check)...
Mon May  6 08:43:57 2019 - [info]  ok.
Mon May  6 08:43:57 2019 - [info] Alive Servers:
Mon May  6 08:43:57 2019 - [info]   192.168.10.50(192.168.10.50:3306)
Mon May  6 08:43:57 2019 - [info]   192.168.10.70(192.168.10.70:3306)
Mon May  6 08:43:57 2019 - [info] Alive Slaves:
Mon May  6 08:43:57 2019 - [info]   192.168.10.50(192.168.10.50:3306)  Version=5.7.23-23-log (oldest major version between slaves) log-bin:enabled
Mon May  6 08:43:57 2019 - [info]     Replicating from 192.168.10.60(192.168.10.60:3306)
Mon May  6 08:43:57 2019 - [info]     Primary candidate for the new Master (candidate_master is set)
Mon May  6 08:43:57 2019 - [info]   192.168.10.70(192.168.10.70:3306)  Version=5.7.23-23-log (oldest major version between slaves) log-bin:enabled
Mon May  6 08:43:57 2019 - [info]     Replicating from 192.168.10.60(192.168.10.60:3306)
Mon May  6 08:43:57 2019 - [info]     Not candidate for the new Master (no_master is set)
Mon May  6 08:43:57 2019 - [info] Starting Non-GTID based failover.
….
Mon May  6 08:43:59 2019 - [info] * Phase 3.4: New Master Diff Log Generation Phase..
Mon May  6 08:43:59 2019 - [info] 
Mon May  6 08:43:59 2019 - [info] Server 192.168.10.50 received relay logs up to: binlog.000004:106167341
Mon May  6 08:43:59 2019 - [info] Need to get diffs from the latest slave(192.168.10.70) up to: binlog.000005:240412 (using the latest slave's relay logs)
Mon May  6 08:43:59 2019 - [info] Connecting to the latest slave host 192.168.10.70, generating diff relay log files..
Mon May  6 08:43:59 2019 - [info] Executing command: apply_diff_relay_logs --command=generate_and_send --scp_user=vagrant --scp_host=192.168.10.50 --latest_mlf=binlog.000005 --latest_rmlp=240412 --target_mlf=binlog.000004 --target_rmlp=106167341 --server_id=3 --diff_file_readtolatest=/tmp/relay_from_read_to_latest_192.168.10.50_3306_20190506084355.binlog --workdir=/tmp --timestamp=20190506084355 --handle_raw_binlog=1 --disable_log_bin=0 --manager_version=0.58 --relay_dir=/var/lib/mysql --current_relay_log=relay-bin.000007 
Mon May  6 08:44:00 2019 - [info] 
    Relay log found at /var/lib/mysql, up to relay-bin.000007
 Fast relay log position search failed. Reading relay logs to find..
Reading relay-bin.000007
 Binlog Checksum enabled
 Master Version is 5.7.23-23-log
 Binlog Checksum enabled
…
…...
 Target relay log file/position found. start_file:relay-bin.000004, start_pos:106167468.
 Concat binary/relay logs from relay-bin.000004 pos 106167468 to relay-bin.000007 EOF into /tmp/relay_from_read_to_latest_192.168.10.50_3306_20190506084355.binlog ..
 Binlog Checksum enabled
 Binlog Checksum enabled
  Dumping binlog format description event, from position 0 to 361.. ok.
  Dumping effective binlog data from /var/lib/mysql/relay-bin.000004 position 106167468 to tail(1074342689)..Out of memory!
Mon May  6 08:44:00 2019 - [error][/usr/local/share/perl/5.26.1/MHA/MasterFailover.pm, ln1090]  Generating diff files failed with return code 1:0.
Mon May  6 08:44:00 2019 - [error][/usr/local/share/perl/5.26.1/MHA/MasterFailover.pm, ln1584] Recovering master server failed.
Mon May  6 08:44:00 2019 - [error][/usr/local/share/perl/5.26.1/MHA/ManagerUtil.pm, ln178] Got ERROR:  at /usr/local/bin/masterha_manager line 65.
Mon May  6 08:44:00 2019 - [info] 

----- Failover Report -----

app1: MySQL Master failover 192.168.10.60(192.168.10.60:3306)

Master 192.168.10.60(192.168.10.60:3306) is down!

Check MHA Manager logs at testnode20 for details.

Started automated(non-interactive) failover.
Invalidated master IP address on 192.168.10.60(192.168.10.60:3306)
The latest slave 192.168.10.70(192.168.10.70:3306) has all relay logs for recovery.
Selected 192.168.10.50(192.168.10.50:3306) as a new master.
Recovering master server failed.
Got Error so couldn't continue failover from here.

Thus, the failover failed. This example above shows that node 192.168.10.70 contains the most updated relay logs. However, in this example scenario, node 192.168.10.70 is set as no_master because it has a low memory. As it tries to recover the slave 192.168.10.50, it fails!

Fixes/Resolution:

This scenario illustrates something very important. An advanced monitoring environment must be setup! For example, you can run a background or daemon script which monitors the replication health. You can add as an entry through a cron job. For example, add an entry using the built-in script masterha_check_repl:

/usr/local/bin/masterha_check_repl --conf=/etc/app1.cnf

or create a background script which invokes this script and runs it in an interval. You can use report_script option to setup an alert notification in case it doesn't conform to your requirements, e.g., slave is lagging for about 100 seconds during a high peak load. You can also use monitoring platforms such as ClusterControl set it up to send you notifications based on the metrics you want to monitor.

In addition to this, take note that, in the example scenario, failover failed due to out-of-memory error. You might consider ensuring all your nodes to have enough memory and the right size of binary logs as they would need to dump the binlog for a slave recovery phase.

Inconsistent Slave, Applying diffs failed!

In relevance to slave lag, since MHA will try to sync relay logs to a candidate master, make sure that your data is in sync. Say for an example below:

...
 Concat succeeded.
 Generating diff relay log succeeded. Saved at /tmp/relay_from_read_to_latest_192.168.10.50_3306_20190506054328.binlog .
 scp testnode7:/tmp/relay_from_read_to_latest_192.168.10.50_3306_20190506054328.binlog to vagrant@192.168.10.50(22) succeeded.
Mon May  6 05:43:53 2019 - [info]  Generating diff files succeeded.
Mon May  6 05:43:53 2019 - [info] 
Mon May  6 05:43:53 2019 - [info] * Phase 3.5: Master Log Apply Phase..
Mon May  6 05:43:53 2019 - [info] 
Mon May  6 05:43:53 2019 - [info] *NOTICE: If any error happens from this phase, manual recovery is needed.
Mon May  6 05:43:53 2019 - [info] Starting recovery on 192.168.10.50(192.168.10.50:3306)..
Mon May  6 05:43:53 2019 - [info]  Generating diffs succeeded.
Mon May  6 05:43:53 2019 - [info] Waiting until all relay logs are applied.
Mon May  6 05:43:53 2019 - [info]  done.
Mon May  6 05:43:53 2019 - [info] Getting slave status..
Mon May  6 05:43:53 2019 - [info] This slave(192.168.10.50)'s Exec_Master_Log_Pos equals to Read_Master_Log_Pos(binlog.000010:161813650). No need to recover from Exec_Master_Log_Pos.
Mon May  6 05:43:53 2019 - [info] Connecting to the target slave host 192.168.10.50, running recover script..
Mon May  6 05:43:53 2019 - [info] Executing command: apply_diff_relay_logs --command=apply --slave_user='cmon' --slave_host=192.168.10.50 --slave_ip=192.168.10.50  --slave_port=3306 --apply_files=/tmp/relay_from_read_to_latest_192.168.10.50_3306_20190506054328.binlog --workdir=/tmp --target_version=5.7.23-23-log --timestamp=20190506054328 --handle_raw_binlog=1 --disable_log_bin=0 --manager_version=0.58 --slave_pass=xxx
Mon May  6 05:43:53 2019 - [info] 
MySQL client version is 5.7.23. Using --binary-mode.
Applying differential binary/relay log files /tmp/relay_from_read_to_latest_192.168.10.50_3306_20190506054328.binlog on 192.168.10.50:3306. This may take long time...
mysqlbinlog: Error writing file 'UNOPENED' (Errcode: 32 - Broken pipe)
FATAL: applying log files failed with rc 1:0!
Error logs from testnode5:/tmp/relay_log_apply_for_192.168.10.50_3306_20190506054328_err.log (the last 200 lines)..
ICwgMmM5MmEwZjkzY2M5MTU3YzAxM2NkZTk4ZGQ1ODM0NDEgLCAyYzkyYTBmOTNjYzkxNTdjMDEz
….
…..
M2QxMzc5OWE1NTExOTggLCAyYzkyYTBmOTNjZmI1YTdhMDEzZDE2NzhiNDc3NDIzNCAsIDJjOTJh
MGY5M2NmYjVhN2EwMTNkMTY3OGI0N2Q0MjMERROR 1062 (23000) at line 72: Duplicate entry '12583545' for key 'PRIMARY'
5ICwgMmM5MmEwZjkzY2ZiNWE3YTAxM2QxNjc4YjQ4
OTQyM2QgLCAyYzkyYTBmOTNjZmI1YTdhMDEzZDE2NzhiNDkxNDI1MSAsIDJjOTJhMGY5M2NmYjVh
N2EwMTNkMTczN2MzOWM3MDEzICwgMmM5MmEwZjkzY2ZiNWE3YTAxM2QxNzM3YzNhMzcwMTUgLCAy
…
--------------

Bye
 at /usr/local/bin/apply_diff_relay_logs line 554.
    eval {...} called at /usr/local/bin/apply_diff_relay_logs line 514
    main::main() called at /usr/local/bin/apply_diff_relay_logs line 121
Mon May  6 05:43:53 2019 - [error][/usr/local/share/perl/5.26.1/MHA/MasterFailover.pm, ln1399]  Applying diffs failed with return code 22:0.
Mon May  6 05:43:53 2019 - [error][/usr/local/share/perl/5.26.1/MHA/MasterFailover.pm, ln1584] Recovering master server failed.
Mon May  6 05:43:53 2019 - [error][/usr/local/share/perl/5.26.1/MHA/ManagerUtil.pm, ln178] Got ERROR:  at /usr/local/bin/masterha_manager line 65.
Mon May  6 05:43:53 2019 - [info]

An inconsistent cluster is really bad especially when automatic failover is enabled. In this case, failover cannot proceed as it detects a duplicate entry for primary key '12583545'.

Fixes/Resolution:

There are multiple things you can do here to avoid inconsistent state of your cluster.

  • Enable Lossless Semi-Synchronous Replication. Check out this external blog which is a good way to learn why you should consider using semi-sync in a standard MySQL replication setup.
  • Constantly run a checksum against your master-slave cluster. You can use pt-table-checksum and run it like once a week or month depending on how constantly your table is updated. Take note that pt-table-checksum can add overhead to your database traffic.
  • Use GTID-based replication. Although this won't impact the problem per se. However, GTID-based replication helps you determine errant transactions, especially those transactions that were ran on the slave directly. Another advantage of this, it's easier to manage GTID-based replication when you need to switch master host in replication.

Hardware Failure On The Master But Slaves Haven't Caught Up Yet

One of the many reasons why you would invest in automatic failover is a hardware failure on the master. For some setups, it may be more ideal to perform automatic failover only when the master encounters a hardware failure. The typical approach is to notify by sending an alarm - which might mean waking up the on-call ops person in the middle of the night let the person decide what to do. This type of approach is done on Github or even Facebook. A hardware failure, especially if the volume where your binlogs and data directory resides is affected, can mess with your failover especially if the binary logs are stored on that failed disk. By design, MHA will try to save binary logs from the crashed master but this cannot be possible if the disk failed. One possible scenario can happen is that server cannot be reachable via SSH. MHA can not save binary logs and has to do failover without applying binary log events that exist on the crashed master only. This will result in losing the latest data, especially if no slave has caught up with the master.

Fixes/Resolution

As one of the use cases by MHA, it's recommended to use semi-synchronous replication as it greatly reduces the risk of such data loss. It is important to note that any writes going to the master must ensure that slaves have received the latest binary log events before syncing to disk. MHA can apply the events to all other slaves so they can be consistent with each other.

Additionally, it's better as well to run a backup stream of your binary logs for disaster recovery in case the main disk volume has failed. If server is still accessible via SSH, then pointing the binary log path to the backup path of your binary log can still work, so failover and slave recovery can still move forward. In this way, you can avoid data loss.

ClusterControl
Single Console for Your Entire Database Infrastructure
Find out what else is new in ClusterControl

VIP (Virtual IP) Failover Causing Split-Brain

MHA, by default, does not handle any VIP management. However, it's easy to incorporate this with MHA's configuration and assign hooks in accordance to what you want MHA to do during the failover. You can set up your own script and hook it to the parameters master_ip_failover_script or master_ip_online_change_script. There are sample scripts as well which are located in <MHA Manager package>/samples/scripts/ directory. But let's go back to the main issue and that is the split-brain during failover.

During an automatic failover, once your script with VIP management is invoked and executed, MHA will do the following: check status, remove (or stop) the old VIP, and then re-assign the new VIP to the new master. A typical example of split brain is, when a master is identified as dead due to a network issue but in fact, slave nodes are still able to connect to the master. This is a false positive, and often leads to data inconsistency across the databases in the setup. Incoming client connections using the VIP will be sent to the new master. While on the other hand, there can be local connections running on old master, which is supposed to be dead. The local connections could be using the unix socket or localhost to lessen network hops. This can cause the data to drift against the new master and the rest of its slaves, as data from old master won't be replicated into the slaves.

Fixes/Resolution:

As stated earlier, some may prefer to avoid automatic failover unless the checks have determined that the master is totally down (like hardware failure), i.e. even the slave nodes are not able to reach it. The idea is that a false positive could be caused by a network glitch between the MHA node controller and the master, so a human may be better suited in this case to make a decision on whether to failover or not.

When dealing with false alarms, MHA has a parameter called secondary_check_script. The value placed here can be your custom scripts or you can use the built-in script /usr/local/bin/masterha_secondary_check which is shipped along with MHA Manager package. This adds extra checks which is actually the recommended approach to avoid false positives. In the example below from my own setup, I am using the built-in script masterha_secondary_check:

secondary_check_script=/usr/local/bin/masterha_secondary_check -s 192.168.10.50 --user=root --master_host=testnode6 --master_ip=192.168.10.60 --master_port=3306

In the above example, MHA Manager will do a loop based on the list of slave nodes (specified by -s argument) which will check the connection against MySQL master (192.168.10.60) host. Take note that, these slave nodes in the example can be some external remote nodes that can establish a connection to the database nodes within the cluster. This is a recommended approach especially for those setups where MHA Manager is running on a different datacenter or different network than the database nodes. The following sequence below illustrates how it proceeds with the checks:

  • From the MHA Host -> check TCP connection to the 1st Slave Node (IP: 192.168.10.50). Let's call this as Connection A. Then from the Slave Node, checks TCP connection to the Master Node (192.168.10.60). Let's call this Connection B.

If "Connection A" was successful but "Connection B" was unsuccessful in both routes, masterha_secondary_check script exits with return code 0 and MHA Manager decides that MySQL master is really dead, and will start failover. If "Connection A" was unsuccessful, masterha_secondary_check exits with return code 2 and MHA Manager guesses that there is a network problem and it does not start failover. If "Connection B" was successful, masterha_secondary_check exits with return code 3 and MHA Manager understands that MySQL master server is actually alive, and does not start failover.

An example of how it reacts during the failover based on the log,

Tue May  7 05:31:57 2019 - [info]  OK.
Tue May  7 05:31:57 2019 - [warning] shutdown_script is not defined.
Tue May  7 05:31:57 2019 - [info] Set master ping interval 1 seconds.
Tue May  7 05:31:57 2019 - [info] Set secondary check script: /usr/local/bin/masterha_secondary_check -s 192.168.10.50 -s 192.168.10.60 -s 192.168.10.70 --user=root --master_host=192.168.10.60 --master_ip=192.168.10.60 --master_port=3306
Tue May  7 05:31:57 2019 - [info] Starting ping health check on 192.168.10.60(192.168.10.60:3306)..
Tue May  7 05:31:58 2019 - [warning] Got error on MySQL connect: 2003 (Can't connect to MySQL server on '192.168.10.60' (110))
Tue May  7 05:31:58 2019 - [warning] Connection failed 1 time(s)..
Tue May  7 05:31:58 2019 - [info] Executing SSH check script: exit 0
Tue May  7 05:31:58 2019 - [info] Executing secondary network check script: /usr/local/bin/masterha_secondary_check -s 192.168.10.50 -s 192.168.10.60 -s 192.168.10.70 --user=root --master_host=192.168.10.60 --master_ip=192.168.10.60 --master_port=3306  --user=vagrant  --master_host=192.168.10.60  --master_ip=192.168.10.60  --master_port=3306 --master_user=cmon --master_password=R00tP@55 --ping_type=SELECT
Master is reachable from 192.168.10.50!
Tue May  7 05:31:58 2019 - [warning] Master is reachable from at least one of other monitoring servers. Failover should not happen.
Tue May  7 05:31:59 2019 - [warning] Got error on MySQL connect: 2003 (Can't connect to MySQL server on '192.168.10.60' (110))
Tue May  7 05:31:59 2019 - [warning] Connection failed 2 time(s)..
Tue May  7 05:32:00 2019 - [warning] Got error on MySQL connect: 2003 (Can't connect to MySQL server on '192.168.10.60' (110))
Tue May  7 05:32:00 2019 - [warning] Connection failed 3 time(s)..
Tue May  7 05:32:01 2019 - [warning] Got error on MySQL connect: 2003 (Can't connect to MySQL server on '192.168.10.60' (110))
Tue May  7 05:32:01 2019 - [warning] Connection failed 4 time(s)..
Tue May  7 05:32:03 2019 - [warning] HealthCheck: Got timeout on checking SSH connection to 192.168.10.60! at /usr/local/share/perl/5.26.1/MHA/HealthCheck.pm line 343.
Tue May  7 05:32:03 2019 - [warning] Secondary network check script returned errors. Failover should not start so checking server status again. Check network settings for details.
Tue May  7 05:32:04 2019 - [warning] Got error on MySQL connect: 2003 (Can't connect to MySQL server on '192.168.10.60' (110))
Tue May  7 05:32:04 2019 - [warning] Connection failed 1 time(s)..
Tue May  7 05:32:04 2019 - [info] Executing secondary network check script: /usr/local/bin/masterha_secondary_check -s 192.168.10.50 -s 192.168.10.60 -s 192.168.10.70 --user=root --master_host=192.168.10.60 --master_ip=192.168.10.60 --master_port=3306  --user=vagrant  --master_host=192.168.10.60  --master_ip=192.168.10.60  --master_port=3306 --master_user=cmon --master_password=R00tP@55 --ping_type=SELECT
Tue May  7 05:32:04 2019 - [info] Executing SSH check script: exit 0

Another thing to add is assigning a value to the parameter shutdown_script. This script is especially useful if you have to implement a proper STONITH or node fencing so it won't rise from the dead. This can avoid data inconsistency.

Lastly, ensure that the MHA Manager resides within the same local network along with the cluster nodes as it lessens the possibility of network outages, especially the connection from MHA Manager to the database nodes.

Avoiding SPOF in MHA

MHA can crash for various reasons, and unfortunately, there's no built-in feature to fix this, i.e. High Availability for MHA. However, as we have discussed in our previous blog "Master High Availability Manager (MHA) Has Crashed! What Do I Do Now?", there's a way to avoid SPOF for MHA.

Fixes/Resolution:

You can leverage Pacemaker to create active/standby nodes handled by cluster resource manager (crm). Alternatively, you can create a script to check the health of the MHA manager node. For example, you can provision a stand-by node which actively checks the MHA manager node by ssh'ing to run the built-in script masterha_check_status just like below:

vagrant@testnode20:~$ /usr/local/bin/masterha_check_status --conf=/etc/app1.cnf
app1 is stopped(2:NOT_RUNNING).

then do some node fencing if that controller is borked. You may also extend MHA tool with a helper script that runs via cron job and monitor the system process of the masterha_manager script and re-spawn it if process is dead.

Data Loss During Failover

MHA relies on the traditional async replication. Although it does support semi-sync, still, semi-sync relies on asynchronous replication. In this type of environment, data loss may happen after a failover. When your database is not setup properly and using an old-fashioned approach of replication, then it can be a pain especially when dealing with data consistency and lost transactions.

Another important thing to note with data loss with MHA, is when GTID is used with no semi-sync enabled. MHA with GTID will not connect through ssh to the master but will try to sync the binary logs for node recovery with the slaves first. This may potentially lead to more data loss than compared to MHA non-GTID with semi-sync not enabled.

Fixes/Resolution

When performing automatic failover, build a list of scenarios when you expect your MHA to failover. Since MHA is dealing with master-slave replication, then our advice to you to avoid data loss are the following:

  • Enable lossless semi-sync replication (exists in version MySQL 5.7)
  • Use GTID-based replication. Of course, you can use the traditional replication by using binlog's x & y coordinates. However, it makes things more difficult and time consuming when you need to locate a specific binary log entry that wasn't applied on the slave. Hence, with GTID in MySQL, it's easier to detect errant transactions.
  • For ACID compliance of your MySQL master-slave replication, enable these specific variables: sync_binlog = 1, innodb_flush_log_at_trx_commit = 1. This is expensive as it requires more processing power when MySQL calls the fsync() function when it commits, and performance can be disk bound in case of high number of writes. However, using RAID with battery-backup cache saves your disk I/O. Additionally, MySQL itself has improved with binary log group commit but still using a backup cache can save some disk syncs.
  • Leverage parallel replication or multi-threaded slave replication. This can help your slaves become more performant, and avoids slave lags against the master. You don't want your automatic failover to occur when the master is not reachable at all via either ssh or tcp connection, or if it encountered a disk failure, and your slaves are lagging behind. That could lead to data loss.
  • When performing an online or manual failover, it's best that you are performing it during non-peak periods to avoid unexpected mishaps that could lead to data loss. Or to avoid time-consuming searches grepping through your binary logs while there is a lot of activity going on.

MHA Says APP is Not Running, or Failover Does Not Work. What Should I Do?

Running checks using the built-in script masterha_check_status will check if the mastreha_manager script is running. Otherwise, you'll get an error like below:

vagrant@testnode20:~$ /usr/local/bin/masterha_check_status --conf=/etc/app1.cnf                                                                                                                       app1 is stopped(2:NOT_RUNNING).

However, there are certain cases where you might get NOT_RUNNING even when masterha_manager is running. This can be due to privilege of the ssh_user you set, or you run masterha_manager with a different system user, or the ssh user encountered a permission denied.

Fixes/Resolution:

MHA will use the the ssh_user defined in the configuration if specified. Otherwise, will use the current system user that you use to invoke the MHA commands. When running the script masterha_check_status for example, you need to ensure that the masterha_manager runs with the same user that is specified in ssh_user in your configuration file, or the user that will interface with the other database nodes in the cluster. You need to ensure that it has password-less, no passphrase SSH keys so MHA won't have any issues when establishing connection to the nodes that MHA is monitoring.

Take note that you need the ssh_user to have access to the following:

  • Can read the binary and relay logs of the MySQL nodes that MHA is monitoring
  • Must have access to the MHA monitoring logs. Check out these parameters in MHA: master_binlog_dir, manager_workdir, and manager_log
  • Must have access to the MHA configuration file. This is also very important. During a failover, once it finishes the failover, it will try to update the configuration file and remove the entry of the dead master. If the configuration file does not allow the ssh_user or the OS user you are currently using, it won't update the configuration file, leading to an escalation of the problem if disaster strikes again.

Candidate Master Lags, How to Force And Avoid Failed Failover

In reference to MHA's wiki, by default, if a slave behinds master more than 100MB of relay logs (= needs to apply more than 100MB of relay logs), MHA does not choose the slave as new master because it takes too long time to recover.

Fixes/Resolution

In MHA, this can be overridden by setting the parameter check_repl_delay=0. During a failover, MHA ignores replication delay when selecting a new master and will execute missing transactions. This option is useful when you set candidate_master=1 on a specific host and you want to make sure that the host can be new master.

You can also integrate with pt-heartbeat to achieve accuracy of slave lag (see this post and this one). But this can also be alleviated with parallel replication or multi-threaded replication slaves, present since MySQL 5.6 or, with MariaDB 10 - claiming to have a boost with 10x improvement in parallel replication and multi-threaded slaves. This can help your slaves replicate faster.

MHA Passwords Are Exposed

Securing or encrypting the passwords isn't something that is handled by MHA. The parameters password or repl_password will be exposed via the configuration file. So your system administrator or security architect must evaluate the grants or privileges of this file as you don’t want to expose valuable database/SSH credentials.

Fixes/Resolution:

MHA has an optional parameter init_conf_load_script. This parameter can be used to have a custom script load your MHA config that will interface to e.g. a database, and retrieve the user/password credentials of your replication setup.

Of course, you can also limit the file attribute of the configuration and the user you are using, and limit the access to the specific Ops/DBA's/Engineers that will handle MHA.

MHA is Not My Choice, What Are the Alternatives for replication failover?

MHA is not a one-size-fits-all solution, it has its limitations and may not fit your desired setup. However, here's a list of variants that you can try.

How to Migrate WHMCS Database to MariaDB Galera Cluster

$
0
0

WHMCS is an all-in-one client management, billing and support solution for web hosting companies. It's one of the leaders in the hosting automation world to be used alongside the hosting control panel itself. WHMCS runs on a LAMP stack, with MySQL/MariaDB as the database provider. Commonly, WHMCS is installed as a standalone instance (application and database) independently by following the WHMCS installation guide, or through software installer tools like cPanel Site Software or Softaculous. The database can be made highly available by migrating to a Galera Cluster of 3 nodes.

In this blog post, we will show you how to migrate the WHMCS database from a standalone MySQL server (provided by the WHM/cPanel server itself) to an external three-node MariaDB Galera Cluster to improve the database availability. The WHMCS application itself will be kept running on the same cPanel server. We’ll also give you some tuning tips to optimize performance.

Deploying the Database Cluster

  1. Install ClusterControl:
    $ whoami
    root
    $ wget https://severalnines.com/downloads/cmon/install-cc
    $ chmod 755 install-cc
    $ ./install-cc
    Follow the instructions accordingly until the installation is completed. Then, go to the http://192.168.55.50/clustercontrol (192.168.55.50 being the IP address of the ClusterControl host) and register a super admin user with password and other required details.
  2. Setup passwordless SSH from ClusterControl to all database nodes:
    $ whoami
    root
    $ ssh-keygen -t rsa # Press enter on all prompts
    $ ssh-copy-id 192.168.55.51
    $ ssh-copy-id 192.168.55.52
    $ ssh-copy-id 192.168.55.53
  3. Configure the database deployment for our 3-node MariaDB Galera Cluster. We are going to use the latest supported version MariaDB 10.3:
    Make sure you get all green checks after pressing ‘Enter’ when adding the node details. Wait until the deployment job completes and you should see the database cluster is listed in ClusterControl.
  4. Deploy a ProxySQL node (we are going to co-locate it with the ClusterControl node) by going to Manage -> Load Balancer -> ProxySQL -> Deploy ProxySQL. Specify the following required details:
    Under "Add Database User", you can ask ClusterControl to create a new ProxySQL and MySQL user as it sets up , thus we put the user as "portal_whmcs", assigned with ALL PRIVILEGES on database "portal_whmcs.*". Then, check all the boxes for "Include" and finally choose "false" for "Are you using implicit transactions?".

Once the deployment finished, you should see something like this under Topology view:

Our database deployment is now complete. Keep in mind that we do not cover the load balancer tier redundancy in this blog post. You can achieve that by adding a secondary load balancer and string them together with Keepalived. To learn more about this, check out ProxySQL Tutorials under chapter "4.2. High availability for ProxySQL".

WHMCS Installation

If you already have WHMCS installed and running, you may skip this step.

Take note that WHMCS requires a valid license which you have to purchase beforehand in order to use the software. They do not provide a free trial license, but they do offer a no questions asked 30-day money-back guarantee, which means you can always cancel the subscription before the offer expires without being charged.

To simplify the installation process, we are going to use cPanel Site Software (you may opt for WHMCS manual installation) to one of our sub-domain, selfportal.mytest.io. After creating the account in WHM, go to cPanel > Software > Site Software > WHMCS and install the web application. Login as the admin user and activate the license to start using the application.

At this point, our WHMCS instance is running as a standalone setup, connecting to the local MySQL server.

ClusterControl
Single Console for Your Entire Database Infrastructure
Find out what else is new in ClusterControl

Migrating the WHMCS Database to MariaDB Galera Cluster

Running WHMCS on a standalone MySQL server exposes the application to single-point-of-failure (SPOF) from database standpoint. MariaDB Galera Cluster provides redundancy to the data layer with built-in clustering features and support for multi-master architecture. Combine this with a database load balancer, for example ProxySQL, and we can improve the WHMCS database availability with very minimal changes to the application itself.

However, there are a number of best-practices that WHMCS (or other applications) have to follow in order to work efficiently on Galera Cluster, especially:

  • All tables must be running on InnoDB/XtraDB storage engine.
  • All tables should have a primary key defined (multi-column primary key is supported, unique key does not count).

Depending on the version installed, in our test environment installation (cPanel/WHM 11.78.0.23, WHMCS 7.6.0 via Site Software), the above two points did not meet the requirement. The default cPanel/WHM MySQL configuration comes with the following line inside /etc/my.cnf:

default-storage-engine=MyISAM

The above would cause additional tables managed by WHMCS Addon Modules to be created in MyISAM storage engine format if those modules are enabled. Here is the output of the storage engine after we have enabled 2 modules (New TLDs and Staff Noticeboard):

MariaDB> SELECT tables.table_schema, tables.table_name, tables.engine FROM information_schema.tables WHERE tables.table_schema='whmcsdata_whmcs' and tables.engine <> 'InnoDB';
+-----------------+----------------------+--------+
| table_schema    | table_name           | engine |
+-----------------+----------------------+--------+
| whmcsdata_whmcs | mod_enomnewtlds      | MyISAM |
| whmcsdata_whmcs | mod_enomnewtlds_cron | MyISAM |
| whmcsdata_whmcs | mod_staffboard       | MyISAM |
+-----------------+----------------------+--------+

MyISAM support is experimental in Galera, which means you should not run it in production. In some worse cases, it could compromise data consistency and cause writeset replication failures due to its non-transactional nature.

Another important point is that every table must have a primary key defined. Depending on the WHMCS installation procedure that you performed (as for us, we used cPanel Site Software to install WHMCS), some of the tables created by the installer do not come with primary key defined, as shown in the following output:

MariaDB [information_schema]> SELECT TABLES.table_schema, TABLES.table_name FROM TABLES LEFT JOIN KEY_COLUMN_USAGE AS c ON (TABLES.TABLE_NAME = c.TABLE_NAME AND c.CONSTRAINT_SCHEMA = TABLES.TABLE_SCHEMA AND c.constraint_name = 'PRIMARY' ) WHERE TABLES.table_schema <> 'information_schema' AND TABLES.table_schema <> 'performance_schema' AND TABLES.table_schema <> 'mysql' and TABLES.table_schema <> 'sys' AND c.constraint_name IS NULL;
+-----------------+------------------------------------+
| table_schema    | table_name                         |
+-----------------+------------------------------------+
| whmcsdata_whmcs | mod_invoicedata                    |
| whmcsdata_whmcs | tbladminperms                      |
| whmcsdata_whmcs | tblaffiliates                      |
| whmcsdata_whmcs | tblconfiguration                   |
| whmcsdata_whmcs | tblknowledgebaselinks              |
| whmcsdata_whmcs | tbloauthserver_access_token_scopes |
| whmcsdata_whmcs | tbloauthserver_authcode_scopes     |
| whmcsdata_whmcs | tbloauthserver_client_scopes       |
| whmcsdata_whmcs | tbloauthserver_user_authz_scopes   |
| whmcsdata_whmcs | tblpaymentgateways                 |
| whmcsdata_whmcs | tblproductconfiglinks              |
| whmcsdata_whmcs | tblservergroupsrel                 |
+-----------------+------------------------------------+

As a side note, Galera would still allow tables without primary key to exist. However, DELETE operations are not supported on those tables plus it would expose you to much bigger problems like node crash, writeset certification performance degradation or rows may appear in a different order on different nodes.

To overcome this, our migration plan must include the additional step to fix the storage engine and schema structure, as shown in the next section.

Migration Plan

Due to restrictions explained in the previous chapter, our migration plan has to be something like this:

  1. Enable WHMCS maintenance mode
  2. Take backups of the whmcs database using logical backup
  3. Modify the dump files to meet Galera requirement (convert storage engine)
  4. Bring up one of the Galera nodes and let the remaining nodes shut down
  5. Restore to the chosen Galera node
  6. Fix the schema structure to meet Galera requirement (missing primary keys)
  7. Bootstrap the cluster from the chosen Galera node
  8. Start the second node and let it sync
  9. Start the third node and let it sync
  10. Change the database pointing to the appropriate endpoint
  11. Disable WHMCS maintenance mode

The new architecture can be illustrated as below:

Our WHMCS database name on the cPanel server is "whmcsdata_whmcs" and we are going to migrate this database to an external three-node MariaDB Galera Cluster deployed by ClusterControl. On top of the database server, we have a ProxySQL (co-locate with ClusterControl) running to act as the MariaDB load balancer, providing the single endpoint to our WHMCS instance. The database name on the cluster will be changed to "portal_whmcs" instead, so we can easily distinguish it.

Firstly, enable the site-wide Maintenance Mode by going to WHMCS > Setup > General Settings > General > Maintenance Mode > Tick to enable - prevents client area access when enabled. This will ensure there will be no activity from the end user during the database backup operation.

Since we have to make slight modifications to the schema structure to fit well into Galera, it's a good idea to create two separate dump files. One with the schema only and another one for data only. On the WHM server, run the following command as root:

$ mysqldump --no-data -uroot whmcsdata_whmcs > whmcsdata_whmcs_schema.sql
$ mysqldump --no-create-info -uroot whmcsdata_whmcs > whmcsdata_whmcs_data.sql

Then, we have to replace all MyISAM occurrences in the schema dump file with 'InnoDB':

$ sed -i 's/MyISAM/InnoDB/g' whmcsdata_whmcs_schema.sql

Verify that we don't have MyISAM lines anymore in the dump file (it should return nothing):

$ grep -i 'myisam' whmcsdata_whmcs_schema.sql

Transfer the dump files from the WHM server to mariadb1 (192.168.55.51):

$ scp whmcsdata_whmcs_* 192.168.55.51:~

Create the MySQL database. From ClusterControl, go to Manage -> Schemas and Users -> Create Database and specify the database name. Here we use a different database name called "portal_whmcs". Otherwise, you can manually create the database with the following command:

$ mysql -uroot -p 
MariaDB> CREATE DATABASE 'portal_whmcs';

Create a MySQL user for this database with its privileges. From ClusterControl, go to Manage -> Schemas and Users -> Users -> Create New User and specify the following:

In case you choose to create the MySQL user manually, run the following statements:

$ mysql -uroot -p 
MariaDB> CREATE USER 'portal_whmcs'@'%' IDENTIFIED BY 'ghU51CnPzI9z';
MariaDB> GRANT ALL PRIVILEGES ON portal_whmcs.* TO portal_whmcs@'%';

Take note that the created database user has to be imported into ProxySQL, to allow the WHMCS application to authenticate against the load balancer. Go to Nodes -> pick the ProxySQL node -> Users -> Import Users and select "portal_whmcs"@"%", as shown in the following screenshot:

In the next window (User Settings), specify Hostgroup 10 as the default hostgroup:

Now the restoration preparation stage is complete.

In Galera, restoring a big database via mysqldump on a single-node cluster is more efficient, and this improves the restoration time significantly. Otherwise, every node in the cluster would have to certify every statement from the mysqldump input, which would take longer time to complete.

Since we already have a three-node MariaDB Galera Cluster running, let's stop MySQL service on mariadb2 and mariadb3, one node at a time for a graceful scale down. To shut down the database nodes, from ClusterControl, simply go to Nodes -> Node Actions -> Stop Node -> Proceed. Here is what you would see from ClusterControl dashboard, where the cluster size is 1 and the status of the db1 is Synced and Primary:

Then, on mariadb1 (192.168.55.51), restore the schema and data accordingly:

$ mysql -uportal_whmcs -p portal_whmcs < whmcsdata_whmcs_schema.sql
$ mysql -uportal_whmcs -p portal_whmcs < whmcsdata_whmcs_data.sql

Once imported, we have to fix the table structure to add the necessary "id" column (except for table "tblaffiliates") as well as adding the primary key on all tables that have been missing any:

$ mysql -uportal_whmcs -p
MariaDB> USE portal_whmcs;
MariaDB [portal_whmcs]> ALTER TABLE `tblaffiliates` ADD PRIMARY KEY (id);
MariaDB [portal_whmcs]> ALTER TABLE `mod_invoicedata` ADD `id` INT NOT NULL AUTO_INCREMENT PRIMARY KEY FIRST;
MariaDB [portal_whmcs]> ALTER TABLE `tbladminperms` ADD `id` INT NOT NULL AUTO_INCREMENT PRIMARY KEY FIRST;
MariaDB [portal_whmcs]> ALTER TABLE `tblconfiguration` ADD `id` INT NOT NULL AUTO_INCREMENT PRIMARY KEY FIRST;
MariaDB [portal_whmcs]> ALTER TABLE `tblknowledgebaselinks` ADD `id` INT NOT NULL AUTO_INCREMENT PRIMARY KEY FIRST;
MariaDB [portal_whmcs]> ALTER TABLE `tbloauthserver_access_token_scopes` ADD `id` INT NOT NULL AUTO_INCREMENT PRIMARY KEY FIRST;
MariaDB [portal_whmcs]> ALTER TABLE `tbloauthserver_authcode_scopes` ADD `id` INT NOT NULL AUTO_INCREMENT PRIMARY KEY FIRST;
MariaDB [portal_whmcs]> ALTER TABLE `tbloauthserver_client_scopes` ADD `id` INT NOT NULL AUTO_INCREMENT PRIMARY KEY FIRST;
MariaDB [portal_whmcs]> ALTER TABLE `tbloauthserver_user_authz_scopes` ADD `id` INT NOT NULL AUTO_INCREMENT PRIMARY KEY FIRST;
MariaDB [portal_whmcs]> ALTER TABLE `tblpaymentgateways` ADD `id` INT NOT NULL AUTO_INCREMENT PRIMARY KEY FIRST;
MariaDB [portal_whmcs]> ALTER TABLE `tblproductconfiglinks` ADD `id` INT NOT NULL AUTO_INCREMENT PRIMARY KEY FIRST;
MariaDB [portal_whmcs]> ALTER TABLE `tblservergroupsrel` ADD `id` INT NOT NULL AUTO_INCREMENT PRIMARY KEY FIRST;

Or, we can translate the above repeated statements using a loop in a bash script:

#!/bin/bash

db_user='portal_whmcs'
db_pass='ghU51CnPzI9z'
db_whmcs='portal_whmcs'
tables=$(mysql -u${db_user} "-p${db_pass}"  information_schema -A -Bse "SELECT TABLES.table_name FROM TABLES LEFT JOIN KEY_COLUMN_USAGE AS c ON (TABLES.TABLE_NAME = c.TABLE_NAME AND c.CONSTRAINT_SCHEMA = TABLES.TABLE_SCHEMA AND c.constraint_name = 'PRIMARY' ) WHERE TABLES.table_schema <> 'information_schema' AND TABLES.table_schema <> 'performance_schema' AND TABLES.table_schema <> 'mysql' and TABLES.table_schema <> 'sys' AND c.constraint_name IS NULL;")
mysql_exec="mysql -u${db_user} -p${db_pass} $db_whmcs -e"

for table in $tables
do
        if [ "${table}" = "tblaffiliates" ]
        then
                $mysql_exec "ALTER TABLE ${table} ADD PRIMARY KEY (id)";
        else
                $mysql_exec "ALTER TABLE ${table} ADD id INT NOT NULL AUTO_INCREMENT PRIMARY KEY FIRST";
        fi
done

At this point, it's safe to start the remaining nodes to sync up with mariadb1. Start with mariadb2 by going to Nodes -> pick db2 -> Node Actions -> Start Node. Monitor the job progress and make sure mariadb2 is in Synced and Primary state (monitor the Overview page for details) before starting up mariadb3.

Finally, change the database pointing to the ProxySQL host on port 6033 inside WHMCS configuration file, as in our case it's located at /home/whmcsdata/public_html/configuration.php:

$ vim configuration.php
<?php
$license = 'WHMCS-XXXXXXXXXXXXXXXXXXXX';
$templates_compiledir = 'templates_c';
$mysql_charset = 'utf8';
$cc_encryption_hash = 'gLg4oxuOWsp4bMleNGJ--------30IGPnsCS49jzfrKjQpwaN';
$db_host = 192.168.55.50;
$db_port = '6033';
$db_username = 'portal_whmcs';
$db_password = 'ghU51CnPzI9z';
$db_name = 'portal_whmcs';

$customadminpath = 'admin2d27';

Don't forget to disable WHMCS maintenance mode by going to WHMCS > Setup > General Settings > General > Maintenance Mode > uncheck "Tick to enable - prevents client area access when enabled". Our database migration exercise is now complete.

Testing and Tuning

You can verify if by looking at the ProxySQL's query entries under Nodes -> ProxySQL -> Top Queries:

For the most repeated read-only queries (you can sort them by Count Star), you may cache them to improve the response time and reduce the number of hits to the backend servers. Simply rollover to any query and click Cache Query, and the following pop-up will appear:

What you need to do is to only choose the destination hostgroup and click "Add Rule". You can then verify if the cached query got hit under "Rules" tab:

From the query rule itself, we can tell that reads (all SELECT except SELECT .. FOR UPDATE) are forwarded to hostgroup 20 where the connections are distributed to all nodes while writes (other than SELECT) are forwarded to hostgroup 10, where the connections are forwarded to one Galera node only. This configuration minimizes the risk for deadlocks that may be caused by a multi-master setup, which improves the replication performance as a whole.

That's it for now. Happy clustering!

How to Automate Migration from Standalone MySQL to Galera Cluster using Ansible

$
0
0

Database migrations don’t scale well. Typically you need to perform a great deal of tests before you can pull the trigger and switch from old to new. Migrations are usually done manually, as most of the process does not lend itself to automation. But that doesn’t mean there is no room for automation in the migration process. Imagine setting up a number of nodes with new software, provisioning them with data and configuring replication between old and new environments by hand. This takes days. Automation can be very useful when setting up a new environment and provisioning it with data. In this blog post, we will take a look at a very simple migration - from standalone Percona Server 5.7 to a 3-node Percona XtraDB Cluster 5.7. We will use Ansible to accomplish that.

Environment Description

First of all, one important disclaimer - what we are going to show here is only a draft of what you might like to run in production. It does work on our test environment but it may require modifications to make it suitable for your environment. In our tests we used four Ubuntu 16.04 VM’s deployed using Vagrant. One contains standalone Percona Server 5.7, remaining three will be used for Percona XtraDB Cluster nodes. We also use a separate node for running ansible playbooks, although this is not a requirement and the playbook can also be executed from one of the nodes. In addition, SSH connectivity is available between all of the nodes. You have to have connectivity from the host where you run ansible, but having the ability to ssh between nodes is useful (especially between master and new slave - we rely on this in the playbook).

Playbook Structure

Ansible playbooks typically share common structure - you create roles, which can be assigned to different hosts. Each role will contain tasks to be executed on it, templates that will be used, files that will be uploaded, variables which are defined for this particular playbook. In our case, the playbook is very simple.

.
├── inventory
├── playbook.yml
├── roles
│   ├── first_node
│   │   ├── my.cnf.j2
│   │   ├── tasks
│   │   │   └── main.yml
│   │   └── templates
│   │       └── my.cnf.j2
│   ├── galera
│   │   ├── tasks
│   │   │   └── main.yml
│   │   └── templates
│   │       └── my.cnf.j2
│   ├── master
│   │   └── tasks
│   │       └── main.yml
│   └── slave
│       └── tasks
│           └── main.yml
└── vars
    └── default.yml

We defined a couple of roles - we have a master role, which is intended to do some sanity checks on the standalone node. There is slave node, which will be executed on one of the Galera nodes to configure it for replication, and set up the asynchronous replication. Then we have a role for all Galera nodes and a role for the first Galera node to bootstrap the cluster from it. For Galera roles, we have a couple of templates that we will use to create my.cnf files. We will also use local .my.cnf to define a username and password. We have a file containing a couple of variables which we may want to customize, just like passwords. Finally we have an inventory file, which defines hosts on which we will run the playbook, we also have the playbook file with information on how exactly things should be executed. Let’s take a look at the individual bits.

Inventory File

This is a very simple file.

[galera]
10.0.0.142
10.0.0.143
10.0.0.144

[first_node]
10.0.0.142

[master]
10.0.0.141

We have three groups, ‘galera’, which contains all Galera nodes, ‘first_node’, which we will use for the bootstrap and finally ‘master’, which contains our standalone Percona Server node.

Playbook.yml

The file playbook.yml contains the general guidelines on how the playbook should be executed.

-   hosts: master
    gather_facts: yes
    become: true
    pre_tasks:
    -   name: Install Python2
        raw: test -e /usr/bin/python || (apt -y update && apt install -y python-minimal)
    vars_files:
        -   vars/default.yml
    roles:
    -   { role: master }

As you can see, we start with the standalone node and we apply tasks related to the role ‘master’ (we will discuss this in details further down in this post).

-   hosts: first_node
    gather_facts: yes
    become: true
    pre_tasks:
    -   name: Install Python2
        raw: test -e /usr/bin/python || (apt -y update && apt install -y python-minimal)
    vars_files:
        -   vars/default.yml
    roles:
    -   { role: first_node }
    -   { role: slave }

Second, we go to node defined in ‘first_node’ group and we apply two roles: ‘first_node’ and ‘slave’. The former is intended to deploy a single node PXC cluster, the later will configure it to work as a slave and set up the replication.

-   hosts: galera
    gather_facts: yes
    become: true
    pre_tasks:
    -   name: Install Python2
        raw: test -e /usr/bin/python || (apt -y update && apt install -y python-minimal)
    vars_files:
        -   vars/default.yml
    roles:
    -   { role: galera }

Finally, we go through all Galera nodes and apply ‘galera’ role on all of them.

Severalnines
 
DevOps Guide to Database Management
Learn about what you need to know to automate and manage your open source databases

Variables

Before we begin to look into roles, we want to mention default variables that we defined for this playbook.

sst_user: "sstuser"
sst_password: "pa55w0rd"
root_password: "pass"
repl_user: "repl_user"
repl_password: "repl1cati0n"

As we stated, this is a very simple playbook without much options for customization. You can configure users and passwords and this is basically it. One gotcha - please make sure that the standalone node’s root password matches ‘root_password’ here as otherwise the playbook wouldn’t be able to connect there (it can be extended to handle it but we did not cover that).

This file is without much of a value but, as a rule of thumb, you want to encrypt any file which contains credentials. Obviously, this is for the security reasons. Ansible comes with ansible-vault, which can be used to encrypt and decrypt files. We will not cover details here, all you need to know is available in the documentation. In short, you can easily encrypt files using passwords and configure your environment so that the playbooks can be decrypted automatically using password from file or passed by hand.

Roles

In this section we will go over roles that are defined in the playbook, summarizing what they are intended to perform.

Master role

As we stated, this role is intended to run a sanity check on the configuration of the standalone MySQL. It will install required packages like percona-xtrabackup-24. It also creates replication user on the master node. A configuration is reviewed to ensure that the server_id and other replication and binary log-related settings are set. GTID is also enabled as we will rely on it for replication.

First_node role

Here, the first Galera node is installed. Percona repository will be configured, my.cnf will be created from the template. PXC will be installed. We also run some cleanup to remove unneeded users and to create those, which will be required (root user with the password of our choosing, user required for SST). Finally, cluster is bootstrapped using this node. We rely on the empty ‘wsrep_cluster_address’ as a way to initialize the cluster. This is why later we still execute ‘galera’ role on the first node - to swap initial my.cnf with the final one, containing ‘wsrep_cluster_address’ with all the members of the cluster. One thing worth remembering - when you create a root user with password you have to be careful not to get locked off MySQL so that Ansible could execute other steps of the playbook. One way to do that is to provide .my.cnf with correct user and password. Another would be to remember to always set correct login_user and login_password in ‘mysql_user’ module.

Slave role

This role is all about configuring replication between standalone node and the single node PXC cluster. We use xtrabackup to get the data, we also check for executed gtid in xtrabackup_binlog_info to ensure the backup will be restored properly and that replication can be configured. We also perform a bit of the configuration, making sure that the slave node can use GTID replication. There is a couple of gotchas here - it is not possible to run ‘RESET MASTER’ using ‘mysql_replication’ module as of Ansible 2.7.10, it should be possible to do that in 2.8, whenever it will come out. We had to use ‘shell’ module to run MySQL CLI commands. When rebuilding Galera node from external source, you have to remember to re-create any required users (at least user used for SST). Otherwise the remaining nodes will not be able to join the cluster.

Galera role

Finally, this is the role in which we install PXC on remaining two nodes. We run it on all nodes, the initial one will get “production” my.cnf instead of its “bootstrap” version. Remaining two nodes will have PXC installed and they will get SST from the first node in the cluster.

Summary

As you can see, you can easily create a simple, reusable Ansible playbook which can be used for deploying Percona XtraDB Cluster and configuring it to be a slave of standalone MySQL node. To be honest, for migrating a single server, this will probably have no point as doing the same manually will be faster. Still, if you expect you will have to re-execute this process a couple of times, it will definitely make sense to automate it and make it more time efficient. As we stated at the beginning, this is by no means production-ready playbook. It is more of a proof of concept, something you may extend to make it suitable for your environment. You can find archive with the playbook here: http://severalnines.com/sites/default/files/ansible.tar.gz

We hope you found this blog post interesting and valuable, do not hesitate to share your thoughts.

Database Automation with Puppet: Deploying MySQL & MariaDB Replication

$
0
0

Puppet is an open source systems management tool for centralizing and automating configuration management. Automation tools help to minimize manual and repetitive tasks, and can save a great deal of time.

Puppet works by default in a server/agent model. Agents fetch their “catalog” (final desired state) from the master and apply it locally. Then they report back to the server. The catalog is computed depending on “facts” the machine sends to the server, user input (parameters) and modules (source code).

In this blog, we’ll show you how to deploy and manage MySQL/MariaDB instances via Puppet. There are a number of technologies around MySQL/MariaDB such as replication (master-slave, Galera or group replication for MySQL), SQL-aware load balancers like ProxySQL and MariaDB MaxScale, backup and recovery tools and many more which we will cover in this blog series. There are also many modules available in the Puppet Forge built and maintained by the community which can help us simplify the code and avoid reinventing the wheel. In this blog, we are going to focus on MySQL Replication.

puppetlabs/mysql

This is the most popular Puppet module for MySQL and MariaDB (and probably the best in the market) right now. This module manages both the installation and configuration of MySQL, as well as extending Puppet to allow management of MySQL resources, such as databases, users, and grants.

The module is officially maintained by the Puppet team (via puppetlabs Github repository) and supports all major versions of Puppet Enterprise 2019.1.x, 2019.0.x, 2018.1.x, Puppet >= 5.5.10 < 7.0.0 on RedHat, Ubuntu, Debian, SLES, Scientific, CentOS, OracleLinux platforms. User has options to install MySQL, MariaDB and Percona Server by customizing the package repository

The following example shows how to deploy a MySQL server. On the puppet master install the MySQL module and create the manifest file:

(puppet-master)$ puppet module install puppetlabs/mysql
(puppet-master)$ vim /etc/puppetlabs/code/environments/production/manifests/mysql.pp

Add the following lines:

node "db1.local" {
  class { '::mysql::server':
    root_password => 't5[sb^D[+rt8bBYu',
    remove_default_accounts => true,
    override_options => {
      'mysqld' => {
        'log_error' => '/var/log/mysql.log',
        'innodb_buffer_pool_size' => '512M'
      }
      'mysqld_safe' => {
        'log_error' => '/var/log/mysql.log'
      }
    }
  }
}

Then on the puppet agent node, run the following command to apply the configuration catalog:

(db1.local)$ puppet agent -t

On the first run, you might get the following error:

Info: Certificate for db1.local has not been signed yet

Just run the following command on the Puppet master to sign the certificate:

(puppet-master)$ puppetserver ca sign --certname=db1.local
Successfully signed certificate request for db1.local

Retry again with "puppet agent -t" command to re-initiate the connection with the signed certificate.

The above definition will install the standard MySQL-related packages available in the OS distribution repository. For example, on Ubuntu 18.04 (Bionic), you would get MySQL 5.7.26 packages installed:

(db1.local) $ dpkg --list | grep -i mysql
ii  mysql-client-5.7                5.7.26-0ubuntu0.18.04.1           amd64        MySQL database client binaries
ii  mysql-client-core-5.7           5.7.26-0ubuntu0.18.04.1           amd64        MySQL database core client binaries
ii  mysql-common                    5.8+1.0.4                         all          MySQL database common files, e.g. /etc/mysql/my.cnf
ii  mysql-server                    5.7.26-0ubuntu0.18.04.1           all          MySQL database server (metapackage depending on the latest version)
ii  mysql-server-5.7                5.7.26-0ubuntu0.18.04.1           amd64        MySQL database server binaries and system database setup
ii  mysql-server-core-5.7           5.7.26-0ubuntu0.18.04.1           amd64        MySQL database server binaries

You may opt for other vendors like Oracle, Percona or MariaDB with extra configuration on the repository (refer to the README section for details). The following definition will install the MariaDB packages from MariaDB apt repository (requires apt Puppet module):

$ puppet module install puppetlabs/apt
$ vim /etc/puppetlabs/code/environments/production/manifests/mariadb.pp
# include puppetlabs/apt module
include apt

# apt definition for MariaDB 10.3
apt::source { 'mariadb':
  location => 'http://sgp1.mirrors.digitalocean.com/mariadb/repo/10.3/ubuntu/',
  release  => $::lsbdistcodename,
  repos    => 'main',
  key      => {
    id     => 'A6E773A1812E4B8FD94024AAC0F47944DE8F6914',
    server => 'hkp://keyserver.ubuntu.com:80',
  },
  include => {
    src   => false,
    deb   => true,
  },
}

# MariaDB configuration
class {'::mysql::server':
  package_name     => 'mariadb-server',
  service_name     => 'mysql',
  root_password    => 't5[sb^D[+rt8bBYu',
  override_options => {
    mysqld => {
      'log-error' => '/var/log/mysql/mariadb.log',
      'pid-file'  => '/var/run/mysqld/mysqld.pid',
    },
    mysqld_safe => {
      'log-error' => '/var/log/mysql/mariadb.log',
    },
  }
}

# Deploy on db2.local
node "db2.local" {
Apt::Source['mariadb'] ->
Class['apt::update'] ->
Class['::mysql::server']
}

Take note on the key->id value, where there is a special way to retrieve the 40-character id as shown in this article:

$ sudo apt-key adv --recv-keys --keyserver hkp://keyserver.ubuntu.com:80 0xF1656F24C74CD1D8
$ apt-key adv --list-public-keys --with-fingerprint --with-colons
uid:-::::1459359915::6DC53DD92B7A8C298D5E54F950371E2B8950D2F2::MariaDB Signing Key <signing-key@mariadb.org>::::::::::0:
sub:-:4096:1:C0F47944DE8F6914:1459359915::::::e::::::23:
fpr:::::::::A6E773A1812E4B8FD94024AAC0F47944DE8F6914:

Where the id value is in the line started with "fpr", which is 'A6E773A1812E4B8FD94024AAC0F47944DE8F6914'.

After the Puppet catalog is applied, you may directly access MySQL console as root without explicit password since the module configures and manages ~/.my.cnf automatically. If we would want to reset the root password to something else, simply change the root_password value in the Puppet definition and apply the catalog on the agent node.

MySQL Replication Deployment

To deploy a MySQL Replication setup, one has to create at least two types of configuration to separate master and slave configuration. The master will have read-only disabled to allow read/write while slaves will be configured with read-only enabled. In this example, we are going to use GTID-based replication to simplify the configuration (since all nodes' configuration would be very similar). We will want to initiate replication link to the master right after the slave is up.

Supposed we are having 3 nodes MySQL master-slave replication:

  • db1.local - master
  • db2.local - slave #1
  • db3.local - slave #2

To meet the above requirements, we can write down our manifest to something like this:

# Puppet manifest for MySQL GTID-based replication MySQL 5.7 on Ubuntu 18.04 (Puppet v6.4.2) 
# /etc/puppetlabs/code/environments/production/manifests/replication.pp

# node's configuration
class mysql {
  class {'::mysql::server':
    root_password           => 'q1w2e3!@#',
    create_root_my_cnf      => true,
    remove_default_accounts => true,
    manage_config_file      => true,
    override_options        => {
      'mysqld' => {
        'datadir'                 => '/var/lib/mysql',
        'bind_address'            => '0.0.0.0',
        'server-id'               => $mysql_server_id,
        'read_only'               => $mysql_read_only,
        'gtid-mode'               => 'ON',
        'enforce_gtid_consistency'=> 'ON',
        'log-slave-updates'       => 'ON',
        'sync_binlog'             => 1,
        'log-bin'                 => '/var/log/mysql-bin',
        'read_only'               => 'OFF',
        'binlog-format'           => 'ROW',
        'log-error'               => '/var/log/mysql/error.log',
        'report_host'             => ${fqdn},
        'innodb_buffer_pool_size' => '512M'
      },
      'mysqld_safe' => {
        'log-error'               => '/var/log/mysql/error.log'
      }
    }
  }
  
  # create slave user
  mysql_user { "${slave_user}@192.168.0.%":
      ensure        => 'present',
      password_hash => mysql_password("${slave_password}")
  }

  # grant privileges for slave user
  mysql_grant { "${slave_user}@192.168.0.%/*.*":
      ensure        => 'present',
      privileges    => ['REPLICATION SLAVE'],
      table         => '*.*',
      user          => "${slave_user}@192.168.0.%"
  }

  # /etc/hosts definition
  host {
    'db1.local': ip => '192.168.0.161';
    'db2.local': ip => '192.169.0.162';
    'db3.local': ip => '192.168.0.163';
  }

  # executes change master only if $master_host is defined
  if $master_host {
    exec { 'change master':
      path    => '/usr/bin:/usr/sbin:/bin',
      command => "mysql --defaults-extra-file=/root/.my.cnf -e \"CHANGE MASTER TO MASTER_HOST = '$master_host', MASTER_USER = '$slave_user', MASTER_PASSWORD = '$slave_password', MASTER_AUTO_POSITION = 1; START SLAVE;\"",
      unless  => "mysql --defaults-extra-file=/root/.my.cnf -e 'SHOW SLAVE STATUS\G' | grep 'Slave_SQL_Running: Yes'"
    }
  }
}

## node assignment

# global vars
$master_host = undef
$slave_user = 'slave'
$slave_password = 'Replicas123'

# master
node "db1.local" {
  $mysql_server_id = '1'
  $mysql_read_only = 'OFF'
  include mysql
}

# slave1
node "db2.local" {
  $mysql_server_id = '2'
  $mysql_read_only = 'ON'
  $master_host = 'db1.local'
  include mysql
}

# slave2
node "db3.local" {
  $mysql_server_id = '3'
  $mysql_read_only = 'ON'
  $master_host = 'db1.local'
  include mysql
}

Force the agent to apply the catalog:

(all-mysql-nodes)$ puppet agent -t

On the master (db1.local), we can verify all the connected slaves:

mysql> SHOW SLAVE HOSTS;
+-----------+-----------+------+-----------+--------------------------------------+
| Server_id | Host      | Port | Master_id | Slave_UUID                           |
+-----------+-----------+------+-----------+--------------------------------------+
|         3 | db3.local | 3306 |         1 | 2d0b14b6-8174-11e9-8bac-0273c38be33b |
|         2 | db2.local | 3306 |         1 | a9dfa4c7-8172-11e9-8000-0273c38be33b |
+-----------+-----------+------+-----------+--------------------------------------+

Pay extra attention to the "exec { 'change master' :" section, where it means a MySQL command will be executed to initiate the replication link if the condition is met. All "exec" resources executed by Puppet must be idempotent, meaning the operation that will have the same effect whether you run it once or 10,001 times. There are a number of condition attributes you may use like "unless", "onlyif" and "create" to safeguard the correct state and prevent Puppet to be messing up with your setup. You may delete/comment that section if you want to initiate the replication link manually.

MySQL Management

This module can be used to perform a number of MySQL management tasks:

  • configuration options (modify, apply, custom configuration)
  • database resources (database, user, grants)
  • backup (create, schedule, backup user, storage)
  • simple restore (mysqldump only)
  • plugins installation/activation

Database Resource

As you can see in the example manifest above, we have defined two MySQL resources - mysql_user and mysql_grant - to create user and grant privileges for the user respectively. We can also use the mysql::db class to ensure a database with associated user and privileges are present, for example:

  # make sure the database and user exist with proper grant
  mysql::db { 'mynewdb':
    user          => 'mynewuser',
    password      => 'passw0rd',
    host          => '192.168.0.%',
    grant         => ['SELECT', 'UPDATE']
  } 

Take note that in MySQL replication, all writes must be performed on the master only. So, make sure that the above resource is assigned to the master. Otherwise, errant transaction could occur.

Backup and Restore

Commonly, only one backup host is required for the entire cluster (unless you replicate a subset of data). We can use the mysql::server::backup class to prepare the backup resources. Suppose we have the following declaration in our manifest:

  # Prepare the backup script, /usr/local/sbin/mysqlbackup.sh
  class { 'mysql::server::backup':
    backupuser     => 'backup',
    backuppassword => 'passw0rd',
    backupdir      => '/home/backup',
    backupdirowner => 'mysql',
    backupdirgroup => 'mysql',
    backupdirmode  => '755',
    backuprotate   => 15,
    time           => ['23','30'],   #backup starts at 11:30PM everyday
    include_routines  => true,
    include_triggers  => true,
    ignore_events     => false,
    maxallowedpacket  => '64M',
    optional_args     => ['--set-gtid-purged=OFF'] #extra argument if GTID is enabled
  }

Puppet will configure all the prerequisites before running a backup - creating the backup user, preparing the destination path, assigning ownership and permission, setting the cron job and setting up the backup command options to use in the provided backup script located at /usr/local/sbin/mysqlbackup.sh. It's then up to the user to run or schedule the script. To make an immediate backup, simply invoke:

$ mysqlbackup.sh

If we extract the actual mysqldump command based on the above, here is what it looks like:

$ mysqldump --defaults-extra-file=/tmp/backup.NYg0TR --opt --flush-logs --single-transaction --events --set-gtid-purged=OFF --all-databases

For those who want to use other backup tools like Percona Xtrabackup, MariaDB Backup (MariaDB only) or MySQL Enterprise Backup, the module provides the following private classes:

  • mysql::backup::xtrabackup (Percona Xtrabackup and MariaDB Backup)
  • mysql::backup::mysqlbackup (MySQL Enterprise Backup)

Example declaration with Percona Xtrabackup:

  class { 'mysql::backup::xtrabackup':
    xtrabackup_package_name => 'percona-xtrabackup',
    backupuser     => 'xtrabackup',
    backuppassword => 'passw0rd',
    backupdir      => '/home/xtrabackup',
    backupdirowner => 'mysql',
    backupdirgroup => 'mysql',
    backupdirmode  => '755',
    backupcompress => true,
    backuprotate   => 15,
    include_routines  => true,
    time              => ['23','30'], #backup starts at 11:30PM
    include_triggers  => true,
    maxallowedpacket  => '64M',
    incremental_backups => true
  }

The above will schedule two backups, one full backup every Sunday at 11:30 PM and one incremental backup every day except Sunday at the same time, as shown by the cron job output after the above manifest is applied:

(db1.local)$ crontab -l
# Puppet Name: xtrabackup-weekly
30 23 * * 0 /usr/local/sbin/xtrabackup.sh --target-dir=/home/backup/mysql/xtrabackup --backup
# Puppet Name: xtrabackup-daily
30 23 * * 1-6 /usr/local/sbin/xtrabackup.sh --incremental-basedir=/home/backup/mysql/xtrabackup --target-dir=/home/backup/mysql/xtrabackup/`date +%F_%H-%M-%S` --backup

For more details and options available for this class (and other classes), check out the option reference here.

For the restoration aspect, the module only support restoration with mysqldump backup method, by importing the SQL file directly to the database using the mysql::db class, for example:

mysql::db { 'mydb':
  user     => 'myuser',
  password => 'mypass',
  host     => 'localhost',
  grant    => ['ALL PRIVILEGES'],
  time     => ['23','5'],

  sql      => '/home/backup/mysql/mydb/backup.gz',
  import_cat_cmd => 'zcat',
  import_timeout => 900
}

The SQL file will be loaded only once and not on every run, unless enforce_sql => true is used.

Configuration Options

In this example, we used manage_config_file => true with override_options to structure our configuration lines which later will be pushed out by Puppet. Any modification to the manifest file will only reflect the content of the target MySQL configuration file. This module will neither load the configuration into runtime nor restart the MySQL service after pushing the changes into the configuration file. It's the sysadmin responsibility to restart the service in order to activate the changes.

To add custom MySQL configuration, we can place additional files into "includedir", default to /etc/mysql/conf.d. This allows us to override settings or add additional ones, which is helpful if you don't use override_options in mysql::server class. Making use of Puppet template is highly recommended here. Place the custom configuration file under the module template directory (default to , /etc/puppetlabs/code/environments/production/modules/mysql/templates) and then add the following lines in the manifest:

# Loads /etc/puppetlabs/code/environments/production/modules/mysql/templates/my-custom-config.cnf.erb into /etc/mysql/conf.d/my-custom-config.cnf

file { '/etc/mysql/conf.d/my-custom-config.cnf':
  ensure  => file,
  content => template('mysql/my-custom-config.cnf.erb')
}

To implement version specific parameters, use the version directive, for example [mysqld-5.5]. This allows one config for different versions of MySQL.

Puppet vs ClusterControl

Did you know that you can also automate the MySQL or MariaDB replication deployment by using ClusterControl? You can use ClusterControl Puppet module to install it, or simply by downloading it from our website.

When compared to ClusterControl, you can expect the following differences:

  • A bit of a learning curve to understand Puppet syntaxes, formatting, structures before you can write manifests.
  • Manifest must be tested regularly. It's very common you will get a compilation error on the code especially if the catalog is applied for the first time.
  • Puppet presumes the codes to be idempotent. The test/check/verify condition falls under the author’s responsibility to avoid messing up with a running system.
  • Puppet requires an agent on the managed node.
  • Backward incompatibility. Some old modules would not run correctly on the new version.
  • Database/host monitoring has to be set up separately.

ClusterControl’s deployment wizard guides the deployment process:

Alternatively, you may use ClusterControl command line interface called "s9s" to achieve similar results. The following command creates a three-node MySQL replication cluster (provided passwordless to all nodes has been configured beforehand):

$ s9s cluster --create \
  --cluster-type=mysqlreplication \
      --nodes=192.168.0.41?master;192.168.0.42?slave;192.168.0.43?slave;192.168.0.44?master; \
  --vendor=oracle \
  --cluster-name='MySQL Replication 8.0' \
  --provider-version=8.0 \
  --db-admin='root' \
  --db-admin-passwd='$ecR3t^word' \
  --log

The following MySQL/MariaDB replication setups are supported:

  • Master-slave replication (file/position-based)
  • Master-slave replication with GTID (MySQL/Percona)
  • Master-slave replication with MariaDB GTID
  • Master-master replication (semi-sync/async)
  • Master-slave chain replication (semi-sync/async)

Post deployment, nodes/clusters can be monitored and fully managed by ClusterControl, including automatic failure detection, master failover, slave promotion, automatic recovery, backup management, configuration management and so on. All of these are bundled together in one product. The community edition (free forever!) offers deployment and monitoring. On average, your database cluster will be up and running within 30 minutes. What it needs is only passwordless SSH to the target nodes.

In the next part, we are going to walk you through Galera Cluster deployment using the same Puppet module. Stay tuned!

An Overview of PostgreSQL & MySQL Cross Replication

$
0
0

This blog is aimed at explaining an overview of cross replication between PostgreSQL and MySQL, and further discussing the methods of configuring cross replication between the two database servers. Traditionally, the databases involved in a cross replication setup are called heterogeneous databases, which is a good approach to move away from one RDBMS server to another.

Both PostgreSQL and MySQL databases are conventionally RDBMS databases but they also offer NoSQL capability with added extensions to have the best of both worlds. This article focuses on the discussion of replication between PostgreSQL and MySQL from an RDBMS perspective.

An exhaustive explanation about internals of replication is not within the purview of this blog, however, some foundational elements shall be discussed to give the audience an understanding of how is replication configured between database servers, advantages, limitations and perhaps some known use cases.

In general replication between two identical database servers is achieved either in binary mode or query mode between a master node (otherwise called publisher, primary or active) and a slave node (subscriber, standby or passive). The aim of replication is to provide a real time copy of the master database on the slave side, where the data is transferred from master to slave, thereby forming an active-passive setup because the replication is only configured to occur one way. On the other hand, replication between two databases can be configured both ways so the data can also be transferred from slave back to master, establishing an active-active configuration. All of this can be configured between two or more identical database servers which may also include a cascading replication. The configuration of active-active or active-passive really depends on the business need, availability of such features within the native configuration or utilizing external solutions to configure and applicable trade-offs.

The above mentioned configuration can be accomplished with diverse database servers, wherein a database server can be configured to accept replicated data from another completely different database server and still maintain real time snapshot of the data being replicated. Both MySQL and PostgreSQL database servers offer most of the configurations discussed above either in their own nativity or with the help of third party extensions including binary log method, disk block method, statement based and row based methods.

The requirement to configure a cross replication between MySQL and PostgreSQL really comes in as a result of a one time migration effort to move away from one database server to another. As both the databases use different protocols so they cannot directly talk to each other. In order to achieve that communication flow, there is an external open source tool such as pg_chameleon.

Background of pg_chameleon

pg_chameleon is a MySQL to PostgreSQL replication system developed in Python 3. It uses an open source library called mysql-replication which is also developed using Python. The functionality involves pulling row images of MySQL tables and storing them as JSONB objects into a PostgreSQL database, which is further decoded by a pl/pgsql function and replaying those changes against the PostgreSQL database.

Features of pg_chameleon

  • Multiple MySQL schemas from the same cluster can be replicated to a single target PostgreSQL database, forming a many-to-one replication setup
  • The source and target schema names can be non-identical
  • Replication data can be pulled from MySQL cascading replica
  • Tables that fail to replicate or generate errors are excluded
  • Each replication functionality is managed with the help of daemons
  • Controlled with the help of parameters and configuration files based on YAML construct

Demo

Hostvm1vm2
OS versionCentOS Linux release 7.6 x86_64CentOS Linux release 7.5 x86_64
Database server with versionMySQL 5.7.26PostgreSQL 10.5
Database port33065433
ip address192.168.56.102192.168.56.106

To begin with, prepare the setup with all the prerequisites needed to install pg_chameleon. In this demo Python 3.6.8 is installed, creating a virtual environment and activating it for use.

$> wget https://www.python.org/ftp/python/3.6.8/Python-3.6.8.tar.xz
$> tar -xJf Python-3.6.8.tar.xz
$> cd Python-3.6.8
$> ./configure --enable-optimizations
$> make altinstall

Following a successful installation of Python3.6, further additional requirements are met such as creating and activating a virtual environment. In addition to that pip module upgraded to the latest version and it is used to install pg_chameleon. In the commands below, pg_chameleon 2.0.9 was deliberately installed whereas the latest version is a 2.0.10. This is done in order to avoid any newly introduced bugs in the updated version.

$> python3.6 -m venv venv
$> source venv/bin/activate
(venv) $> pip install pip --upgrade
(venv) $> pip install pg_chameleon==2.0.9

The next step is to invoke the pg_chameleon (chameleon is the command) with set_configuration_files argument to enable pg_chameleon to create default directories and configuration files.

(venv) $> chameleon set_configuration_files
creating directory /root/.pg_chameleon
creating directory /root/.pg_chameleon/configuration/
creating directory /root/.pg_chameleon/logs/
creating directory /root/.pg_chameleon/pid/
copying configuration  example in /root/.pg_chameleon/configuration//config-example.yml

Now, create a copy of config-example.yml as default.yml to make it the default configuration file. A sample configuration file used for this demo is provided below.

$> cat default.yml
---
#global settings
pid_dir: '~/.pg_chameleon/pid/'
log_dir: '~/.pg_chameleon/logs/'
log_dest: file
log_level: info
log_days_keep: 10
rollbar_key: ''
rollbar_env: ''

# type_override allows the user to override the default type conversion into a different one.
type_override:
  "tinyint(1)":
    override_to: boolean
    override_tables:
      - "*"

#postgres  destination connection
pg_conn:
  host: "192.168.56.106"
  port: "5433"
  user: "usr_replica"
  password: "pass123"
  database: "db_replica"
  charset: "utf8"

sources:
  mysql:
    db_conn:
      host: "192.168.56.102"
      port: "3306"
      user: "usr_replica"
      password: "pass123"
      charset: 'utf8'
      connect_timeout: 10
    schema_mappings:
      world_x: pgworld_x
    limit_tables:
#      - delphis_mediterranea.foo
    skip_tables:
#      - delphis_mediterranea.bar
    grant_select_to:
      - usr_readonly
    lock_timeout: "120s"
    my_server_id: 100
    replica_batch_size: 10000
    replay_max_rows: 10000
    batch_retention: '1 day'
    copy_max_memory: "300M"
    copy_mode: 'file'
    out_dir: /tmp
    sleep_loop: 1
    on_error_replay: continue
    on_error_read: continue
    auto_maintenance: "disabled"
    gtid_enable: No
    type: mysql
    skip_events:
      insert:
        - delphis_mediterranea.foo #skips inserts on the table delphis_mediterranea.foo
      delete:
        - delphis_mediterranea #skips deletes on schema delphis_mediterranea
      update:

The configuration file used in this demo is the sample file that comes with pg_chameleon with minor edits to suit the source and destination environments, and a summary of different sections of the configuration file follows.

The default.yml configuration file has a “global settings” section that control details such as lock file location, logging locations and retention period, etc. The section that follows next is the “type override” section which is a set of rules to override types during replication. A sample type override rule is used by default which converts a tinyint(1) to a boolean value. The next section is the destination database connection details section which in our case is a PostgreSQL database, denoted by “pg_conn”. The final section is the source section which has all the details of source database connection settings, schema mapping between source and destination, any tables to skip including timeout, memory and batch size settings. Notice the “sources” denoting that there can be multiple sources to a single destination to form a many-to-one replication setup.

A “world_x” database is used in this demo which is a sample database with 4 tables containing sample rows, that MySQL community offers for demo purposes, and it can be downloaded from here. The sample database comes as a tar and compressed archive along with instructions to create it and import rows in it.

A dedicated user is created in both the MySQL and PostgreSQL databases with the same name as usr_replica that is further granted additional privileges on MySQL to have read access to all the tables being replicated.

mysql> CREATE USER usr_replica ;
mysql> SET PASSWORD FOR usr_replica='pass123';
mysql> GRANT ALL ON world_x.* TO 'usr_replica';
mysql> GRANT RELOAD ON *.* to 'usr_replica';
mysql> GRANT REPLICATION CLIENT ON *.* to 'usr_replica';
mysql> GRANT REPLICATION SLAVE ON *.* to 'usr_replica';
mysql> FLUSH PRIVILEGES;

A database is created on the PostgreSQL side that will accept changes from MySQL database, which is named as “db_replica”. The “usr_replica” user in PostgreSQL is automatically configured as an owner of two schemas such as “pgworld_x” and “sch_chameleon” that contain the actual replicated tables and catalog tables of replication respectively. This automatic configuration is done by the create_replica_schema argument, indicated further below.

postgres=# CREATE USER usr_replica WITH PASSWORD 'pass123';
CREATE ROLE
postgres=# CREATE DATABASE db_replica WITH OWNER usr_replica;
CREATE DATABASE

The MySQL database is configured with a few parameter changes in order to prepare it for replication, as shown below, and it requires a database server restart for the changes to take effect.

$> vi /etc/my.cnf
binlog_format= ROW
binlog_row_image=FULL
log-bin = mysql-bin
server-id = 1

At this point, it is significant to test the connectivity to both the database servers to ensure there are no issues when pg_chameleon commands are executed.

On the PostgreSQL node:

$> mysql -u usr_replica -Ap'admin123' -h 192.168.56.102 -D world_x 

On the MySQL node:

$> psql -p 5433 -U usr_replica -h 192.168.56.106 db_replica

The next three commands of pg_chameleon (chameleon) is where it sets the environment up, adds a source and initializes a replica. The “create_replica_schema” argument of pg_chameleon creates the default schema (sch_chameleon) and replication schema (pgworld_x) in the PostgreSQL database as has already been discussed. The “add_source” argument adds the source database to the configuration by reading the configuration file (default.yml), which in this case is “mysql”, while the “init_replica” initializes the configuration based on the settings of the configuration file.

$> chameleon create_replica_schema --debug
$> chameleon add_source --config default --source mysql --debug
$> chameleon init_replica --config default --source mysql --debug

The output of the above three commands is self explanatory indicating the success of each command with an evident output message. Any failures or syntax errors are clearly mentioned in simple and plain messages, thereby suggesting and prompting corrective actions.

The final step is to start the replication with “start_replica”, the success of which is indicated by an output hint as shown below.

$> chameleon start_replica --config default --source mysql 
output: Starting the replica process for source mysql

The status of replication can be queried with the “show_status” argument while errors can be viewed with ‘show_errors” argument.

$> chameleon show_status --source mysql  
OUTPUT: 
  Source id  Source name    Type    Status    Consistent    Read lag    Last read    Replay lag    Last replay
-----------  -------------  ------  --------  ------------  ----------  -----------  ------------  -------------
          1  mysql          mysql   running   No            N/A                      N/A

== Schema mappings ==
Origin schema    Destination schema
---------------  --------------------
world_x          pgworld_x

== Replica status ==
---------------------  ---
Tables not replicated  0
Tables replicated      4
All tables             4
Last maintenance       N/A
Next maintenance       N/A
Replayed rows
Replayed DDL
Skipped rows
---------------------  ---
$> chameleon show_errors --config default 
output: There are no errors in the log

As discussed earlier that each of the replication functionality is managed with the help of daemons, which can be viewed by querying the process table using Linux “ps” command, exhibited below.

$>  ps -ef|grep chameleon
root       763     1  0 19:20 ?        00:00:00 /u01/media/mysql_samp_dbs/world_x-db/venv/bin/python3.6 /u01/media/mysq l_samp_dbs/world_x-db/venv/bin/chameleon start_replica --config default --source mysql
root       764   763  0 19:20 ?        00:00:01 /u01/media/mysql_samp_dbs/world_x-db/venv/bin/python3.6 /u01/media/mysq l_samp_dbs/world_x-db/venv/bin/chameleon start_replica --config default --source mysql
root       765   763  0 19:20 ?        00:00:00 /u01/media/mysql_samp_dbs/world_x-db/venv/bin/python3.6 /u01/media/mysq l_samp_dbs/world_x-db/venv/bin/chameleon start_replica --config default --source mysql

No replication setup is complete until it is put to the “real-time apply” test, which has been simulated as below. It involves creating a table and inserting a couple of records in the MySQL database, subsequently, the “sync_tables” argument of pg_chameleon is invoked to update the daemons to replicate the table along with its records to the PostgreSQL database.

mysql> create table t1 (n1 int primary key, n2 varchar(10));
Query OK, 0 rows affected (0.01 sec)
mysql> insert into t1 values (1,'one');
Query OK, 1 row affected (0.00 sec)
mysql> insert into t1 values (2,'two');
Query OK, 1 row affected (0.00 sec)
$> chameleon sync_tables --tables world_x.t1 --config default --source mysql
Sync tables process for source mysql started.

The test is confirmed by querying the table from PostgreSQL database to reflect the rows.

$> psql -p 5433 -U usr_replica -d db_replica -c "select * from pgworld_x.t1";
 n1 |  n2
----+-------
  1 | one
  2 | two

If it is a migration project then the following pg_chameleon commands will mark the end of the migration effort. The commands should be executed after it is confirmed that rows of all the target tables have been replicated across, and the result will be a cleanly migrated PostgreSQL database without any references to the source database or replication schema (sch_chameleon).

$> chameleon stop_replica --config default --source mysql 
$> chameleon detach_replica --config default --source mysql --debug

Optionally the following commands will drop the source configuration and replication schema.

$> chameleon drop_source --config default --source mysql --debug
$> chameleon drop_replica_schema --config default --source mysql --debug

Pros of Using pg_chameleon

  • Simple to setup and less complicated configuration
  • Painless troubleshooting and anomaly detection with easy to understand error output
  • Additional adhoc tables can be added to the replication after initialization, without altering any other configuration
  • Multiple sources can be configured for a single destination database, which is useful in consolidation projects to merge data from one or more MySQL databases into a single PostgreSQL database
  • Selected tables can be skipped from being replicated

Cons of Using pg_chameleon

  • Only supported from MySQL 5.5 onwards as Origin database and PostgreSQL 9.5 onwards for destination database
  • Requires every table to have a primary or unique key, otherwise, the tables get initialized during the init_replica process but they will fail to replicate
  • One way replication, i.e., MySQL to PostgreSQL. Thereby limiting its use to only an active-passive setup
  • The source database can only be a MySQL database while support for PostgreSQL database as source is experimental with further limitations (click here to learn more)

pg_chameleon Summary

The replication approach offered by pg_chameleon is favourable to a database migration of MySQL to PostgreSQL. However, one of the significant limitations of one-way replication can discourage database professionals to adopt it for anything other than migration. This drawback of unidirectional replication can be addressed using yet another open source tool called SymmetricDS.

In order to study the utility more in detail, please refer to the official documentation here. The command line reference can be obtained from here.

Download the Whitepaper Today
 
PostgreSQL Management & Automation with ClusterControl
Learn about what you need to know to deploy, monitor, manage and scale PostgreSQL

An Overview of SymmetricDS

SymmetricDS is an open source tool that is capable of replicating any database to any other database, from the popular list of database servers such as Oracle, MongoDB, PostgreSQL, MySQL, SQL Server, MariaDB, DB2, Sybase, Greenplum, Informix, H2, Firebird and other cloud based database instances such as Redshift and Azure etc. Some of the offerings include database and file synchronization, multi-master replication, filtered synchronization, and transformation. The tool is developed using Java, requiring a standard edition (version 8.0 or above) of either JRE or JDK. The functionality involves data changes being captured by triggers at source database and routing it to a participating destination database as outgoing batches

Features of SymmetricDS

  • Platform independent, which means two or more dissimilar databases can communicate with each other, any database to any other database
  • Relational databases achieve synchronization using change data capture while file system based systems utilize file synchronization
  • Bi-directional replication using Push and Pull method, which is accomplished based on set rules
  • Data transfer can also occur over secure and low bandwidth networks
  • Automatic recovery during the resumption of a crashed node and automatic conflict resolution
  • Cloud ready and contains powerful extension APIs

Demo

SymmetricDS can be configured in one of the two options:

  • A master (parent) node that acts as a centralized intermediary coordinating data replication between two slave (child) nodes, in which the communication between the two child nodes can only occur via the parent.
  • An active node (node1) can replicate to and from another active node (node2) without any intermediary.

In both the options, the communication between the nodes happens via “Push” and “Pull” events. In this demo, an active-active configuration between two nodes will be explained. The full architecture can be exhaustive, so the readers are encouraged to check the user guide available here to learn more about the internals of SymmetricDS.

Installing SymmetricDS is as simple as downloading the open source version of zip file from here and extracting it in a convenient location. The details of install location and version of SymmetricDS in this demo are as per the table below, along with other details pertaining to database versions, Linux versions, ip addresses and communication port for both the participating nodes.

Hostvm1vm2
OS versionCentOS Linux release 7.6 x86_64CentOS Linux release 7.6 x86_64
Database server versionMySQL 5.7.26PostgreSQL 10.5
Database port33065832
ip address192.168.1.107192.168.1.112
SymmetricDS versionSymmetricDS 3.9SymmetricDS 3.9
SymmetricDS install location/usr/local/symmetric-server-3.9.20/usr/local/symmetric-server-3.9.20
SymmetricDS node namecorp-000store-001

The install home in this case is “/usr/local/symmetric-server-3.9.20” which will be the home directory of SymmetricDS, which contains various other sub-directories and files. Two of the sub-directories that are of importance now are “samples” and “engines”. The samples directory contains node properties configuration file samples in addition to sample SQL scripts to kick start a quick demo.

The following three node properties configuration files can be seen in the “samples” directory with names indicating the nature of node in a given setup.

corp-000.properties
store-001.properties
store-002.properties

As SymmetricDS comes with all the necessary configuration files to support a basic 3 node setup (option 1), it is convenient to use the same configuration files to setup a 2 node setup (option 2) as well. The intended configuration file is copied from the “samples” directory to the “engines” on host vm1, and it looks like below.

$> cat engines/corp-000.properties
engine.name=corp-000
db.driver=com.mysql.jdbc.Driver
db.url=jdbc:mysql://192.168.1.107:3306/replica_db?autoReconnect=true&useSSL=false
db.user=root
db.password=admin123
registration.url=
sync.url=http://192.168.1.107:31415/sync/corp-000
group.id=corp
external.id=000

The name of this node in SymmetricDS configuration is “corp-000” with the database connection handled with mysql jdbc driver using the connection string as stated above along with login credentials. The database to connect is “replica_db” and the tables will be created during the creation of sample schema. The “sync.url” denotes the location to contact the node for synchronization.

The node 2 on host vm2 is configured as “store-001” with the rest of the details as configured in the node.properties file, shown below. The “store-001” node runs a PostgreSQL database, with “pgdb_replica” as the database for replication. The “registration.url” enables host “vm2” to communicate with host “vm1” to pull configuration details.

$> cat engines/store-001.properties
engine.name=store-001
db.driver=org.postgresql.Driver
db.url=jdbc:postgresql://192.168.1.112:5832/pgdb_replica
db.user=postgres
db.password=admin123
registration.url=http://192.168.1.107:31415/sync/corp-000
group.id=store
external.id=001

The pre-configured default demo of SymmetricDS contains settings to setup a bi-directional replication between two database servers (two nodes). The steps below are executed on host vm1 (corp-000), which will create a sample schema having 4 tables. Further, execution of “create-sym-tables” with “symadmin” command will create the catalog tables that store and control the rules and direction of replication between nodes. Finally, the demo tables are loaded with sample data.

vm1$> cd /usr/local/symmetric-server-3.9.20/bin
vm1$> ./dbimport --engine corp-000 --format XML create_sample.xml
vm1$> ./symadmin --engine corp-000 create-sym-tables
vm1$> ./dbimport --engine corp-000 insert_sample.sql

The demo tables “item” and “item_selling_price” are auto-configured to replicate from corp-000 to store-001 while the sale tables (sale_transaction and sale_return_line_item) are auto-configured replicate from store-001 to corp-000. The next step is to create the sample schema in the PostgreSQL database on host vm2 (store-001), in order to prepare it to receive data from corp-000.

vm2$> cd /usr/local/symmetric-server-3.9.20/bin
vm2$> ./dbimport --engine store-001 --format XML create_sample.xml

It is important to verify the existence of demo tables and SymmetricDS catalog tables in the MySQL database on vm1 at this stage. Note, the SymmetricDS system tables (tables with prefix “sym_”) are only available in the corp-000 node at this point of time, because that is where the “create-sym-tables” command was executed, which will be the place to control and manage the replication. In addition to that, the store-001 node database will only have 4 demo tables with no data in it.

The environment is now ready to start the “sym” server processes on both the nodes, as show below.

vm1$> cd /usr/local/symmetric-server-3.9.20/bin
vm1$> sym 2>&1 &

The log entries are both sent to a background log file (symmetric.log) under a logs directory in the SymmetricDS install location as well as to the standard output. The “sym” server can now be initiated on store-001 node.

vm2$> cd /usr/local/symmetric-server-3.9.20/bin
vm2$> sym 2>&1 &

The startup of “sym” server process on host vm2 will create the SymmetricDS catalog tables in the PostgreSQL database as well. The startup of “sym” server process on both the nodes will get them to coordinate with each other to replicate data from corp-000 to store-001. After a few seconds, querying all the four tables on either side will show the successful replication results. Alternatively, an initial load can also be sent to the store-001 node from corp-000 with the below command.

vm1$> ./symadmin --engine corp-000 reload-node 001

At this point, a new record is inserted into the “item” table in MySQL database at corp-000 node (host: vm1) and it can be verified to have successfully replicated to the PostgreSQL database at store-001 node (host: vm2). This shows the “Pull” event of data from corp-000 to store-001.

mysql> insert into item values ('22000002','Jelly Bean');
Query OK, 1 row affected (0.00 sec)
vm2$> psql -p 5832 -U postgres pgdb_replica -c "select * from item" 
 item_id  |   name
----------+-----------
 11000001 | Yummy Gum
 22000002 | Jelly Bean
(2 rows)

The “Push” event of data from store-001 to corp-000 can be achieved by inserting a record into the “sale_transaction” table and confirming it to replicate through.

pgdb_replica=# insert into "sale_transaction" ("tran_id", "store_id", "workstation", "day", "seq") values (1000, '001', '3', '2007-11-01', 100);
vm1$> [root@vm1 ~]#  mysql -uroot -p'admin123' -D replica_db -e "select * from sale_transaction";
+---------+----------+-------------+------------+-----+
| tran_id | store_id | workstation | day        | seq |
+---------+----------+-------------+------------+-----+
|     900 | 001      | 3           | 2012-12-01 |  90 |
|    1000 | 001      | 3           | 2007-11-01 | 100 |
|    2000 | 002      | 2           | 2007-11-01 | 200 |
+---------+----------+-------------+------------+-----+

This marks the successful configuration of bidirectional replication of demo tables between a MySQL and PostgreSQL database. Whereas, the configuration of replication for newly created user tables can be achieved using the following steps. An example table “t1” is created for the demo and the rules of its replication are configured as per the procedure below. The steps only configure the replication from corp-000 to store-001.

mysql> create table  t1 (no integer);
Query OK, 0 rows affected (0.01 sec)


mysql> insert into sym_channel (channel_id,create_time,last_update_time) 
values ('t1',current_timestamp,current_timestamp);
Query OK, 1 row affected (0.01 sec)
mysql> insert into sym_trigger (trigger_id, source_table_name,channel_id,
last_update_time, create_time) values ('t1', 't1', 't1', current_timestamp,
current_timestamp);
Query OK, 1 row affected (0.01 sec)


mysql> insert into sym_trigger_router (trigger_id, router_id,
Initial_load_order, create_time,last_update_time) values ('t1',
'corp-2-store-1', 1, current_timestamp,current_timestamp);
Query OK, 1 row affected (0.01 sec)

After this, the configuration is notified about the schema change of adding a new table by invoking the symadmin command with “sync-triggers” argument which will recreate the triggers to match table definitions. Subsequently, execute “send-schema” to send schema changes out to store-001 node, following which the replication of “t1” table will be configured successfully.

vm1$> ./symadmin -e corp-000 --node=001 sync-triggers    
vm1$> ./symadmin send-schema -e corp-000 --node=001 t1

Pros of Using SymmetricDS

  • Effortless installation and configuration including a pre-configured set of parameter files to build either a 3-node or a 2-node setup
  • Cross platform database enabled and platform independent including servers, laptops and mobile devices
  • Replicate any database to any other database, whether on-prem, WAN or cloud
  • Capable of optimally handling a couple of databases to several thousand databases to replicate data seamlessly
  • A commercial version of the software offers GUI driven management console with an excellent support package

Cons of Using SymmetricDS

  • Manual command line configuration may involve defining rules and direction of replication via SQL statements to load catalog tables, which may be inconvenient to manage
  • Setting up a large number of tables for replication will be an exhaustive effort, unless some form of scripting is utilized to generate the SQL statements defining rules and direction of replication
  • Plenty of logging information cluttering the logfile, thereby requiring periodic logfile maintenance to not allow the logfile to fill up the disk

SymmetricDS Summary

SymmetricDS offers the ability to setup bi-directional replication between 2 nodes, 3 nodes and so on for several thousand nodes to replicate data and achieve file synchronization. It is a unique tool that performs many of the self-healing maintenance tasks such as the automatic recovery of data after extended periods of downtime in a node, secure and efficient communication between nodes with the help of HTTPS and automatic conflict management based on set rules, etc. The essential feature of replicating any database to any other database makes SymmetricDS ready to be deployed for a number of use cases including migration, version and patch upgrade, distribution, filtering and transformation of data across diverse platforms.

The demo was created by referring to the official quick-start tutorial of SymmetricDS which can be accessed from here. The user guide can be found here, which provides a detailed account of various concepts involved in a SymmetricDS replication setup.


Database Automation with Puppet: Deploying MySQL & MariaDB Galera Cluster

$
0
0

In the previous blog post, we showed you some basic steps to deploy and manage a standalone MySQL server as well as MySQL Replication setup using the MySQL Puppet module. In this second installation, we are going to cover similar steps, but now with a Galera Cluster setup.

Galera Cluster with Puppet

As you might know, Galera Cluster has three main providers:

  • MySQL Galera Cluster (Codership)
  • Percona XtraDB Cluster (Percona)
  • MariaDB Cluster (embedded into MariaDB Server by MariaDB)

A common practice with Galera Cluster deployments is to have an additional layer sitting on top of the database cluster for load balancing purposes. However, that is a complex process which deserves its own post.

There are a number of Puppet modules available in the Puppet Forge that can be used to deploy a Galera Cluster. Here are some of them..

Since our objective is to provide a basic understanding of how to write manifest and automate the deployment for Galera Cluster, we will be covering the deployment of the MariaDB Galera Cluster using the puppetlabs/mysql module. For other modules, you can always take a look at their respective documentation for instructions or tips on how to install.

In Galera Cluster, the ordering when starting node is critical. To properly start a fresh new cluster one node has to be setup as the reference node. This node will be started with an empty-host connection string (gcomm://) to initialize the cluster. This process is called bootstrapping.

Once started, the node will become a primary component and the remaining nodes can be started using the standard mysql start command (systemctl start mysql or service mysql start) followed by a full-host connection string (gcomm://db1,db2,db3). Bootstrapping is only required if there is no primary component holds by any other node in the cluster (check with wsrep_cluster_status status).

The cluster startup process must be performed explicitly by the user. The manifest itself must NOT start the cluster (bootstrap any node) at the first run to avoid any risk of data loss. Remember, the Puppet manifest must be written to be as idempotent as possible. The manifest must be safe in order to be executed multiple times without affecting the already running MySQL instances. This means we have to focus primarily on repository configuration, package installation, pre-running configuration, and SST user configuration.

The following configuration options are mandatory for Galera:

  • wsrep_on: A flag to turn on writeset replication API for Galera Cluster (MariaDB only).
  • wsrep_cluster_name: The cluster name. Must be identical on all nodes that part of the same cluster.
  • wsrep_cluster_address: The Galera communication connection string, prefix with gcomm:// and followed by node list, separated by comma. Empty node list means cluster initialization.
  • wsrep_provider: The path where the Galera library resides. The path might be different depending on the operating system.
  • bind_address: MySQL must be reachable externally so value '0.0.0.0' is compulsory.
  • wsrep_sst_method: For MariaDB, the preferred SST method is mariabackup.
  • wsrep_sst_auth: MySQL user and password (separated by colon) to perform snapshot transfer. Commonly, we specify a user that has the ability to create a full backup.
  • wsrep_node_address: IP address for Galera communication and replication. Use Puppet facter to pick the correct IP address.
  • wsrep_node_name: hostname of FQDN. Use Puppet facter to pick the correct hostname.

For Debian-based deployments, the post-installation script will attempt to start the MariaDB server automatically. If we configured wsrep_on=ON (flag to enable Galera) with the full address in wsrep_cluster_address variable, the server would fail during installation. This is because it has no primary component to connect to.

To properly start a cluster in Galera the first node (called bootstrap node) has to be configured with an empty connection string (wsrep_cluster_address = gcomm://) to initiate the node as the primary component. You can also run the provided bootstrap script, called galera_new_cluster, which basically does a similar thing in but the background.

Deployment of Galera Cluster (MariaDB)

Deployment of Galera Cluster requires additional configuration on the APT source to install the preferred MariaDB version repository.

Note that Galera replication is embedded inside MariaDB Server and requires no additional packages to be installed. That being said, an extra flag is required to enable Galera by using wsrep_on=ON. Without this flag, MariaDB will act as a standalone server.

In our Debian-based environment, the wsrep_on option can only present in the manifest after the first deployment completes (as shown further down in the deployment steps). This is to ensure the first, initial start acts as a standalone server for Puppet to provision the node before it's completely ready to be a Galera node.

Let's start by preparing the manifest content as below (modify the global variables section if necessary):

# Puppet manifest for Galera Cluster MariaDB 10.3 on Ubuntu 18.04 (Puppet v6.4.2) 
# /etc/puppetlabs/code/environments/production/manifests/galera.pp

# global vars
$sst_user         = 'sstuser'
$sst_password     = 'S3cr333t$'
$backup_dir       = '/home/backup/mysql'
$mysql_cluster_address = 'gcomm://192.168.0.161,192.168.0.162,192.168.0.163'


# node definition
node "db1.local", "db2.local", "db3.local" {
  Apt::Source['mariadb'] ~>
  Class['apt::update'] ->
  Class['mysql::server'] ->
  Class['mysql::backup::xtrabackup']
}

# apt module must be installed first: 'puppet module install puppetlabs-apt'
include apt

# custom repository definition
apt::source { 'mariadb':
  location => 'http://sfo1.mirrors.digitalocean.com/mariadb/repo/10.3/ubuntu',
  release  => $::lsbdistcodename,
  repos    => 'main',
  key      => {
    id     => 'A6E773A1812E4B8FD94024AAC0F47944DE8F6914',
    server => 'hkp://keyserver.ubuntu.com:80',
  },
  include  => {
    src    => false,
    deb    => true,
  },
}

# Galera configuration
class {'mysql::server':
  package_name            => 'mariadb-server',
  root_password           => 'q1w2e3!@#',
  service_name            => 'mysql',
  create_root_my_cnf      => true,
  remove_default_accounts => true,
  manage_config_file      => true,
  override_options        => {
    'mysqld' => {
      'datadir'                 => '/var/lib/mysql',
      'bind_address'            => '0.0.0.0',
      'binlog-format'           => 'ROW',
      'default-storage-engine'  => 'InnoDB',
      'wsrep_provider'          => '/usr/lib/galera/libgalera_smm.so',
      'wsrep_provider_options'  => 'gcache.size=1G',
      'wsrep_cluster_name'      => 'galera_cluster',
      'wsrep_cluster_address'   => $mysql_cluster_address,
      'log-error'               => '/var/log/mysql/error.log',
      'wsrep_node_address'      => $facts['networking']['interfaces']['enp0s8']['ip'],
      'wsrep_node_name'         => $hostname,
      'innodb_buffer_pool_size' => '512M',
      'wsrep_sst_method'        => 'mariabackup',
      'wsrep_sst_auth'          => "${sst_user}:${sst_password}"
    },
    'mysqld_safe' => {
      'log-error'               => '/var/log/mysql/error.log'
    }
  }
}

# force creation of backup dir if not exist
exec { "mkdir -p ${backup_dir}" :
  path   => ['/bin','/usr/bin'],
  unless => "test -d ${backup_dir}"
}

# create SST and backup user
class { 'mysql::backup::xtrabackup' :
  xtrabackup_package_name => 'mariadb-backup',
  backupuser              => "${sst_user}",
  backuppassword          => "${sst_password}",
  backupmethod            => 'mariabackup',
  backupdir               => "${backup_dir}"
}

# /etc/hosts definition
host {
  'db1.local': ip => '192.168.0.161';
  'db2.local': ip => '192.169.0.162';
  'db3.local': ip => '192.168.0.163';
}

A bit of explanation is needed at this point. 'wsrep_node_address' must be pointed to the same IP address as what was declared in the wsrep_cluster_address. In this environment our hosts have two network interfaces and we want to use the second interface (called enp0s8) for Galera communication (where 192.168.0.0/24 network is connected to). That's why we use Puppet facter to get the information from the node and apply it to the configuration option. The rest is pretty self-explanatory.

On every MariaDB node, run the following command to apply the catalogue as root user:

$ puppet agent -t

The catalogue will be applied to each node for installation and preparation. Once done, we have to add the following line into our manifest under "override_options => mysqld" section:

'wsrep_on'                 => 'ON',

The above will satisfy the Galera requirement for MariaDB. Then, apply the catalogue on every MariaDB node once more:

$ puppet agent -t

Once done, we are ready to bootstrap our cluster. Since this is a new cluster, we can pick any of the node to be the reference node a.k.a bootstrap node. Let's pick db1.local (192.168.0.161) and run the following command:

$ galera_new_cluster #db1

Once the first node is started, we can start the remaining node with the standard start command (one node at a time):

$ systemctl restart mariadb #db2 and db3

Once started, take a peek at the MySQL error log at /var/log/mysql/error.log and make sure the log ends up with the following line:

2019-06-10  4:11:10 2 [Note] WSREP: Synchronized with group, ready for connections

The above tells us that the nodes are synchronized with the group. We can then verify the status by using the following command:

$ mysql -uroot -e 'show status like "wsrep%"'

Make sure on all nodes, the wsrep_cluster_size, wsrep_cluster_status and wsrep_local_state_comment are 3, "Primary" and "Synced" respectively.

MySQL Management

This module can be used to perform a number of MySQL management tasks...

  • configuration options (modify, apply, custom configuration)
  • database resources (database, user, grants)
  • backup (create, schedule, backup user, storage)
  • simple restore (mysqldump only)
  • plugins installation/activation

Service Control

The safest way when provisioning Galera Cluster with Puppet is to handle all service control operations manually (don't let Puppet handle it). For a simple cluster rolling restart, the standard service command would do. Run the following command one node at a time.

$ systemctl restart mariadb # Systemd
$ service mariadb restart # SysVinit

However, in the case of a network partition happening and no primary component is available (check with wsrep_cluster_status), the most up-to-date node has to be bootstrapped to bring the cluster back operational without data loss. You can follow the steps as shown in the above deployment section. To learn more about bootstrapping process with examples scenario, we have covered this in detail in this blog post, How to Bootstrap MySQL or MariaDB Galera Cluster.

Database Resource

Use the mysql::db class to ensure a database with associated user and privileges are present, for example:

  # make sure the database and user exist with proper grant
  mysql::db { 'mynewdb':
    user          => 'mynewuser',
    password      => 'passw0rd',
    host          => '192.168.0.%',
    grant         => ['SELECT', 'UPDATE']
  } 

The above definition can be assigned to any node since every node in a Galera Cluster is a master.

Backup and Restore

Since we created an SST user using the xtrabackup class, Puppet will configure all the prerequisites for the backup job - creating the backup user, preparing the destination path, assigning ownership and permission, setting the cron job and setting up the backup command options to use in the provided backup script. Every node will be configured with two backup jobs (one for weekly full and another for daily incremental) default to 11:05 PM as you can tell from the crontab output:

$ crontab -l
# Puppet Name: xtrabackup-weekly
5 23 * * 0 /usr/local/sbin/xtrabackup.sh --target-dir=/home/backup/mysql --backup
# Puppet Name: xtrabackup-daily
5 23 * * 1-6 /usr/local/sbin/xtrabackup.sh --incremental-basedir=/home/backup/mysql --target-dir=/home/backup/mysql/`date +%F_%H-%M-%S` --backup

If you would like to schedule mysqldump instead, use the mysql::server::backup class to prepare the backup resources. Suppose we have the following declaration in our manifest:

  # Prepare the backup script, /usr/local/sbin/mysqlbackup.sh
  class { 'mysql::server::backup':
    backupuser     => 'backup',
    backuppassword => 'passw0rd',
    backupdir      => '/home/backup',
    backupdirowner => 'mysql',
    backupdirgroup => 'mysql',
    backupdirmode  => '755',
    backuprotate   => 15,
    time           => ['23','30'],   #backup starts at 11:30PM everyday
    include_routines  => true,
    include_triggers  => true,
    ignore_events     => false,
    maxallowedpacket  => '64M'
  }

The above tells Puppet to configure the backup script at /usr/local/sbin/mysqlbackup.sh and schedule it up at 11:30PM everyday. If you want to make an immediate backup, simply invoke:

$ mysqlbackup.sh

For the restoration, the module only supports restoration with mysqldump backup method, by importing the SQL file directly to the database using the mysql::db class, for example:

mysql::db { 'mydb':
  user     => 'myuser',
  password => 'mypass',
  host     => 'localhost',
  grant    => ['ALL PRIVILEGES'],
  sql      => '/home/backup/mysql/mydb/backup.gz',
  import_cat_cmd => 'zcat',
  import_timeout => 900
}

The SQL file will be loaded only once and not on every run, unless enforce_sql => true is used.

Configuration Management

In this example, we used manage_config_file => true with override_options to structure our configuration lines which later will be pushed out by Puppet. Any modification to the manifest file will only reflect the content of the target MySQL configuration file. This module will neither load the configuration into runtime nor restart the MySQL service after pushing the changes into the configuration file. It's the sysadmin responsibility to restart the service in order to activate the changes.

To add custom MySQL configuration, we can place additional files into "includedir", default to /etc/mysql/conf.d. This allows us to override settings or add additional ones, which is helpful if you don't use override_options in mysql::server class. Making use of Puppet template is highly recommended here. Place the custom configuration file under the module template directory (default to , /etc/puppetlabs/code/environments/production/modules/mysql/templates) and then add the following lines in the manifest:

# Loads /etc/puppetlabs/code/environments/production/modules/mysql/templates/my-custom-config.cnf.erb into /etc/mysql/conf.d/my-custom-config.cnf

file { '/etc/mysql/conf.d/my-custom-config.cnf':
  ensure  => file,
  content => template('mysql/my-custom-config.cnf.erb')
}
Severalnines
 
DevOps Guide to Database Management
Learn about what you need to know to automate and manage your open source databases

Puppet vs ClusterControl

Did you know that you can also automate the MySQL or MariaDB Galera deployment by using ClusterControl? You can use ClusterControl Puppet module to install it, or simply by downloading it from our website.

When compared to ClusterControl, you can expect the following differences:

  • A bit of a learning curve to understand Puppet syntaxes, formatting, structures before you can write manifests.
  • Manifest must be tested regularly. It's very common you will get a compilation error on the code especially if the catalog is applied for the first time.
  • Puppet presumes the codes to be idempotent. The test/check/verify condition falls under the author’s responsibility to avoid messing up with a running system.
  • Puppet requires an agent on the managed node.
  • Backward incompatibility. Some old modules would not run correctly on the new version.
  • Database/host monitoring has to be set up separately.

ClusterControl’s deployment wizard guides the deployment process:

Alternatively, you may use the ClusterControl command line interface called "s9s" to achieve similar results. The following command creates a three-node Percona XtraDB Cluster (provided passwordless to all nodes has been configured beforehand):

$ s9s cluster --create \
  --cluster-type=galera \
  --nodes='192.168.0.21;192.168.0.22;192.168.0.23' \
  --vendor=percona \
  --cluster-name='Percona XtraDB Cluster 5.7' \
  --provider-version=5.7 \
  --db-admin='root' \
  --db-admin-passwd='$ecR3t^word' \
  --log

Additionally, ClusterControl supports deployment of load balancers for Galera Cluster - HAproxy, ProxySQL and MariaDB MaxScale - together with a virtual IP address (provided by Keepalived) to eliminate any single point of failure for your database service.

Post deployment, nodes/clusters can be monitored and fully managed by ClusterControl, including automatic failure detection, automatic recovery, backup management, load balancer management, attaching asynchronous slave, configuration management and so on. All of these are bundled together in one product. On average, your database cluster will be up and running within 30 minutes. What it needs is only passwordless SSH to the target nodes.

You can also import an already running Galera Cluster, deployed by Puppet (or any other means) into ClusterControl to supercharge your cluster with all the cool features that comes with it. The community edition (free forever!) offers deployment and monitoring.

In the next episode, we are going to walk you through MySQL load balancer deployment using Puppet. Stay tuned!

Migrating from MySQL Enterprise to MariaDB 10.3

$
0
0

While it shares the same heritage with MySQL, MariaDB is a different database. Over the years as new versions of MySQL and MariaDB were released, both projects have differed into two different RDBMS platforms.

MariaDB becomes the main database distribution on many Linux platforms and it’s getting high popularity these days. At the same time, it becomes a very attractive database system for many corporations. It’s getting features that are close to the enterprise needs like encryption, hot backups or compatibility with proprietary databases.

But how do new features affect MariaDB compatibility with MySQL? Is it still drop replacement for MySQL? How do the latest changes amplify the migration process? We will try to answer that in this article.

What You Need to Know Before Upgrade

MariaDB and MySQL differ from each other significantly in the last two years, especially with the arrival of their most recent versions: MySQL 8.0, MariaDB 10.3 and MariaDB 10.4 RC (we discussed new features of MariaDB 10.4 RC quite recently so If you would like to read more about what's upcoming in 10.4 please check two blogs of my colleague Krzysztof, What's New in MariaDB 10.4 and second about What's New in MariaDB Cluster 10.4).

With the release MariaDB 10.3, MariaDB surprised many since it is no longer a drop-in replacement for MySQL. MariaDB is no longer merging new MySQL features with MariaDB noir solving MySQL bugs. Nevertheless version 10.3 is now becoming a real alternative to Oracle MySQL Enterprise as well as other enterprise proprietary databases such as Oracle 12c (MSSQL in version 10.4).

Preliminary Check and limitations

Migration is a complex process no matter which version you are upgrading to. There are a few things you need to keep in mind when planning this, such as essential changes between RDBMS versions as well as detailed testing that needs to lead any upgrade process. This is especially critical if you would like to maintain availability for the duration of the upgrade.

Upgrading to a new major version involves risk, and it is important to plan the whole process thoughtfully. In this document, we’ll look at the important new changes in the 10.3 (and upcoming 10.4) version and show you how to plan the test process.

To minimize the risk, let’s take a look on platform differences and limitations.

Starting with the configuration there are some parameters that have different default values. MariaDB provides a matrix of parameter differences. It can be found here.

In MySQL 8.0, caching_sha2_password is the default authentication plugin. This enhancement should improve security by using the SHA-256 algorithm. MySQL has this plugin enabled by default, while MariaDB doesn’t. Although there is already a feature request opened with MariaDB MDEV-9804. MariaDB offers ed25519 plugin instead which seems to be a good alternative to the old authentication method.

MariaDB's support for encryption on tables and tablespaces was added in version 10.1.3. With your tables being encrypted, your data is almost impossible for someone to steal. This type of encryption also allows your organization to be compliant with government regulations like GDPR.

MariaDB supports connection thread pools, which are most effective in situations where queries are relatively short and the load is CPU bound. On MySQL’s community edition, the number of threads is static, which limits the flexibility in these situations. The enterprise plan of MySQL includes threadpool capabilities.

MySQL 8.0 includes the sys schema, a set of objects that helps database administrators and software engineers interpret data collected by the Performance Schema. Sys schema objects can be used for optimization and diagnosis use cases. MariaDB doesn’t have this enhancement included.

Another one is invisible columns. Invisible columns give the flexibility of adding columns to existing tables without the fear of breaking an application. This feature is not available in MySQL. It allows creating columns which aren’t listed in the results of a SELECT * statement, nor do they need to be assigned a value in an INSERT statement when their name isn’t mentioned in the statement.

MariaDB decided not to implement native JSON support (one of the major features of MySQL 5.7 and 8.0) as they claim it’s not part of the SQL standard. Instead, to support replication from MySQL, they only defined an alias for JSON, which is actually a LONGTEXT column. In order to ensure that a valid JSON document is inserted, the JSON_VALID function can be used as a CHECK constraint (default for MariaDB 10.4.3). MariaDB can't directly access MySQL JSON format.

Oracle automates a lot of tasks with MySQL Shell. In addition to SQL, MySQL Shell also offers scripting capabilities for JavaScript and Python.

Migration Process Using mysqldump

Once we know our limitations the installation process is fairly simple. It’s pretty much related to standard installation and import using mysqldump. MySQL Enterprise backup tool is not compatible with MariaDB so the recommended way is to use mysqldump. Here is the example process is done on Centos 7 and MariaDB 10.3.

Create dump on MySQL Enterprise server

$ mysqldump --routines --events --triggers --single-transaction db1 > export_db1.sql

Clean yum cache index

sudo yum makecache fast

Install MariaDB 10.3

sudo yum -y install MariaDB-server MariaDB-client

Start MariaDB service.

sudo systemctl start mariadb
sudo systemctl enable mariadb

Secure MariaDB by running mysql_secure_installation.

# mysql_secure_installation 

NOTE: RUNNING ALL PARTS OF THIS SCRIPT IS RECOMMENDED FOR ALL MariaDB
      SERVERS IN PRODUCTION USE!  PLEASE READ EACH STEP CAREFULLY!

In order to log into MariaDB to secure it, we'll need the current
password for the root user.  If you've just installed MariaDB, and
you haven't set the root password yet, the password will be blank,
so you should just press enter here.

Enter current password for root (enter for none): 
OK, successfully used password, moving on...

Setting the root password ensures that nobody can log into the MariaDB
root user without the proper authorisation.

Set root password? [Y/n] y
New password: 
Re-enter new password: 
Password updated successfully!
Reloading privilege tables..
 ... Success!


By default, a MariaDB installation has an anonymous user, allowing anyone
to log into MariaDB without having to have a user account created for
them.  This is intended only for testing, and to make the installation
go a bit smoother.  You should remove them before moving into a
production environment.

Remove anonymous users? [Y/n] y
 ... Success!

Normally, root should only be allowed to connect from 'localhost'.  This
ensures that someone cannot guess at the root password from the network.

Disallow root login remotely? [Y/n] y
 ... Success!

By default, MariaDB comes with a database named 'test' that anyone can
access.  This is also intended only for testing, and should be removed
before moving into a production environment.

Remove test database and access to it? [Y/n] y
 - Dropping test database...
 ... Success!
 - Removing privileges on test database...
 ... Success!

Reloading the privilege tables will ensure that all changes made so far
will take effect immediately.

Reload privilege tables now? [Y/n] y
 ... Success!

Cleaning up...

All done!  If you've completed all of the above steps, your MariaDB
installation should now be secure.
Thanks for using MariaDB!

Import dump

Mysql -uroot -p
> tee import.log
> source export_db1.sql
Review the import log.

$vi import.log

To deploy an environment you can also use ClusterControl which has an option to deploy from scratch.

ClusterControl Deploy MariaDB

ClusterControl can be also used to set up replication or to import a backup from MySQL Enterprise Edition.

Migration Process Using Replication

The other approach for migration between MySQL Enterprise and MariaDB is to use replication process. MariaDB versions allow replicating to them, from MySQL databases - which means you can easily migrate MySQL databases to MariaDB. MySQL Enterprise versions won’t allow replication from MariaDB servers so this is one-way route.

Based on MariaDB documentation: https://mariadb.com/kb/en/library/mariadb-vs-mysql-compatibility/. X refers to MySQL documentation.

Here are some general rules pointed by the MariaDB.

  • Replicating from MySQL 5.5 to MariaDB 5.5+ should just work. You’ll want MariaDB to be the same or higher version than your MySQL server.
  • When using a MariaDB 10.2+ as a slave, it may be necessary to set binlog_checksum to NONE.
  • Replicating from MySQL 5.6 without GTID to MariaDB 10+ should work.
  • Replication from MySQL 5.6 with GTID, binlog_rows_query_log_events and ignorable events works starting from MariaDB 10.0.22 and MariaDB 10.1.8. In this case, MariaDB will remove the MySQL GTIDs and other unneeded events and instead adds its own GTIDs.

Even if you don’t plan to use replication in the migration/cutover process having one is a good confidence-builder is to replicate your production server on a testing sandbox, and then practice on it.

We hope this introductory blog post helped you to understand the assessment and implementation process of MySQL Enterprise Migration to MariaDB.

Handling Large Data Volumes with MySQL and MariaDB

$
0
0

Most databases grow in size over time. The growth is not always fast enough to impact the performance of the database, but there are definitely cases where that happens. When it does, we often wonder what could be done to reduce that impact and how can we ensure smooth database operations when dealing with data on a large scale.

First of all, let’s try to define what does a “large data volume” mean? For MySQL or MariaDB it is uncompressed InnoDB. InnoDB works in a way that it strongly benefits from available memory - mainly the InnoDB buffer pool. As long as the data fits there, disk access is minimized to handling writes only - reads are served out of the memory. What happens when the data outgrows memory? More and more data has to be read from disk when there’s a need to access rows, which are not currently cached. When the amount of data increase, the workload switches from CPU-bound towards I/O-bound. It means that the bottleneck is no longer CPU (which was the case when the data fit in memory - data access in memory is fast, data transformation and aggregation is slower) but rather it’s the I/O subsystem (CPU operations on data are way faster than accessing data from disk.) With increased adoption of flash, I/O bound workloads are not that terrible as they used to be in the times of spinning drives (random access is way faster with SSD) but the performance hit is still there.

Another thing we have to keep in mind that we typically only care about the active dataset. Sure, you may have terabytes of data in your schema but if you have to access only last 5GB, this is actually quite a good situation. Sure, it still pose operational challenges, but performance-wise it should still be ok.

Let’s just assume for the purpose of this blog, and this is not a scientific definition, that by the large data volume we mean case where active data size significantly outgrows the size of the memory. It can be 100GB when you have 2GB of memory, it can be 20TB when you have 200GB of memory. The tipping point is that your workload is strictly I/O bound. Bear with us while we discuss some of the options that are available for MySQL and MariaDB.

Partitioning

The historical (but perfectly valid) approach to handling large volumes of data is to implement partitioning. The idea behind it is to split table into partitions, sort of a sub-tables. The split happens according to the rules defined by the user. Let’s take a look at some of the examples (the SQL examples are taken from MySQL 8.0 documentation)

MySQL 8.0 comes with following types of partitioning:

  • RANGE
  • LIST
  • COLUMNS
  • HASH
  • KEY

It can also create subpartitions. We are not going to rewrite documentation here but we would still like to give you some insight into how partitions work. To create partitions, you have to define the partitioning key. It can be a column or in case of RANGE or LIST multiple columns that will be used to define how the data should be split into partitions.

HASH partitioning requires user to define a column, which will be hashed. Then, the data will be split into user-defined number of partitions based on that hash value:

CREATE TABLE employees (
    id INT NOT NULL,
    fname VARCHAR(30),
    lname VARCHAR(30),
    hired DATE NOT NULL DEFAULT '1970-01-01',
    separated DATE NOT NULL DEFAULT '9999-12-31',
    job_code INT,
    store_id INT
)
PARTITION BY HASH( YEAR(hired) )
PARTITIONS 4;

In this case hash will be created based on the outcome generated by YEAR() function on ‘hired’ column.

KEY partitioning is similar with the exception that user define which column should be hashed and the rest is up to the MySQL to handle.

While HASH and KEY partitions randomly distributed data across the number of partitions, RANGE and LIST let user decide what to do. RANGE is commonly used with time or date:

CREATE TABLE quarterly_report_status (
    report_id INT NOT NULL,
    report_status VARCHAR(20) NOT NULL,
    report_updated TIMESTAMP NOT NULL DEFAULT CURRENT_TIMESTAMP ON UPDATE CURRENT_TIMESTAMP
)
PARTITION BY RANGE ( UNIX_TIMESTAMP(report_updated) ) (
    PARTITION p0 VALUES LESS THAN ( UNIX_TIMESTAMP('2008-01-01 00:00:00') ),
    PARTITION p1 VALUES LESS THAN ( UNIX_TIMESTAMP('2008-04-01 00:00:00') ),
    PARTITION p2 VALUES LESS THAN ( UNIX_TIMESTAMP('2008-07-01 00:00:00') ),
    PARTITION p3 VALUES LESS THAN ( UNIX_TIMESTAMP('2008-10-01 00:00:00') ),
    PARTITION p4 VALUES LESS THAN ( UNIX_TIMESTAMP('2009-01-01 00:00:00') ),
    PARTITION p5 VALUES LESS THAN ( UNIX_TIMESTAMP('2009-04-01 00:00:00') ),
    PARTITION p6 VALUES LESS THAN ( UNIX_TIMESTAMP('2009-07-01 00:00:00') ),
    PARTITION p7 VALUES LESS THAN ( UNIX_TIMESTAMP('2009-10-01 00:00:00') ),
    PARTITION p8 VALUES LESS THAN ( UNIX_TIMESTAMP('2010-01-01 00:00:00') ),
    PARTITION p9 VALUES LESS THAN (MAXVALUE)
);

It can also be used with other type of columns:

CREATE TABLE employees (
    id INT NOT NULL,
    fname VARCHAR(30),
    lname VARCHAR(30),
    hired DATE NOT NULL DEFAULT '1970-01-01',
    separated DATE NOT NULL DEFAULT '9999-12-31',
    job_code INT NOT NULL,
    store_id INT NOT NULL
)
PARTITION BY RANGE (store_id) (
    PARTITION p0 VALUES LESS THAN (6),
    PARTITION p1 VALUES LESS THAN (11),
    PARTITION p2 VALUES LESS THAN (16),
    PARTITION p3 VALUES LESS THAN MAXVALUE
);

The LIST partitions work based on a list of values that sorts the rows across multiple partitions:

CREATE TABLE employees (
    id INT NOT NULL,
    fname VARCHAR(30),
    lname VARCHAR(30),
    hired DATE NOT NULL DEFAULT '1970-01-01',
    separated DATE NOT NULL DEFAULT '9999-12-31',
    job_code INT,
    store_id INT
)
PARTITION BY LIST(store_id) (
    PARTITION pNorth VALUES IN (3,5,6,9,17),
    PARTITION pEast VALUES IN (1,2,10,11,19,20),
    PARTITION pWest VALUES IN (4,12,13,14,18),
    PARTITION pCentral VALUES IN (7,8,15,16)
);

What is the point in using partitions you may ask? The main point is that the lookups are significantly faster than with non-partitioned table. Let’s say that you want to search for the rows which were created in a given month. If you have several years worth of data stored in the table, this will be a challenge - an index will have to be used and, as we know, indexes help to find rows but accessing those rows will result in a bunch of random reads from the whole table. If you have partitions created on year-month basis, MySQL can just read all the rows from that particular partition - no need for accessing index, no need for doing random reads: just read all the data from the partition, sequentially, and we are all set.

Partitions are also very useful in dealing with data rotation. If MySQL can easily identify rows to delete and map them to single partition, instead of running DELETE FROM table WHERE …, which will use index to locate rows, you can truncate the partition. This is extremely useful with RANGE partitioning - sticking to the example above, if we want to keep data for 2 years only, we can easily create a cron job, which will remove old partition and create a new, empty one for next month.

InnoDB Compression

If we have a large volume of data (not necessarily thinking about databases), the first thing that comes to our mind is to compress it. There are numerous tools that provide an option to compress your files, significantly reducing their size. InnoDB also has an option for that - both MySQL and MariaDB supports InnoDB compression. The main advantage of using compression is the reduction of the I/O activity. Data, when compressed, is smaller thus it is faster to read and to write. Typical InnoDB page is 16KB in size, for SSD this is 4 I/O operations to read or write (SSD typically use 4KB pages). If we manage to compress 16KB into 4KB, we just reduced I/O operations by four. It does not really help much regarding dataset to memory ratio. Actually, it may even make it worse - MySQL, in order to operate on the data, has to decompress the page. Yet it reads compressed page from disk. This results in InnoDB buffer pool storing 4KB of compressed data and 16KB of uncompressed data. Of course, there are algorithms in place to remove unneeded data (uncompressed page will be removed when possible, keeping only compressed one in memory) but you cannot expect too much of an improvement in this area.

It is also important to keep in mind how compression works regarding the storage. Solid state drives are norm for database servers these days and they have a couple of specific characteristics. They are fast, they don’t care much whether traffic is sequential or random (even though they still prefer sequential access over the random). They are expensive for large volumes. They suffer from “worn out” as they can handle a limited number of write cycles. Compression significantly helps here - by reducing the size of the data on disk, we reduce the cost of the storage layer for database. By reducing the size of the data we write to disk, we increase the lifespan of the SSD.

Unfortunately, even if compression helps, for larger volumes of data it still may not be enough. Another step would be to look for something else than InnoDB.

MyRocks

MyRocks is a storage engine available for MySQL and MariaDB that is based on a different concept than InnoDB. My colleague, Sebastian Insausti, has a nice blog about using MyRocks with MariaDB. The gist is, due to its design (it uses Log Structured Merge, LSM), MyRocks is significantly better in terms of compression than InnoDB (which is based on B+Tree structure). MyRocks is designed for handling large amounts of data and to reduce the number of writes. It originated from Facebook, where data volumes are large and requirements to access the data are high. Thus SSD storage - still, on such a large scale every gain in compression is huge. MyRocks can deliver even up to 2x better compression than InnoDB (which means you cut the number of servers by two). It is also designed to reduce the write amplification (number of writes required to handle a change of the row contents) - it requires 10x less writes than InnoDB. This, obviously, reduces I/O load but, even more importantly, it will increase lifespan of a SSD ten times compared with handing the same load using InnoDB). From a performance standpoint, smaller the data volume, the faster the access thus storage engines like that can also help to get the data out of the database faster (even though it was not the highest priority when designing MyRocks).

Columnar Datastores

At some point all we can do is to admit that we cannot handle such volume of data using MySQL. Sure, you can shard it, you can do different things but eventually it just doesn’t make sense anymore. It is time to look for additional solutions. One of them would be to use columnar datastores - databases, which are designed with big data analytics in mind. Sure, they will not help with OLTP type of the traffic but analytics are pretty much standard nowadays as companies try to be data-driven and make decisions based on exact numbers, not random data. There are numerous columnar datastores but we would like to mention here two of those. MariaDB AX and ClickHouse. We have a couple of blogs explaining what MariaDB AX is and how can MariaDB AX be used. What’s important, MariaDB AX can be scaled up in a form of a cluster, improving the performance. ClickHouse is another option for running analytics - ClickHouse can easily be configured to replicate data from MySQL, as we discussed in one of our blog posts. It is fast, it is free and it can also be used to form a cluster and to shard data for even better performance.

Conclusion

We hope that this blog post gave you insights into how large volumes of data can be handled in MySQL or MariaDB. Luckily, there are a couple of options at our disposal and, eventually, if we cannot really make it work, there are good alternatives.

MySQL Replication with ProxySQL on WHM/cPanel Servers - Part 1

$
0
0

WHM and cPanel is no doubt the most popular hosting control panel for Linux based environments. It supports a number of database backends - MySQL, MariaDB and PostgreSQL as the application datastore. WHM only supports standalone database setups and you can either have it deployed locally (default configuration) or remotely, by integrating with an external database server. The latter would be better if you want to have better load distribution, as WHM/cPanel handles a number of processes and applications like HTTP(S), FTP, DNS, MySQL and such.

In this blog post, we are going to show you how to integrate an external MySQL replication setup into WHM seamlessly, to improve the database availability and offload the WHM/cPanel hosting server. Hosting providers who run MySQL locally on the WHM server would know how demanding MySQL is in terms of resource utilization (depending on the number of accounts it hosts and the server specs).

MySQL Replication on WHM/cPanel

By default, WHM natively supports both MariaDB and MySQL as a standalone setup. You can attach an external MySQL server into WHM, but it will act as a standalone host. Plus, the cPanel users have to know the IP address of the MySQL server and manually specify the external host in their web application if this feature is enabled.

In this blog post, we are going to use ProxySQL UNIX socket file to trick WHM/cPanel in connecting to the external MySQL server via UNIX socket file. This way, you get the feel of running MySQL locally so users can use "localhost" with port 3306 as their MySQL database host.

The following diagram illustrates the final architecture:

We are having a new WHM server, installed with WHM/cPanel 80.0 (build 18). Then we have another three servers - one for ClusterControl and two for master-slave replication. ProxySQL will be installed on the WHM server itself.

Deploying MySQL Replication

At the time of this writing, we are using WHM 80.0 (build 18) which only supports up to MySQL 5.7 and MariaDB 10.3. In this case, we are going to use MySQL 5.7 from Oracle. We assume you have already installed ClusterControl on the ClusterControl server.

Firstly, setup passwordless SSH from ClusterControl server to MySQL replication servers. On ClusterControl server, do:

$ ssh-copy-id 192.168.0.31
$ ssh-copy-id 192.168.0.32

Make sure you can run the following command on ClusterControl without password prompt in between:

$ ssh 192.168.0.31 "sudo ls -al /root"
$ ssh 192.168.0.32 "sudo ls -al /root"

Then go to ClusterControl -> Deploy -> MySQL Replication and enter the required information. On the second step, choose Oracle as the vendor and 5.7 as the database version:

Then, specify the IP address of the master and slave:

Pay attention to the green tick right before the IP address. It means ClusterControl is able to connect to the server and is ready for the next step. Click Deploy to start the deployment. The deployment process should take 15 to 20 minutes.

Deploying ProxySQL on WHM/cPanel

Since we want ProxySQL to take over the default MySQL port 3306, we have to firstly modify the existing MySQL server installed by WHM to listen to other port and other socket file. In /etc/my.cnf, modify the following lines (add them if do not exist):

socket=/var/lib/mysql/mysql2.sock
port=3307
bind-address=127.0.0.1

Then, restart MySQL server on cPanel server:

$ systemctl restart mysqld

At this point, the local MySQL server should be listening on port 3307, bind to localhost only (we close it down from external access to be more secure). Now we can proceed to deploy ProxySQL on the WHM host, 192.168.0.16 via ClusterControl.

First, setup passwordless SSH from ClusterControl node to the WHM server that we want to install ProxySQL:

(clustercontrol)$ ssh-copy-id root@192.168.0.16

Make sure you can run the following command on ClusterControl without password prompt in between:

(clustercontrol)$ ssh 192.168.0.16 "sudo ls -al /root"

Then, go to ClusterControl -> Manage -> Load Balancers -> ProxySQL -> Deploy ProxySQL and specify the required information:

Fill in all necessary details as highlighted by the arrows above in the diagram. The server address is the WHM server, 192.168.0.16. The listening port is 3306 on the WHM server, taking over the local MySQL which is already running on port 3307. Further down, we specify the ProxySQL admin and monitoring users' password. Then include both MySQL servers into the load balancing set and then choose "No" in the Implicit Transactions section. Click Deploy ProxySQL to start the deployment.

Our ProxySQL is now installed and configured with two host groups for MySQL Replication. One for the writer group (hostgroup 10), where all connections will be forwarded to the master and the reader group (hostgroup 20) for all read-only workloads which will be balanced to both MySQL servers.

The next step is to grant MySQL root user and import it into ProxySQL. Occasionally, WHM somehow connects to the database via TCP connection, bypassing the UNIX socket file. In this case, we have to allow MySQL root access from both root@localhost and root@192.168.0.16 (the IP address of WHM server) in our replication cluster.

Thus, running the following statement on the master server (192.168.0.31) is necessary:

(master)$ mysql -uroot -p
mysql> GRANT ALL PRIVILEGES ON *.* TO root@'192.168.0.16' IDENTIFIED BY 'M6sdk1y3PPk@2' WITH GRANT OPTION;

Then, import 'root'@'localhost' user from our MySQL server into ProxySQL user by going to ClusterControl -> Nodes -> pick the ProxySQL node -> Users -> Import Users. You will be presented with the following dialog:

Tick on the root@localhost checkbox and click Next. In the User Settings page, choose hostgroup 10 as the default hostgroup for the user:

We can then verify if ProxySQL is running correctly on the WHM/cPanel server by using the following command:

$ netstat -tulpn | grep -i proxysql
tcp        0      0 0.0.0.0:3306            0.0.0.0:*               LISTEN      17306/proxysql
tcp        0      0 0.0.0.0:6032            0.0.0.0:*               LISTEN      17306/proxysql

Port 3306 is what ProxySQL should be listening to accept all MySQL connections. Port 6032 is the ProxySQL admin port, where we will connect to configure and monitor ProxySQL components like users, hostgroups, servers and variables.

At this point, if you go to ClusterControl -> Topology, you should see the following topology:

Configuring MySQL UNIX Socket

In Linux environment, if you define MySQL host as "localhost", the client/application will try to connect via the UNIX socket file, which by default is located at /var/lib/mysql/mysql.sock on the cPanel server. Using the socket file is the most recommended way to access MySQL server, because it has less overhead as compared to TCP connections. A socket file doesn't actually contain data, it transports it. It is like a local pipe the server and the clients on the same machine can use to connect and exchange requests and data.

Having said that, if your application connects via "localhost" and port 3306 as the database host and port, it will connect via socket file. If you use "127.0.0.1" and port 3306, most likely the application will connect to the database via TCP. This behaviour is well explained in the MySQL documentation. In simple words, use socket file (or "localhost") for local communication and use TCP if the application is connecting remotely.

In cPanel, the MySQL socket file is monitored by cpservd process and would be linked to another socket file if we configured a different path than the default one. For example, suppose we configured a non-default MySQL socket file as we configured in the previous section:

$ cat /etc/my.cnf | grep socket
socket=/var/lib/mysql/mysql2.sock

cPanel via cpservd process would correct this by creating a symlink to the default socket path:

(whm)$ ls -al /var/lib/mysql/mysql.sock
lrwxrwxrwx. 1 root root 34 Jul  4 12:25 /var/lib/mysql/mysql.sock -> ../../../var/lib/mysql/mysql2.sock

To avoid cpservd to automatically re-correct this (cPanel has a term for this behaviour called "automagically"), we have to disable MySQL monitoring by going to WHM -> Service Manager (we are not going to use the local MySQL anyway) and uncheck "Monitor" checkbox for MySQL as shown in the screenshot below:

Save the changes in WHM. It's now safe to remove the default socket file and create a symlink to ProxySQL socket file with the following command:

(whm)$ ln -s /tmp/proxysql.sock /var/lib/mysql/mysql.sock

Verify the socket MySQL socket file is now redirected to ProxySQL socket file:

(whm)$ ls -al /var/lib/mysql/mysql.sock
lrwxrwxrwx. 1 root root 18 Jul  3 12:47 /var/lib/mysql/mysql.sock -> /tmp/proxysql.sock

We also need to change the default login credentials inside /root/.my.cnf as follows:

(whm)$ cat ~/.my.cnf
[client]
#password="T<y4ar&cgjIu"
user=root
password='M6sdk1y3PPk@2'
socket=/var/lib/mysql/mysql.sock

A bit of explanation - The first line that we commented out is the MySQL root password generated by cPanel for the local MySQL server. We are not going to use that, therefore the '#' is at the beginning of the line. Then, we added the MySQL root password for our MySQL replication setup and UNIX socket path, which is now symlink to ProxySQL socket file.

At this point, on the WHM server you should be able to access our MySQL replication cluster as root user by simply typing "mysql", for example:

(whm)$ mysql
Welcome to the MySQL monitor.  Commands end with ; or \g.
Your MySQL connection id is 239
Server version: 5.5.30 (ProxySQL)

Copyright (c) 2000, 2019, Oracle and/or its affiliates. All rights reserved.

Oracle is a registered trademark of Oracle Corporation and/or its
affiliates. Other names may be trademarks of their respective
owners.

Type 'help;' or '\h' for help. Type '\c' to clear the current input statement.

mysql>

Notice the server version is 5.5.30 (ProxySQL). If you can connect as above, we can configure the integration part as described in the next section.

WHM/cPanel Integration

WHM supports a number of database server, namely MySQL 5.7, MariaDB 10.2 and MariaDB 10.3. Since WHM is now only seeing the ProxySQL and it is detected as version 5.5.30 (as stated above), WHM will complain about unsupported MySQL version. You can go to WHM -> SQL Services -> Manage MySQL Profiles and click on Validate button. You should get a red toaster notification on the top-right corner telling about this error.

Therefore, we have to change the MySQL version in ProxySQL to the same version as our MySQL replication cluster. You can get this information by running the following statement on the master server:

mysql> SELECT @@version;
+------------+
| @@version  |
+------------+
| 5.7.26-log |
+------------+

Then, login to the ProxySQL admin console to change the mysql-server_version variable:

(whm)$ mysql -uproxysql-admin -p -h192.168.0.16 -P6032

Use the SET statement as below:

mysql> SET mysql-server_version = '5.7.26';

Then load the variable into runtime and save it into disk to make it persistent:

mysql> LOAD MYSQL VARIABLES TO RUNTIME;
mysql> SAVE MYSQL VARIABLES TO DISK;

Finally verify the version that ProxySQL will represent:

mysql> SHOW VARIABLES LIKE 'mysql-server_version';
+----------------------+--------+
| Variable_name        | Value  |
+----------------------+--------+
| mysql-server_version | 5.7.26 |
+----------------------+--------+

If you try again to connect to the MySQL by running "mysql" command, you should now get "Server version: 5.7.26 (ProxySQL)" in the terminal.

Now we can update the MySQL root password under WHM -> SQL Services -> Manage MySQL Profiles. Edit the localhost profile by changing the Password field at the bottom with the MySQL root password of our replication cluster. Click on the Save button once done. We can then click on "Validate" to verify if WHM can access our MySQL replication cluster via ProxySQL service correctly. You should get the following green toaster at the top right corner:

If you get the green toaster notification, we can proceed to integrate ProxySQL via cPanel hook.

ProxySQL Integration via cPanel Hook

ProxySQL as the middle-man between WHM and MySQL replication needs to have a username and password for every MySQL user that will be passing through it. With the current architecture, if one creates a user via the control panel (WHM via account creation or cPanel via MySQL Database wizard), WHM will automatically create the user directly in our MySQL replication cluster using root@localhost (which has been imported into ProxySQL beforehand). However, the same database user would be not added into ProxySQL mysql_users table automatically.

From the end-user perspective, this would not work because all localhost connections at this point should be passed through ProxySQL. We need a way to integrate cPanel with ProxySQL, whereby for any MySQL user related operations performed by WHM and cPanel, ProxySQL must be notified and do the necessary actions to add/remove/update its internal mysql_users table.

The best way to automate and integrate these components is by using the cPanel standardized hook system. Standardized hooks trigger applications when cPanel & WHM performs an action. Use this system to execute custom code (hook action code) to customize how cPanel & WHM functions in specific scenarios (hookable events).

Firstly, create a Perl module file called ProxysqlHook.pm under /usr/local/cpanel directory:

$ touch /usr/local/cpanel/ProxysqlHook.pm

Then, copy and paste the lines from here. For more info, check out the Github repository at ProxySQL cPanel Hook.

Configure the ProxySQL admin interface from line 16 until 19:

my $proxysql_admin_host = '192.168.0.16';
my $proxysql_admin_port = '6032';
my $proxysql_admin_user = 'proxysql-admin';
my $proxysql_admin_pass = 'mys3cr3t';

Now that the hook is in place, we need to register it with the cPanel hook system:

(whm)$ /usr/local/cpanel/bin/manage_hooks add module ProxysqlHook
info [manage_hooks] **** Reading ProxySQL information: Host: 192.168.0.16, Port: 6032, User: proxysql-admin *****
Added hook for Whostmgr::Accounts::Create to hooks registry
Added hook for Whostmgr::Accounts::Remove to hooks registry
Added hook for Cpanel::UAPI::Mysql::create_user to hooks registry
Added hook for Cpanel::Api2::MySQLFE::createdbuser to hooks registry
Added hook for Cpanel::UAPI::Mysql::delete_user to hooks registry
Added hook for Cpanel::Api2::MySQLFE::deletedbuser to hooks registry
Added hook for Cpanel::UAPI::Mysql::set_privileges_on_database to hooks registry
Added hook for Cpanel::Api2::MySQLFE::setdbuserprivileges to hooks registry
Added hook for Cpanel::UAPI::Mysql::rename_user to hooks registry
Added hook for Cpanel::UAPI::Mysql::set_password to hooks registry

From the output above, this module hooks into a number of cPanel and WHM events:

  • Whostmgr::Accounts::Create - WHM -> Account Functions -> Create a New Account
  • Whostmgr::Accounts::Remove - WHM -> Account Functions -> Terminate an Account
  • Cpanel::UAPI::Mysql::create_user - cPanel -> Databases -> MySQL Databases -> Add New User 
  • Cpanel::Api2::MySQLFE::createdbuser - cPanel -> Databases -> MySQL Databases -> Add New User (requires for Softaculous integration).
  • Cpanel::UAPI::Mysql::delete_user - cPanel -> Databases -> MySQL Databases -> Delete User
  • Cpanel::Api2::MySQLFE::deletedbuser - cPanel -> Databases -> MySQL Databases -> Add New User (requires for Softaculous integration).
  • Cpanel::UAPI::Mysql::set_privileges_on_database - cPanel -> Databases -> MySQL Databases -> Add User To Database
  • Cpanel::Api2::MySQLFE::setdbuserprivileges - cPanel -> Databases -> MySQL Databases -> Add User To Database (requires for Softaculous integration).
  • Cpanel::UAPI::Mysql::rename_user - cPanel -> Databases -> MySQL Databases -> Rename User
  • Cpanel::UAPI::Mysql::set_password - cPanel -> Databases -> MySQL Databases -> Change Password

If the event above is triggered, the module will execute the necessary actions to sync up the mysql_users table in ProxySQL. It performs the operations via ProxySQL admin interface running on port 6032 on the WHM server. Thus, it's vital to specify the correct user credentials for ProxySQL admin user to make sure all users will be synced with ProxySQL correctly.

Take note that this module, ProxysqlHook.pm has never been tested in the real hosting environment (with many accounts and many third-party plugins) and obviously does not cover all MySQL related events within cPanel. We have tested it with Softaculous free edition and it worked greatly via cPanel API2 hooks. Some further modification might be required to embrace full automation.

That's it for now. In the next part, we will look into the post-deployment operations and what we could gain with our highly available MySQL server solution for our hosting servers if compared to standard standalone MySQL setup.

MySQL Replication with ProxySQL on WHM/cPanel Servers - Part 2

$
0
0

In the first part of the series, we showed you how to deploy a MySQL Replication setup with ProxySQL with WHM and cPanel. In this part, we are going to show some post-deployment operations for maintenance, management, failover as well as advantages over the standalone setup.

MySQL User Management

With this integration enabled, MySQL user management will have to be done from WHM or cPanel. Otherwise, ProxySQL mysql_users table would not sync with what is configured for our replication master. Suppose we already created a user called severaln_user1 (the MySQL username is automatically prefixed by cPanel to comply to MySQL limitation), and we would like to assign to database severaln_db1 like below:

The above will result to the following mysql_users table output in ProxySQL:

If you would like to create MySQL resources outside of cPanel, you can use ClusterControl -> Manage -> Schemas and Users feature and then import the database user into ProxySQL by going to ClusterControl -> Nodes -> pick the ProxySQL node -> Users -> Import Users

The Proxysqlhook module that we use to sync up ProxySQL users sends the debugging logs into /usr/local/cpanel/logs/error_log. Use this file to inspect and understand what happens behind the scenes. The following lines would appear in the cPanel log file if we installed a web application called Zikula using Softaculous:

[2019-07-08 11:53:41 +0800] info [mysql] Creating MySQL database severaln_ziku703 for user severalnines
[2019-07-08 11:53:41 +0800] info [mysql] Creating MySQL virtual user severaln_ziku703 for user severalnines
[2019-07-08 11:53:41 +0800] info [cpanel] **** Reading ProxySQL information: Host: 192.168.0.16, Port: 6032, User: proxysql-admin *****
[2019-07-08 11:53:41 +0800] info [cpanel] **** Checking if severaln_ziku703 exists inside ProxySQL mysql_users table *****
[2019-07-08 11:53:41 +0800] info [cpanel] **** Inserting severaln_ziku703 into ProxySQL mysql_users table *****
[2019-07-08 11:53:41 +0800] info [cpanel] **** Save and load user into ProxySQL runtime *****
[2019-07-08 11:53:41 +0800] info [cpanel] **** Checking if severaln_ziku703 exists inside ProxySQL mysql_users table *****
[2019-07-08 11:53:41 +0800] info [cpanel] **** Checking if severaln_ziku703 exists inside ProxySQL mysql_users table *****
[2019-07-08 11:53:41 +0800] info [cpanel] **** Updating severaln_ziku703 default schema in ProxySQL mysql_users table *****
[2019-07-08 11:53:41 +0800] info [cpanel] **** Save and load user into ProxySQL runtime *****

You would see some repeated lines like "Checking if {DB user} exists" because WHM creates multiple MySQL user/host for every create database user request. In our example, WHM would create these 3 users:

  • severaln_ziku703@localhost
  • severaln_ziku703@'<WHM IP address>'
  • severaln_ziku703@'<WHM FQDN>'

ProxySQL only needs the username, password and default hostgroup information when adding a user. Therefore, the checking lines are there to avoid multiple inserts of the exact same user.

If you would like to modify the module and make some improvements into it, don't forget to re-register the module by running the following command on the WHM server:

(whm)$ /usr/local/cpanel/bin/manage_hooks add module ProxysqlHook

Query Monitoring and Caching

With ProxySQL, you can monitor all queries coming from the application that have been passed or are passing through it. The standard WHM does not provide this level of detail in MySQL query monitoring. The following shows all MySQL queries that have been captured by ProxySQL:

With ClusterControl, you can easily look up the most repeated queries and cache them via ProxySQL query cache feature. Use the "Order By" dropdown to sort the queries by "Count Star", rollover to the query that you want to cache and click the "Cache Query" button underneath it. The following dialog will appear:

The resultset of cached queries will be stored and served by the ProxySQL itself, reducing the number of hits to the backend which will offload your MySQL replication cluster as a whole. ProxySQL query cache implementation is fundamentally different from MySQL query cache. It's time-based cache and will be expired after a timeout called "Cache TTL". In this configuration, we would like to cache the above query for 5 seconds (5000 ms) from hitting the reader group where the destination hostgroup is 20.

Read/Write Splitting and Balancing

By listening to MySQL default port 3306, ProxySQL is kind of acting like the MySQL server itself. It speaks MySQL protocols on both frontend and backend. The query rules defined by ClusterControl when setting up the ProxySQL will automatically split all reads (^SELECT .* in Regex language) to hostgroup 20 which is the reader group, and the rest will be forwarded to the writer hostgroup 10, as shown in the following query rules section:

With this architecture, you don't have to worry about splitting up read/write queries as ProxySQL will do the job for you. The users have minimal to none changes to the code, allowing the hosting users to use all the applications and features provided by WHM and cPanel natively, similar to connecting to a standalone MySQL setup.

In terms of connection balancing, if you have more than one active node in a particular hostgroup (like reader hostgroup 20 in this example), ProxySQL will automatically spread the load between them based on a number of criteria - weights, replication lag, connections used, overall load and latency. ProxySQL is known to be very good in high concurrency environment by implementing an advanced connection pooling mechanism. Quoted from ProxySQL blog post, ProxySQL doesn't just implement Persistent Connection, but also Connection Multiplexing. In fact, ProxySQL can handle hundreds of thousands of clients, yet forward all their traffic to few connections to the backend. So ProxySQL can handle N client connections and M backend connections , where N > M (even N thousands times bigger than M).

MySQL Failover and Recovery

With ClusterControl managing the replication cluster, failover is performed automatically if automatic recovery is enabled. In case of a master failure:

  • ClusterControl will detect and verify the master failure via MySQL client, SSH and ping.
  • ClusterControl will wait for 3 seconds before commencing a failover procedure.
  • ClusterControl will promote the most up-to-date slave to become the next master.
  • If the old master comes back online, it will be started as a read-only, without participating in the active replication.
  • It's up to users to decide what will happen to the old master. It could be introduced back to the replication chain by using "Rebuild Replication Slave" functionality in ClusterControl.
  • ClusterControl will only attempt to perform the master failover once. If it fails, user intervention is required.

You can monitor the whole failover process under ClusterControl -> Activity -> Jobs -> Failover to a new master as shown below:

During the failover, all connections to the database servers will be queued up in ProxySQL. They won't get terminated until timeout, controlled by mysql-default_query_timeout variable which is 86400000 milliseconds or 24 hours. The applications would most likely not see errors or failures to the database at this point, but the tradeoff is increased latency, within a configurable threshold.

At this point, ClusterControl will present the topology as below:

If we would like to allow the old master join back into the replication after it is up and available, we would need to rebuild it as a slave by going to ClusterControl -> Nodes -> pick the old master -> Rebuild Replication Slave -> pick the new master -> Proceed. Once the rebuilding is complete, you should get the following topology (notice 192.168.0.32 is the master now):

Server Consolidation and Database Scaling

With this architecture, we can consolidate many MySQL servers which resides on every WHM server into one single replication setup. You can scale more database nodes as you grow, or have multiple replication clusters to support all of them and managed by a single ClusterControl server. The following architecture diagram illustrates if we have two WHM servers connected to one single MySQL replication cluster via ProxySQL socket file:

The above allows us to separate the two most important tiers in our hosting system - application (front-end) and database (back-end). As you might know, co-locating MySQL in the WHM server commonly results to resource exhaustion as MySQL needs a huge upfront RAM allocation to start up and perform well (mostly depending on the innodb_buffer_pool_size variable). Considering the disk space is sufficient, with the above setup, you can have more hosting accounts hosted per server, where all the server resources can be utilized by the front-end tier applications.

Scaling up the MySQL replication cluster will be much simpler with a separate tier architecture. If let's say the master requires a scale up (upgrading RAM, hard disk, RAID, NIC) maintenance, we can switch over the master role to another slave (ClusterControl -> Nodes -> pick a slave -> Promote Slave) and then perform the maintenance task without affecting the MySQL service as a whole. For scale out operation (adding more slaves), you can perform that without even affecting the master by performing the staging directly from any active slave. With ClusterControl, you can even stage a new slave from an existing MySQL backup (PITR-compatible only):

Rebuilding a slave from backup will not bring additional burden to the master. ClusterControl will copy the selected backup file from ClusterControl server to the target node and perform the restoration there. Once done, the node will be connecting to the master and starts retrieving all the missing transactions since the restore time and catch up with the master. When it's lagging, ProxySQL will not include the node in the load balancing set until the replication lag is less than 10 seconds (configurable when adding a mysql_servers table via ProxySQL admin interface).

Final Thoughts

ProxySQL extends the capabilities of WHM cPanel in managing MySQL Replication. With ClusterControl managing your replication cluster, all the complex tasks involved in managing the replication cluster are now easier than ever before.

Viewing all 568 articles
Browse latest View live